HackTown
Cyber Criminal University - Home

You are not logged in. You will only be able to access the courses in GREEN from the course list.
Chapter 7 - Locating the Access Point
In order to benefit from this chapter you'll need to purchase another Wi-Fi antenna to add to your arsenal. It's not 100% required but it will assist you moving forward and give you a better understanding of how you would be tracked when on a hacked Wi-Fi network. Some might implement this, and some may not.
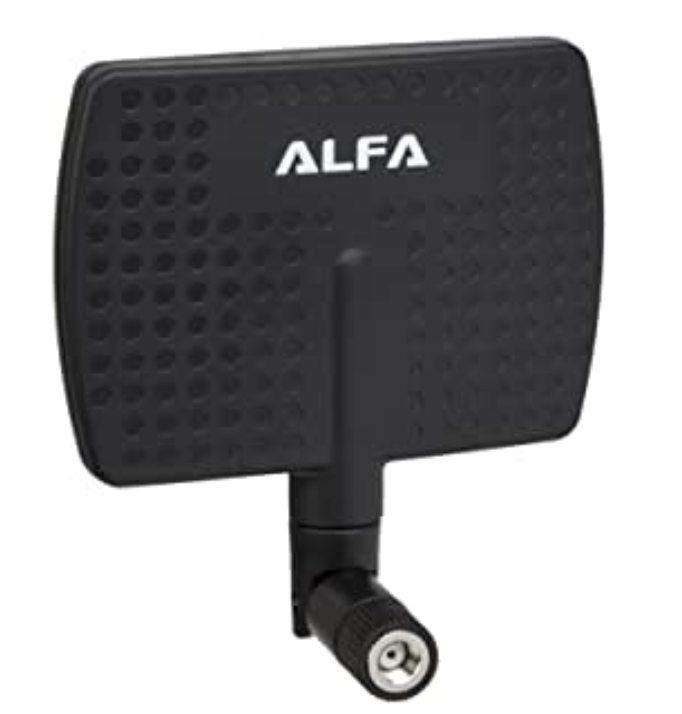
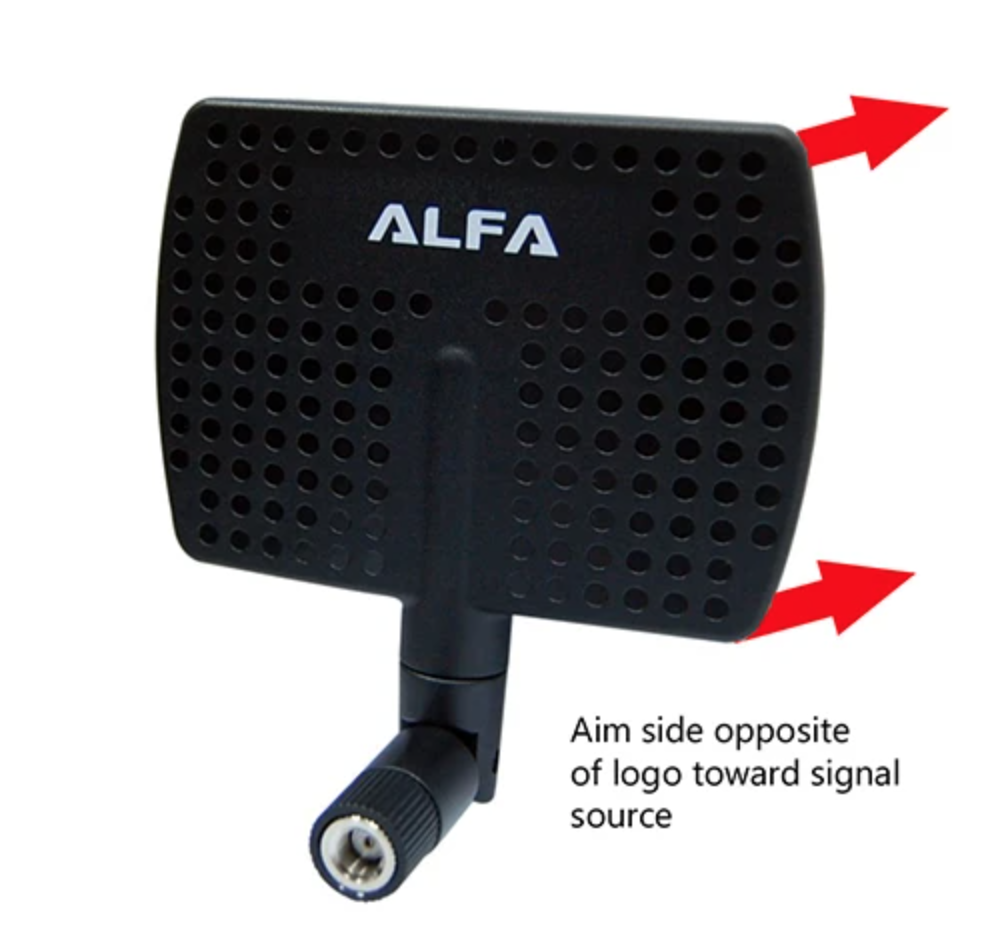
The antenna you're going to want to purchase can be seen in the picture below. It does not necessarily have to be "ALFA" brand, as there are many, but it should look the same in the picture. We'll need this type of directional antenna to help pin point the location of where the Wi-Fi network signal is coming from in order to increase the success of our Wi-Fi attacks.
https://shop.hak5.org/products/7dbi-panel-antenna
https://www.amazon.fr/Alfa-2-4HGz-RP-SMA-Screw-Antenna/dp/B003ZWPRUI
https://www.data-alliance.net/antenna-2-4ghz-7dbi-directional-panel-w-rp-sma-wif-signal-booster-fpv
Remember, you want to be the strongest signal around in order to maximize any type of Wi-Fi attack.
We can accomplish this a few ways.
The first way you can achieve this is by moving as close as physically possible to the Wi-Fi network access point (AP) IE: The Wi-Fi router. Obviously if you're sitting in the same room as the Wi-Fi router this would be ideal and would be the best signal strength.
The second way in achieving this is to increase the transmitting power of the network card itself. We can increase the signal transmitting power of the Alfa network card to make it a beast and be the most powerful signal around. We already know that being as close as possible to the target Wi-Fi router is important when planning an attack whether that's performing a DoS to bring the router offline or being the strongest signal around so that others will connect to us so we can launch an EvilTwin attack.
This chapter will focus on how you get as physically close as possible to the network by tracking down it's physical location.
This is pretty easy to do when it's your Wi-Fi router we're targeting right? So, get up and walk the fuck over to your router and then you can feel confident you'll as close as possible to it.
Obviously this isn't going to be possible when you're targeting other people's Wi-Fi networks since you won't know where the router is physically located in their home/business. This can make it difficult when you're trying to determine if your attacks are effective or not. I can guarantee you that there will be times when you're trying to hack the Wi-Fi networks around you and you're not having success because you're simply too far away from it. Your weak ass signal strength has no affect against the people you're targeting.
There are times when it may appear that a Wi-Fi network near you is showing a strong signal strength when you're using Windows, macOS, or Linux but you're just not having success like you should be when launching your attacks against it. You're sitting there for years trying to disconnect the clients on the network but no one is connecting to your EvilTwin tricks.
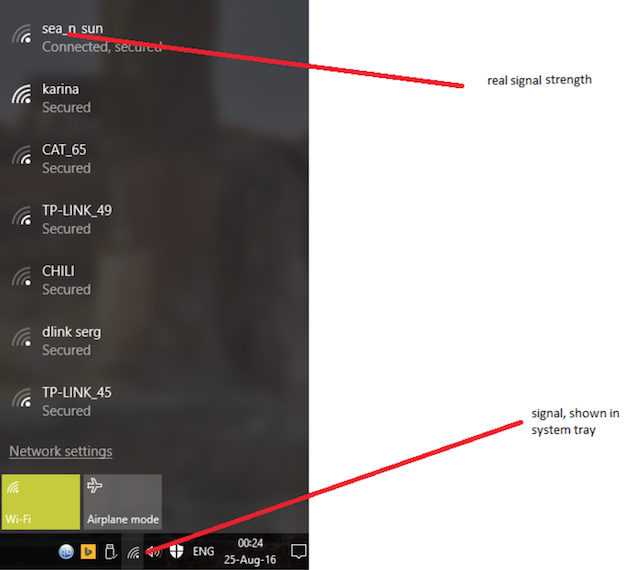
If you're familiar at all with Wi-Fi hacking then I'm sure you've all experienced, to some degree, those times when you're targeting a specific Wi-Fi network but just can't get shit to work in your favor? You've decided to launch an EvilTwin attack because you're unable to brute force the password needed to crack the WPA/WPA2 password or your attacks keep timing the fuck out? Not getting anyone to connect to your rogue AP nor getting a chance to capture their entered Wi-Fi credentials, right? Like what the fuck?! These attacks tend to be the most frustrating for new hackers because they don't succeed every time, for multiple reasons, and most people don't understand why their attacks are failing.
Depending on your skill leve there are going to be times when shit just doesn't work out and you won't have a clue to check if your attacks are even effective.
When you're new to hacking Wi-Fi networks it can be difficult to determine:
A) Are people not being deceived by your social eningeering fuckery?
B) Are your attacks working properly from a technical standpoint?
C) Are you too far away from the Wi-Fi router?
We want to reduce the number of failures and increase our chance of success for every attack we launch. Don't half ass shit when you're launching any type of attack and you'll succeed much more. Remember, be a professional and make your attacks as such. Treat hacking as a profession and act professional, you understand yes?
Remember, your host laptop Wi-Fi network card will display different Wi-Fi networks than your Alfa network card because they're different network cards with different hardware specifications, obviously. Depending on how you want to connect to the Internet you want to make sure the host Wi-Fi card is displaying the best signal more so than the Alfa. Alfa networks can be used, of course, to connect to Wi-Fi networks but depending on your setup you might prefer your host computer to be connected to Wi-Fi network and then launch Whonix VM or use the Alfa network card in Tails to connect to a Wi-Fi network far away.
Lastly, you can install the Alfa network card drivers on your host OS (Windows or Linux not macOS) and use that too for main Wi-Fi connection or just hooked to a VM. Plenty of options depending on your setup and comfort.
Let's look at an example:
You're sitting at coffee shop and have a Wi-Fi network you want to hack but is the access point (AP) across the street or (4) floors above you?! What barriers does that Wi-Fi signal have to go through before getting to you? Are you the closet and strongest signal so that when you launch EvilTwin attacks the Wi-Fi owners connect to you or what? Will the connection be stable enough to even connect to from your location? Many things to know.
Maybe you want to "work" from your home comfortably, so you decide to compromise every Wi-Fi network around you which is what most people end up doing. This way you're stationary but have the comfort of knowing you're not using your own Wi-Fi network. This isn't recommended but sometimes you just don't want to leave the hotel or your bed so you aim your directional antenna down the street and compromise a Wi-Fi network 100m from you. ;)
Me personally, I will literally compromise as many Wi-Fi networks as possible wherever I am and rotate them accordingly to help evade any chance of tracking me because I always assume the worst. Damn that paranoia! Compromise the whole apartment building across the street and jump from Wi-Fi network to Wi-Fi network on the daily if need be! Figure out what risk is acceptable to you and get to it!
Here's another example.
You live on 5th floor of 10 story apartment building. Now picture every floor is just one unit. So, you live on 5th floor and no one else but you lives on that floor as does your neighbor who lives above you who lives on one floor and so on. Based on this hypothetical example this means only 10 people will live in your building since it's a 10-story building you understand? Picture you're sitting in your living room which is on the North East side of the building and the Wi-Fi network you're attacking is one floor above you but on the South West side of the building. The Wi-Fi router you're targeting is the farthest from you but still reasonably close that you should be able to see it's available when looking for a network to connect to. Depending on how far this signal is from you will dictate the chance of your Wi-Fi attacks being successful and maintaining a connection to that network when you get on it.
I remember back in the day I would be launching a DoS attack against a Wi-Fi router in order to bring the router down so I can launch an EvilTwin attack but couldn't get the router down. I didn't realize at the time I was too far from the router with multiple physical barriers that can fuck up the Wi-Fi signal between me and the AP which was contributing to my failures. You might be walking around with your laptop looking for the best signal and find one but what you don't realize is that Wi-Fi signal is bouncing off walls and other things giving you a false sense of the Wi-Fi signal strength. This will make your connection to the network terrible along with the chances of successfully hacking it decreased.
It would be better if you knew exactly where the AP was physically located and then move towards the signal so you can maximize your attacks and have the best Wi-Fi signal strength possible. Remember, you want to be as close to the AP as possible and be the strongest Wi-Fi signal that your target(s) only see your rogue AP in order to maximize an EviTwin attack and other Wi-Fi network attacks.
This actually took me some time to figure out how important this was when I was first starting out with Wi-Fi hacking but eventually you realize the importance of this and the techniques needed to maximize the chance of success with Wi-Fi attacks.
OK now we're going to focus on your own Wi-Fi router to determine roughly where it is in relation to your physical location so you understand how to use this technique against other W-Fi networks. Once we know where the Wi-Fi router is physically located, we can then "aim" our antennas towards the AP in order to increase our chance of compromising the Wi-Fi network or being the strongest signal for our victims.
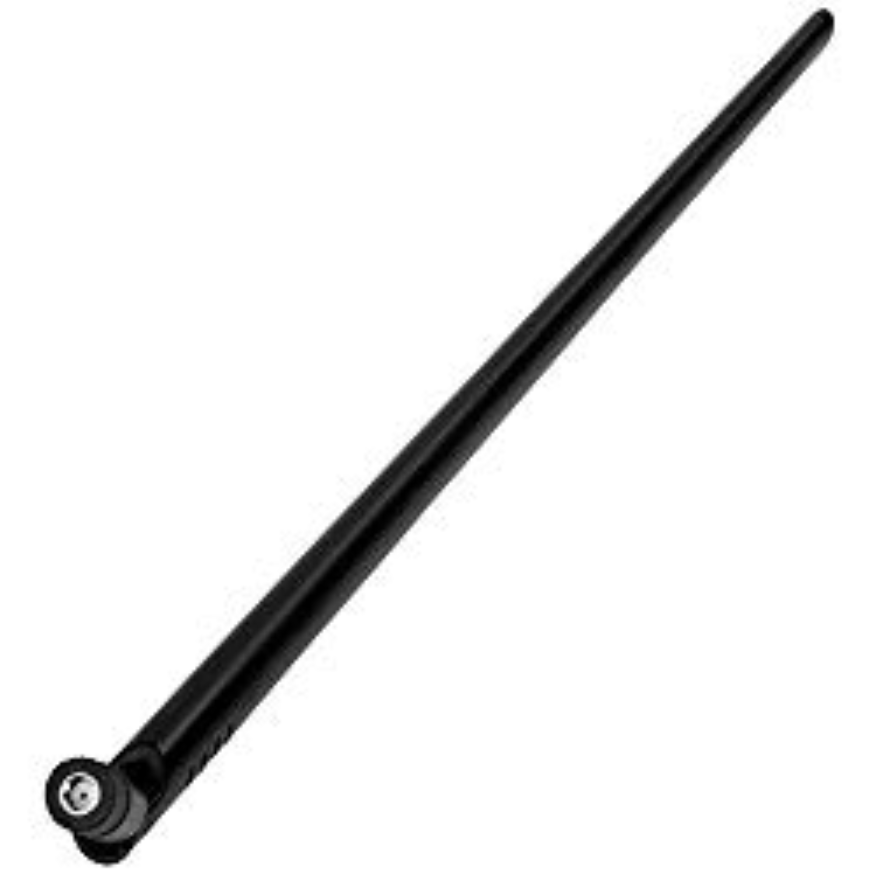
In Chapter 2 we briefly talked about different antennas and how you should upgrade when you feel the need to do so. When you purchased the Alfa network card it would've came with a small omnidirectional antenna that can be replaced with different antennas. The antenna that comes with the card is an omnidirectional antenna which are good when you don't know where the Wi-Fi signal is coming from and are ideal for trying to connect to Wi-Fi networks that are on the same floor/level as you.
In the screenshot below is a typical omnidirectional antenna that you should be familiar with.
Below is a picture of the potential range of coverage an omnidirectional antenna can cover.
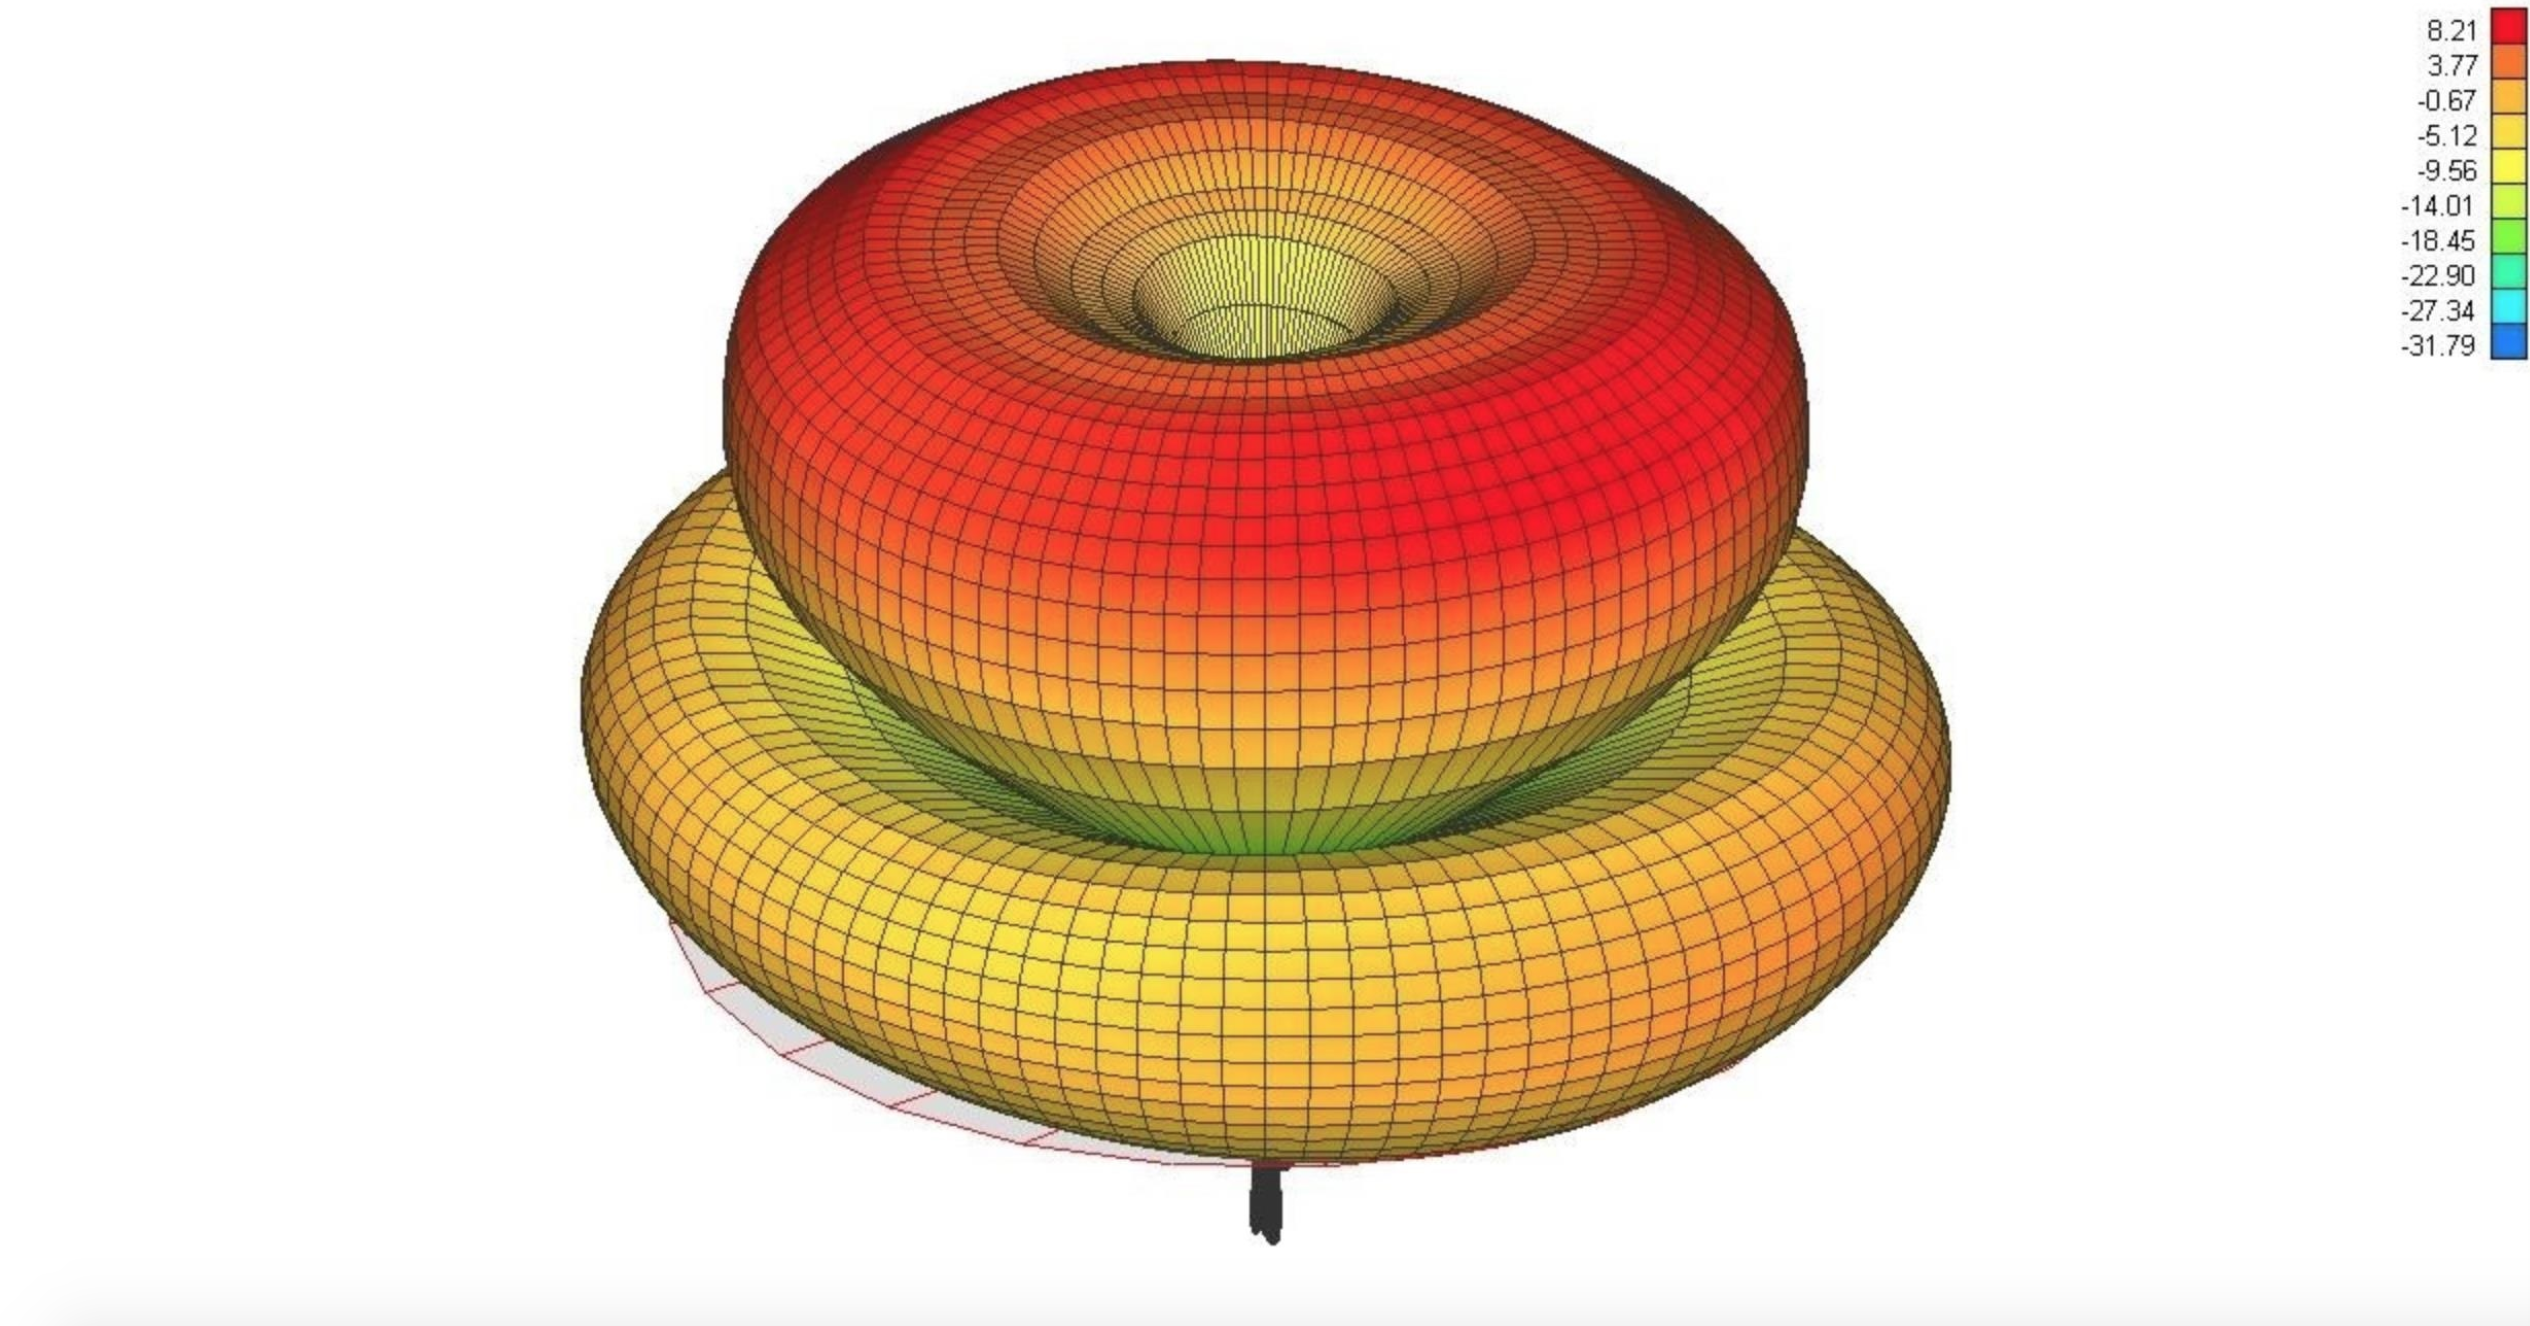
As you can see omnidirectional antennas are ideal for connecting to a wireless access point on the same floor but aren't suitable for connecting to any network outside its range. It's like a donut range, right? An omnidirectional antenna range can capture, intercept, and broadcast signals within that donut shape and the farther they are away from the antenna the weaker the signal is. Easy to remember!
It's best to think about the maximum range of an omnidirectional antenna like the light that comes off of a lamp with a lampshade on it sitting on a night side table. Picture when you turn on the lamp and the light that it gives off is that of how an omnidirectional antenna range looks like. As far as that light may reach would be the range of the omnidirectional antenna. Whereas directional antennas are more like the light that comes from a flashlight. Like a laser pointer type of beam for a signal you understand?
Omnidirectional antennas make it difficult in determining where the Wi-Fi network signal is coming from since the signal is equal from every direction whereas directional antennas can help you focus on one direction and therefor assist in determining which direction the Wi-Fi network signal is coming from. Like a flashlight shining some light into the dark! :)
Remember, directional antennas are like a laser pointer when looking for the Wi-Fi network signal whereas omnidirectional antennas are like the light coming from a lamp. Hopefully this makes sense and can help with your learning.
Using the right software along with a directional antenna sweeping through the air will result in the signal strength getting stronger when then antenna is pointed in the direction of the AP and weaker when the directional antenna is pointed away from the signal. Obviously. If we're aiming our antennas towards the signal the signal strength will increase so this would make sense and we can use this to determine where exactly the Wi-Fi signal originates.
We utilize this feature in order to hunt down the access point and focus our efforts in compromising it. The same techniques are used to catch hackers and rogue devices connected to a network. If you've ever wondered how an attacker is physically located when connected to a hacked Wi-Fi network this is a technique used to locate you. Just because you're on a hacked Wi-Fi network doesn't mean you still cannot be located, don't be naive. Since we can locate the AP based on signal strength law enforcement would be able to locate your location when connected to a Wi-Fi network based on your signal strength if they're in the area hunting for you! This is why it's important, like I talked about before, to hack as many Wi-Fi networks as you can that way you have many Wi-Fi networks available at your disposal to be more difficult to catch. Move locations frequently if possible.
Should there be a mistake on your part and law enforcement is looking for you since you use so many different Wi-Fi networks it would be much harder to track you and would take a lot of manpower and finances to do so. Hack as many Wi-Fi networks as possible and rotate them monthly, weekly, or daily depending on your paranoia level.
Using the newly purchased directional antenna in this chapter and Wireshark we can create a display filter to target a specific AP signal and plot it on a graph in real time. This way when you're using the directional antenna you're literally sweeping it around the area/location like a metal detector in the air looking at the signal strength graph to determine the AP exact location.
If you've never used Wireshark before and you're not familiar with it you can check out some very useful YouTube videos or purchase Wireshark books online from amazon or eBay. There are plenty of tutorials surrounding Wireshark and I won't go into details about the program because that's a book on its own.
There are other tools people use to track down a rogue AP or Wi-Fi network but I've always used Wireshark and I think it's a good tool to learn so let's stick with it. It's very easy to use so don't get overwhelmed! Once you see how easy it is and how important it is to properly track down the Wi-Fi network you plan on targeting you'll be using this technique all the time for your Wi-Fi hacking madness.
At the end of this chapter you'll find a link to a video which will help solidify this new knowledge. Please read first and try to follow along and then watch the video to help with visuals if needed.
It should be noted that I copied this exact technique from Kody at Nullbyte so props to him for explaining it all. I always found it difficult to explain it to others as I used a proprietary program stolen from a previous employer so support Kody if you can because this is his work.
The only thing you need to do first is determine what channel your target Wi-Fi network is on. It's important to put your Wi-Fi network into monitor mode first and then scan for Wi-Fi networks around you. If you followed the YouTube videos on the Wi-Fi megaprimer with Vivek you should be familiar with aircrack-ng and how to put your card into monitor mode. If not, this is OK as we'll talk about it now.
When you're following along below it's best to target your own best to target your own Wi-Fi network/router so you have a much better understanding of how to properly find another AP with the strength of the Wi-Fi network signal.
We need to put the Alfa network card into monitor mode and then select which channel to sniff the wireless traffic on manually because Wireshark cannot control the wireless card by itself, so we need to do this first so Wireshark is all setup properly. Let's get into it.
 Running "sudo airmon-ng check kill" should be used every time you launch Wi-Fi attacks to ensure there are no other applications that will interfere with your attacks.
For this example, I'll be using "wlan1" as my interface but yours could be different.
In Kali type the following:
sudo airmon-ng check kill
sudo airmon-ng start INTERFACE
sudo airodump-ng INTERFACE
My example:
sudo airmon-ng check kill

sudo airmon-ng start wlan1

sudo airodump-ng wlan1mon
Locate your Wi-Fi network and take note of the channel it's on. Once you know the channel cancel airodump-ng with CTRL+C on your keyboard and then type:
sudo airodump-ng INTERFACE -c CHANNEL
My example:
sudo airodump-ng wlan1mon -c 1We now have our Alfa network card in monitor mode sniffing Wi-Fi network traffic on channel 1 and we're ready to launch Wireshark.
Open Terminal and typing the following:
sudo wireshark &
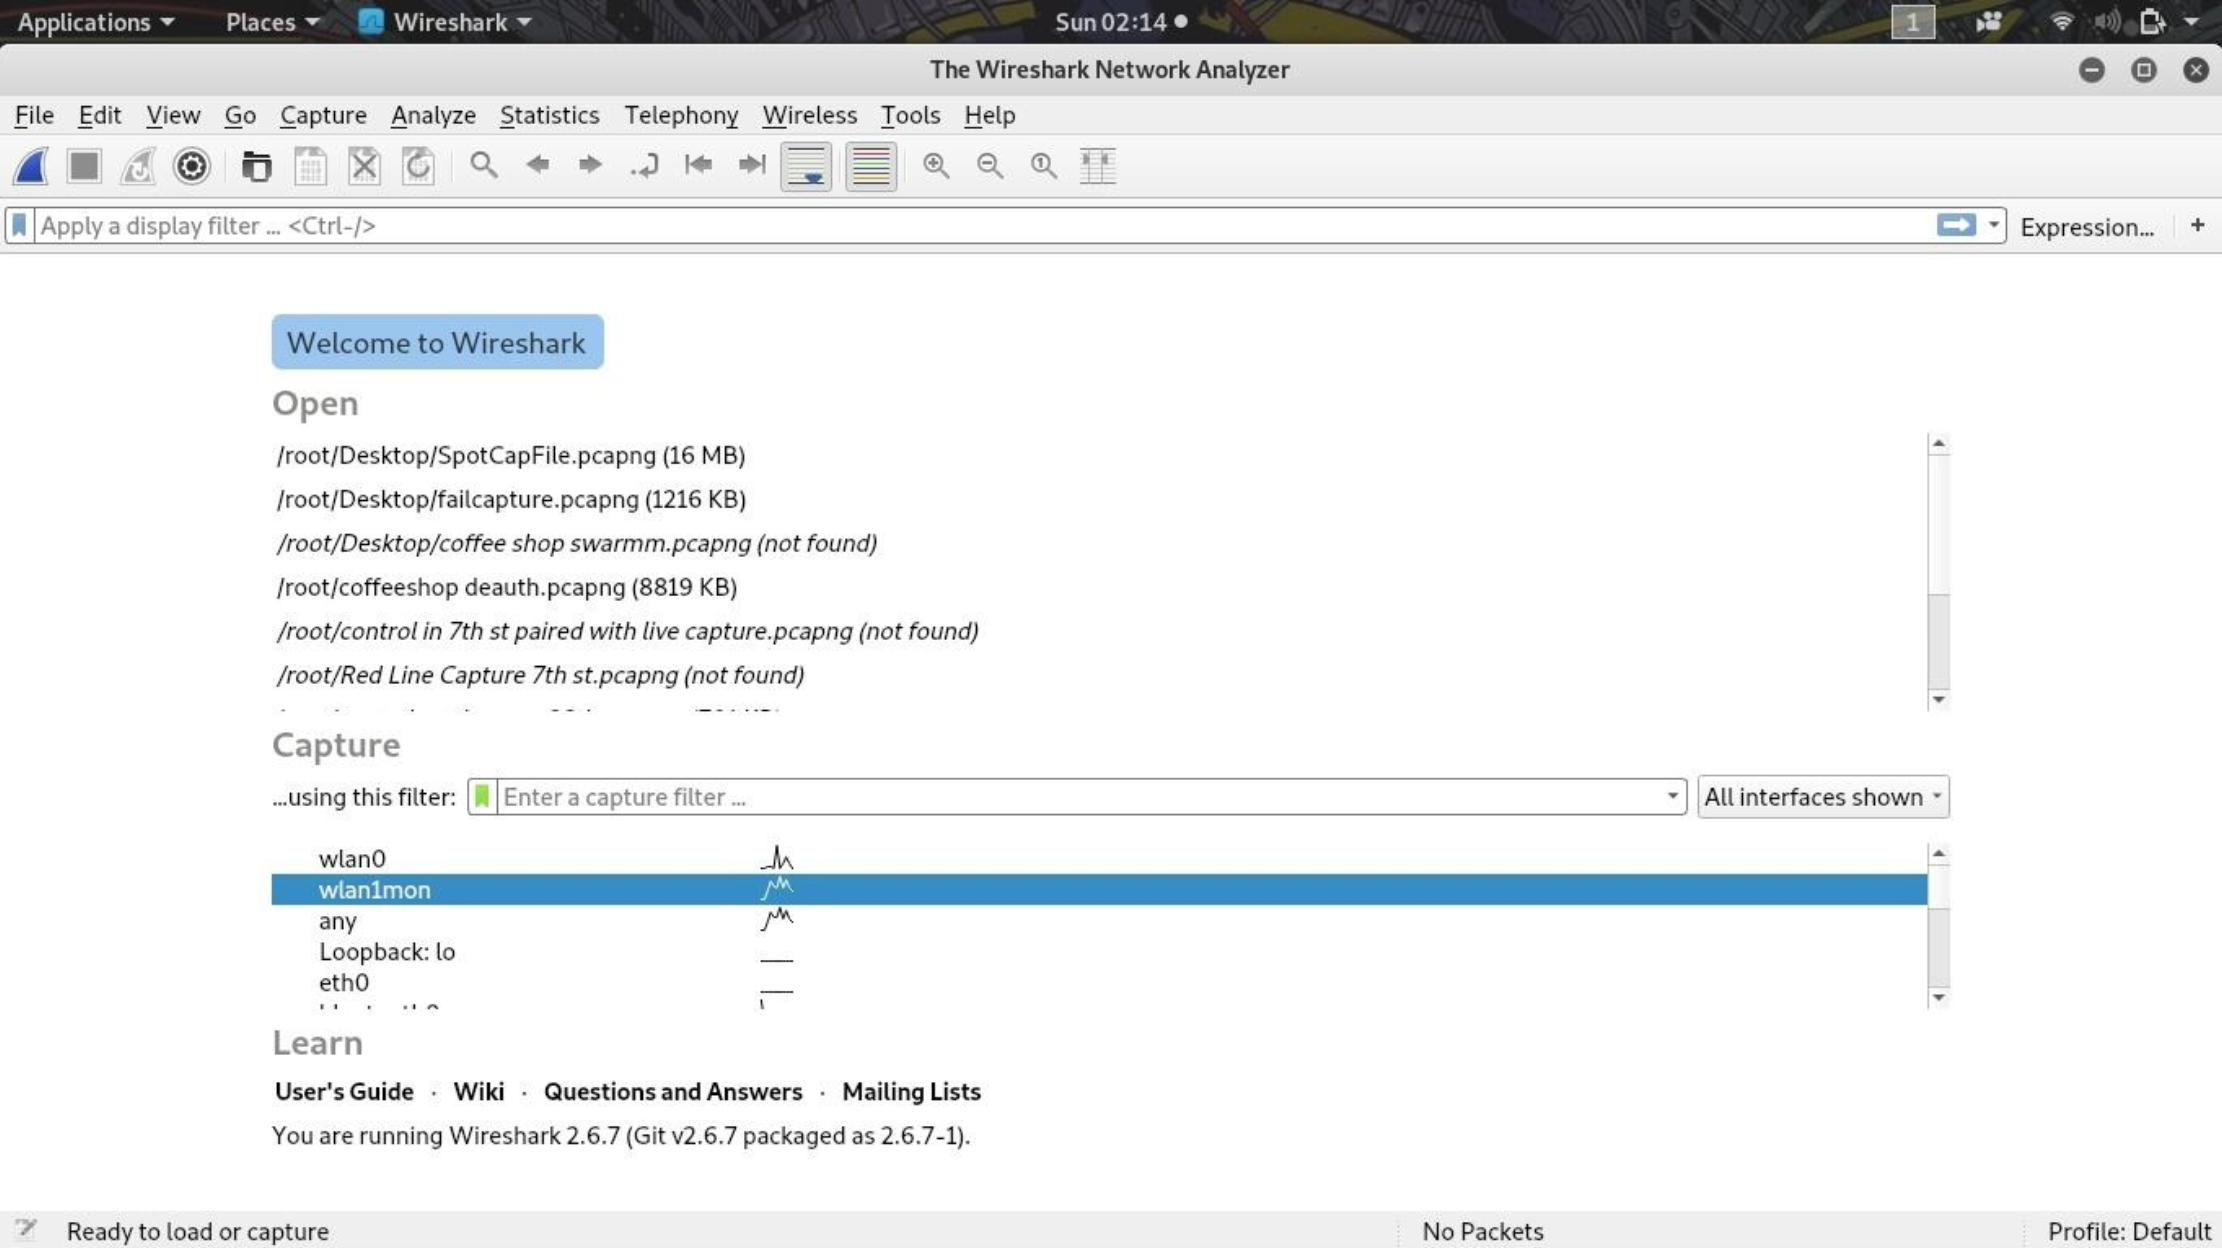
Once Wireshark is loaded select your monitor interface to capture the data packets on that interface. My example monitor interface is "wlan1mon" as seen in the screenshot above.
Once you've selected your monitor network interface, you'll see a bunch of data go by the screen in WireShark. Wait about 20 seconds and then stop the capture by clicking on the STOP button in red located on the toolbar on the left-hand side.
Locate your own Wi-Fi network by scrolling through the data captured by Wireshark. You should be able to see your SSID of your Wi-Fi network (the name of your Wi-Fi network). Take note of the items highlighted in blue in the screenshot below to help follow along. Once you have found your Wi-Fi network then left click on it to highlight it then click on the arrow next to "IEEE 802.11" and look for the "Transmitter address" or "Source address" field. That's what we'll use to build our capture filter to show only the device we're hunting for. You can see in the screenshot below I've left clicked on my Wi-Fi network and then clicked on the "IEEE 802.11" tab and have highlighted "Transmitter address".
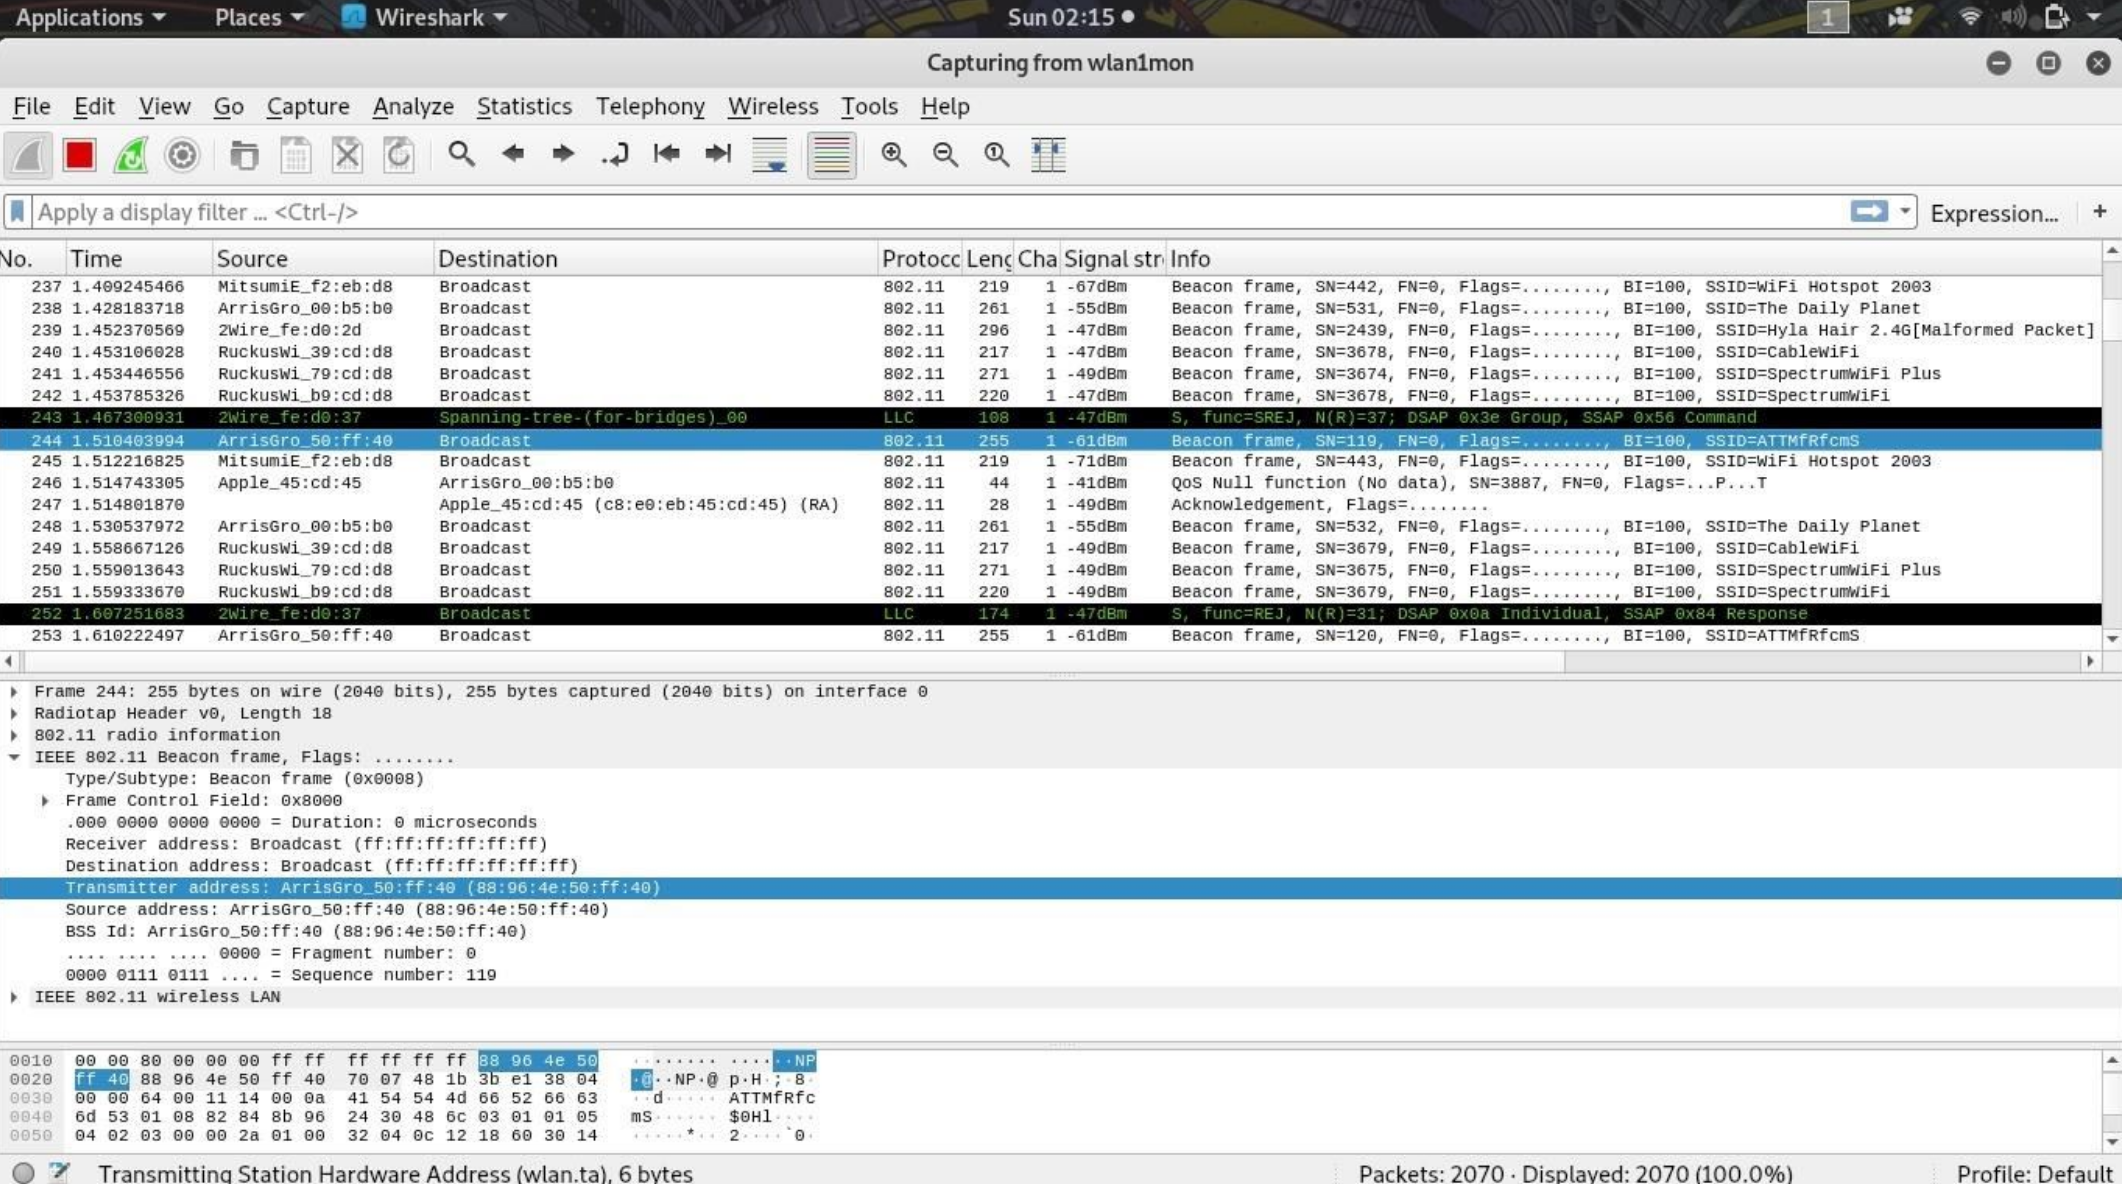
Right click on the "Transmitter address" to show a list of options then select "Apply as filter" and then "Selected" in order to create a display filter that will only show packets transmitted from that specific device. This filter will show all Wi-Fi transmissions from that target network and nothing from unrelated networks.
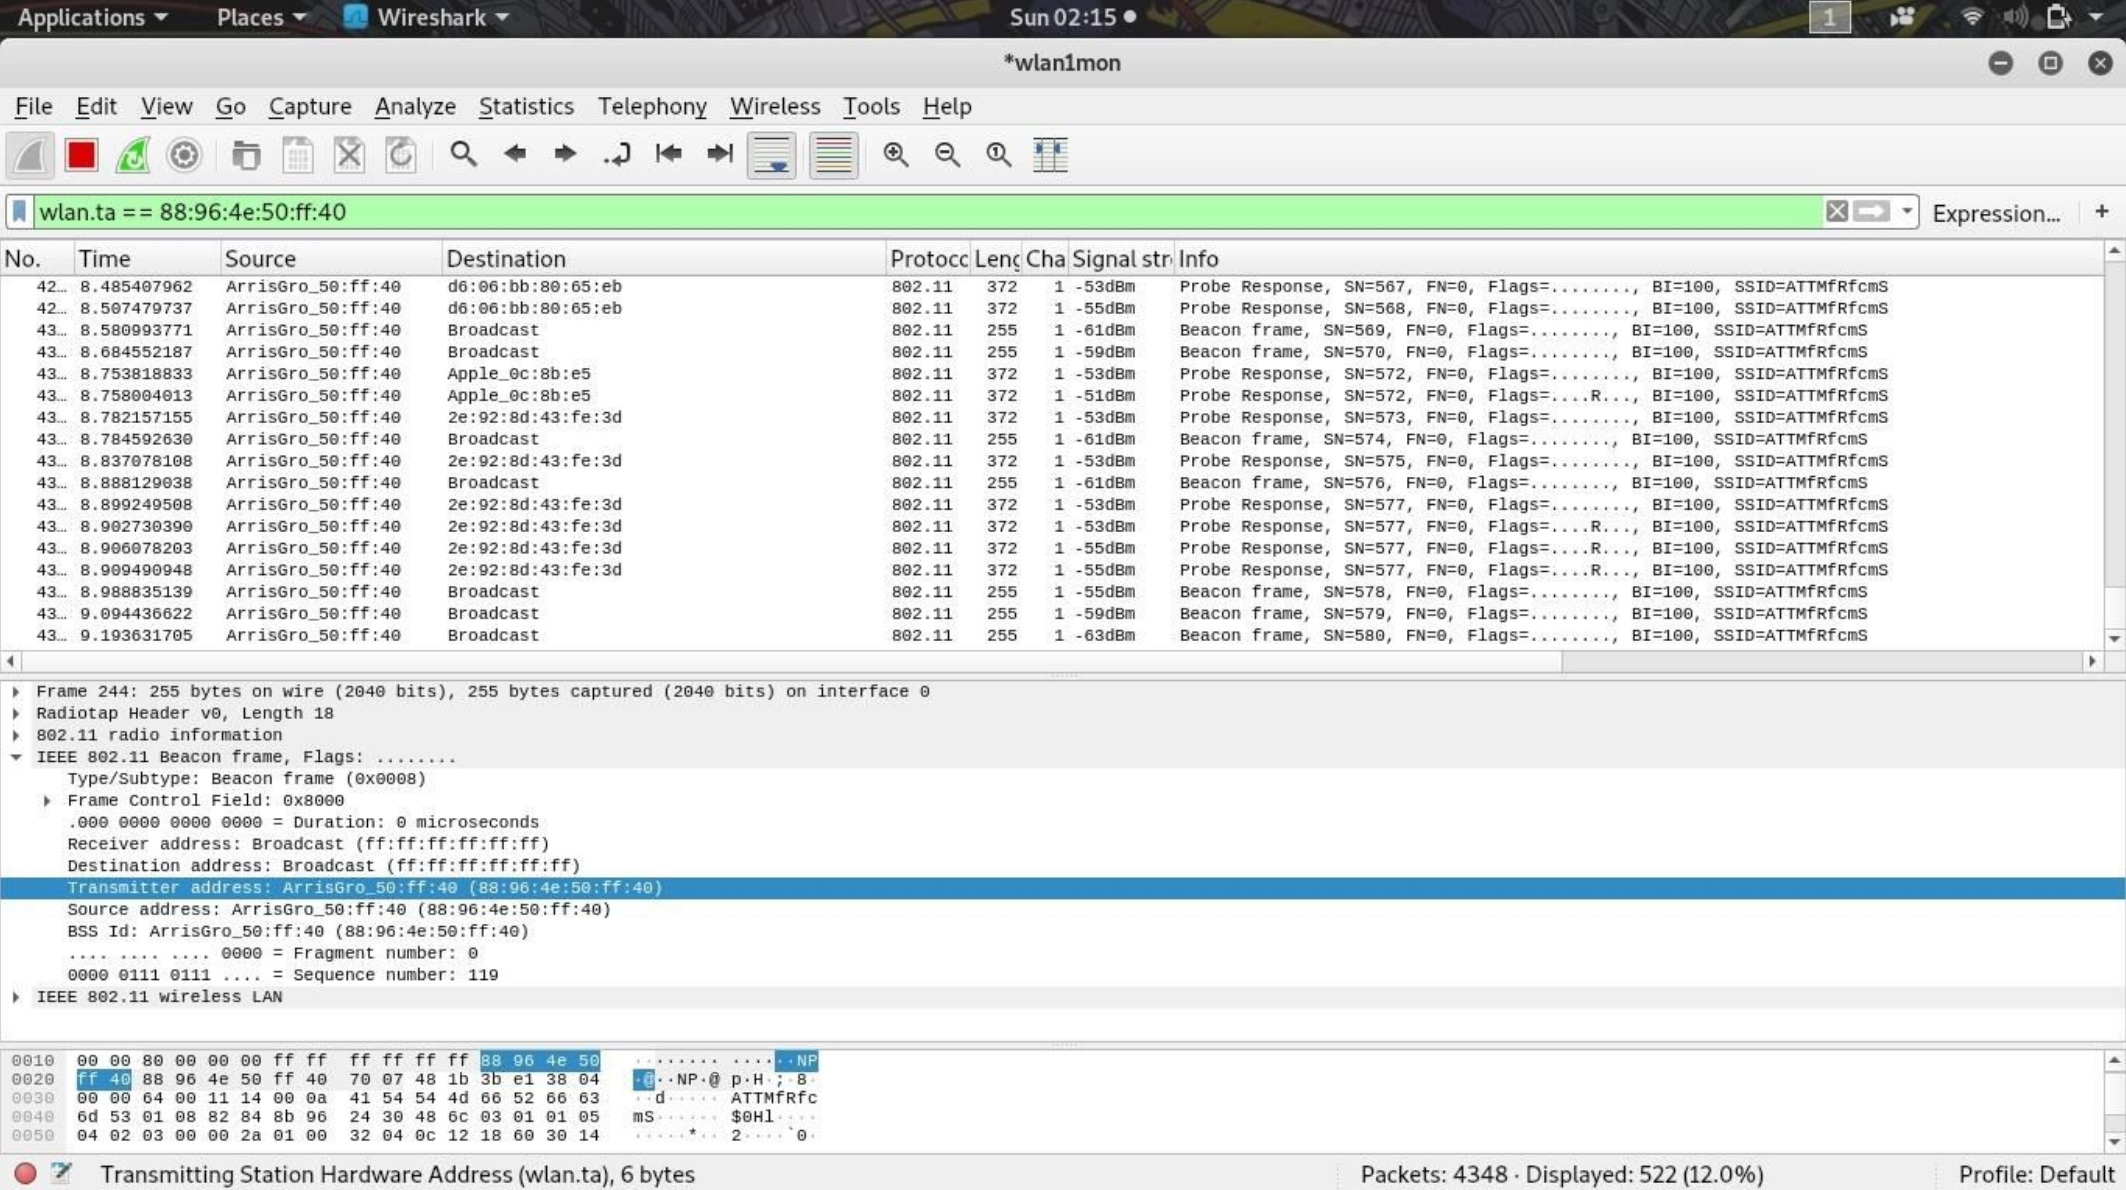
You should notice a new filter in the filter bar that looks like "wlan.ta ==". Copy that whole display filter as we'll need it for later. This is important!
To re-cap:
We've isolated the Wi-Fi network we're targeting by first determining what channel it was on and then we created a filter in WireShark to show the packets only from the device we want to attack. Once we've isolated the Wi-Fi network signal we can then switch to visualizing the signal strength which will help us locate the AP. Again, I want you to picture the motion when someone is using a metal detector on the beach looking for treasure. This is what you will be doing but instead will be waving an antenna in the air looking for the power strength of the Wi-Fi signal! Same type of concept and motion.
There's a video at the end of this chapter to assist as a visual aid for directions so don't stress if you're confused because the video will help.
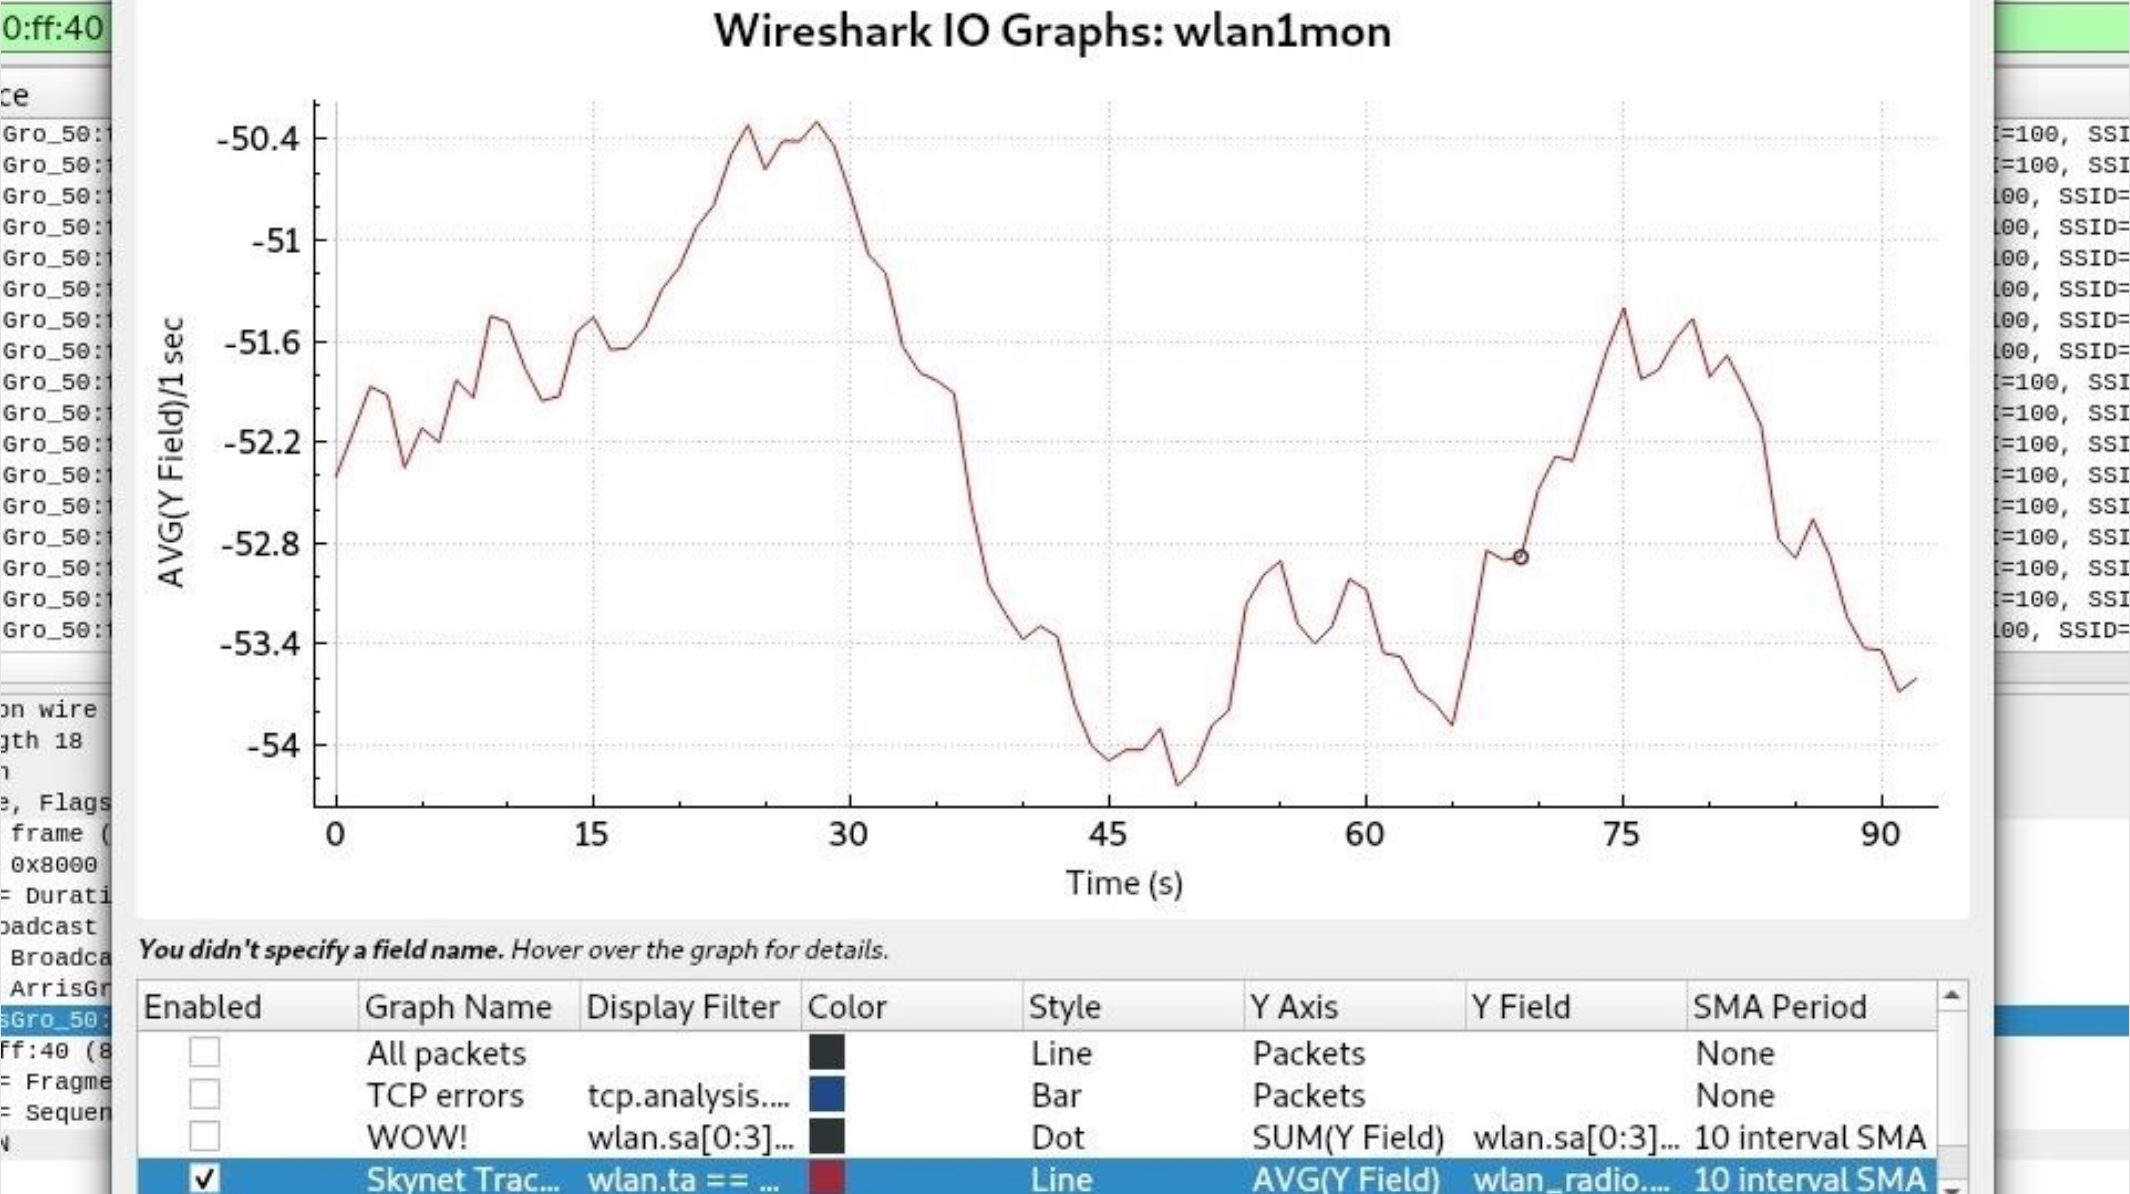
To start the visual graph for the signal strength, copy the display filter we already created with WireShark (told you it was important) and click on "Statistics" and then "I/O Graph" to launch the WireShark visual signal window. Once that's loaded click on the plus (+) icon to create a new graph and make sure you uncheck any other graphs that may be enabled.
You can name your graph whatever you like. Remember the WireShark display filter you copied before? Paste that into the Display Filter field beside your graph name. For the "Y Axis" column select "AVG(Y Field)". For the "Y Field" column paste "wlan_radio.signal_dbm" into it. Finally, set the SMA Period to "10 Interval SMA". Once you've finished that shit your settings should be similar to the screenshot below and your signal strength graph should begin.
Ok now exit out of the I/O graph and stop the Wireshark capture. Place the Alfa network card antenna away from your AP (preferably face down on the floor) and then restart the WireShark capture. Once you've restarted the WireShark capture select "Statistics" and then then "I/O Graph" to launch the WireShark visual signal window again. Now we have a fresh graph and a baseline to work with.
Leave your Alfa network card with the directional antenna faced down on the floor for (10) seconds to let it gather data for a base line reading. This graph will show you the average signal strength from your targeted Wi-Fi network over time. The signal may seem to fluctuate a lot at first because Wireshark is graphing the small changes in the signal. Signals can bounce the fuck all over the place as well so it may appear a little chaotic at first. The graph will all make sense once you pick up the directional antenna to sweep through the air visually seeing a stronger and weaker signal represented on the graph.
OK once you've left the Alfa card face down for (10) seconds pick it with the directional antenna and slowly sweep it around your place and watch the graph. I recommend to start facing away from your own AP and then slowly rotating towards it while watching for a spike on the graph to indicate which direction the Wi-Fi signal is coming from! Keep rotating it around until it's pointing towards your AP. You should be able to detect a spike in signal and begin to locate the location of the AP. Once you have a spike on the graph keep it steady and walk towards the signal and do another sweep to begin really narrowing the AP location down! See how the graph changes?! Try this from various distances to see how this works and feel comfortable with this technique.
In the screenshot below you can see a spike in the signal strength indicating the directional of the Wi-Fi network access point (AP).
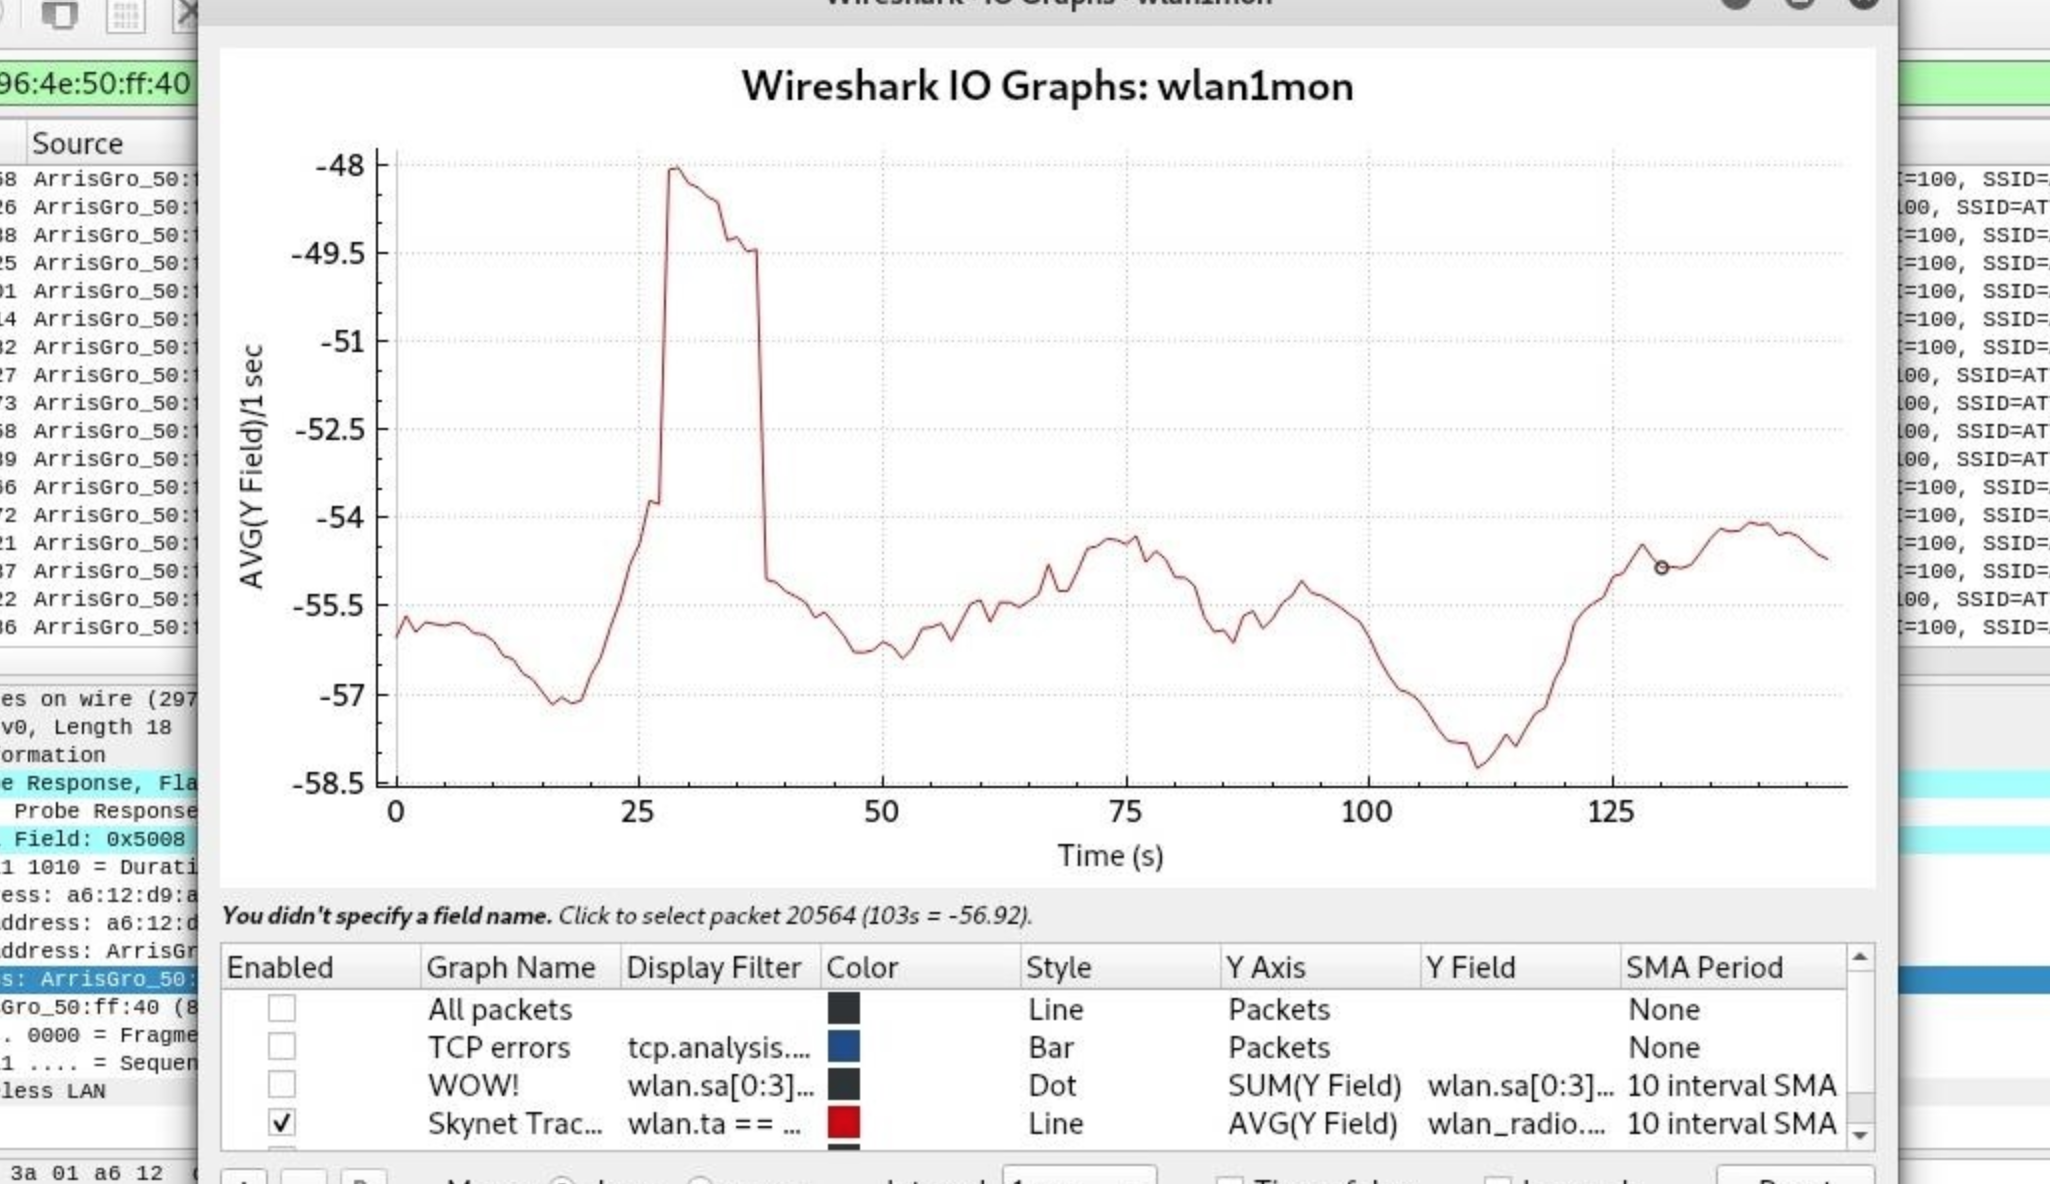
That spike is the strongest signal in that particular direction. Obviously when targeting your own Wi-Fi network you can physically walk towards the location of the AP with the antenna to test signal strength. This would be no different when targeting any other Wi-Fi network.
Below is a screenshot of my AP I was targeting.
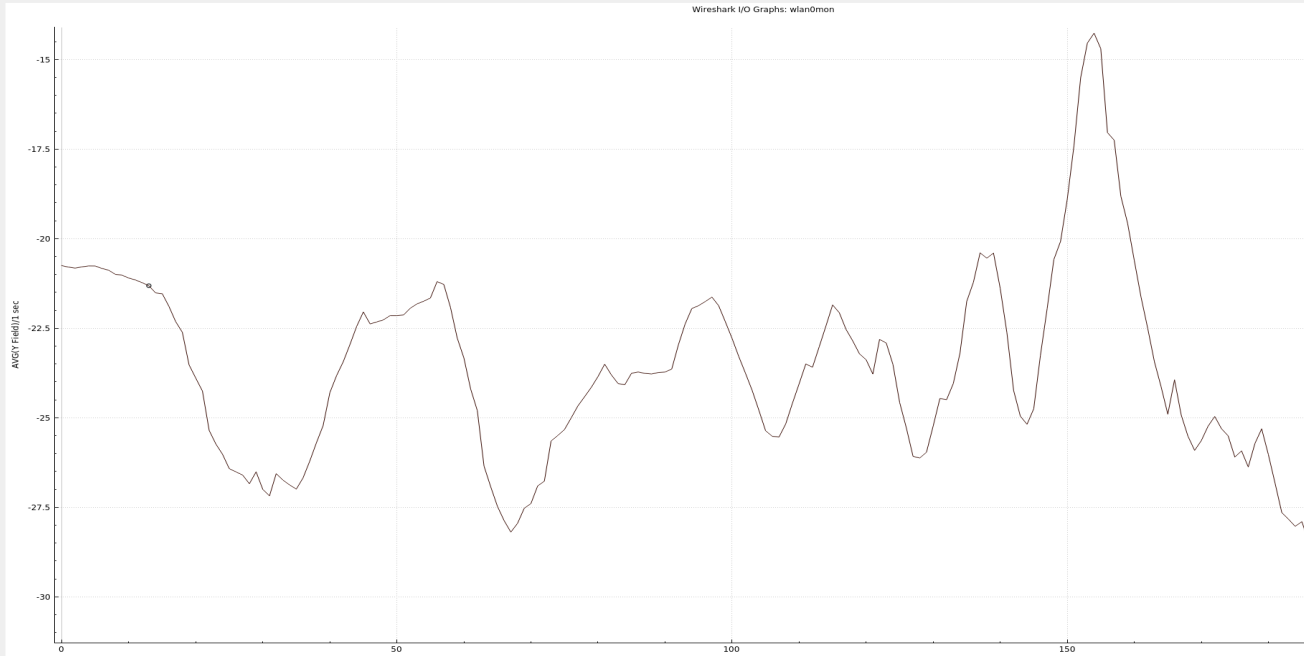
Notice the power levels on the left-hand side in the screenshot above?
-20
-22.5
-25
This is the power level that I had when I was 10FT away with my antenna pointed at my AP. If you're targeting an AP with a power level of -65 or higher, you're too far away to launch any meaningful attack against that Wi-Fi network. Keep your AP targets ideally within 0 to -55 ranges. If you have a weak signal walk towards the direction of the spike and see if you can close the gap.
You'll also notice in the screenshot above the graph is fairly chaotic with a lot of spikes here and there but you can tell there is difference in one of the spikes yes? Sometimes your baseline will be all over the place and it can be difficult to determine what is what. Take your time and swivel the antenna around until you can see that obvious spike from the others and focus in that direction. Like anything you need to practice and the more you practice the more comfortable you'll be with it all which means the more effective you are at launching your attacks.
This skill and technique are important when locating the direction of the Wi-Fi network you plan on targeting. For me, there are times when I prefer to work outdoors and sit down on a park bench so I have my long-range directional antenna hidden inside my backpack aimed towards a specific building to hack onto a Wi-Fi network and use it for the day. I use this technique every time to determine exactly where to try and aim my long-range antenna to maximize my attacks and connectivity to the network. You should incorporate this into your hacker toolbox as well :)
This technique is better explained by the video below if you have issues.
Ok one last thing. Once you've determined the direction of the Wi-Fi signal depending on how far you want to take it you may want to know exactly how far the Wi-Fi network is from you. We can find this out by using a tool called DMC. This tool is a decibel-meter converter that shows an approximate distance to a Wi-Fi device or router.
By scanning Wi-Fi traffic, your antenna will receive different signal power levels from different hosts, measured in dBm (decibel-meter). This power level can be converted into an approximate distance using some math based on the signal's frequency. The basic idea is the more strong the signal, the closer you're to the host and vice versa.
Before using the tool below you want to use airodump-ng or whatever you're using to get the MAC address of the Wi-Fi network that you're targeting. Once you have the MAC then we can plug that into the DMC tool.
In Kali type the following:
cd DMC
sudo bash dmc.sh TARGET_MAC_ADDRESS
Now you'll have a better idea of how far away the Wi-Fi network is from you that you're targeting. This knowledge can assist in finding that specific Wi-Fi network you're after based on distance (neighbours, business across the street, etc.).